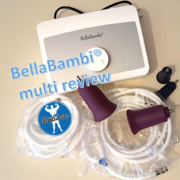
BellaBambi multi (affiliate link) ist ein Gerät, das stufenlos einstellbaren Unterdruck von -130 mbar bis -280 mbar nutzt, um mittels unterschiedlich großer Saugglocken (Ø 20 mm und Ø 34 mm) einen Massageeffekt zu erzeugen. Es ist eine moderne Form der seit Jahrtausenden bekannten und immer noch angewandten Form des Schröpfens. Auch bekannt unter dem englischen Begriff „Cupping“. Die Saugglocken aus Biosilikon „Made in Germany“ von BellaBambi bieten, aus meiner Sicht, deutliche Vorteile gegenüber herkömmlichen Schröpfgefäßen aus Glas oder Plastik. In diesem Artikel erkläre ich, wie ich diese Form des Cuppings im Rahmen meiner “Stößlein Strength” Methode nutze, welche Effekte Schröpfen erzeugt, dessen unterschiedliche Herangehenswiesen und worauf man achten sollte!
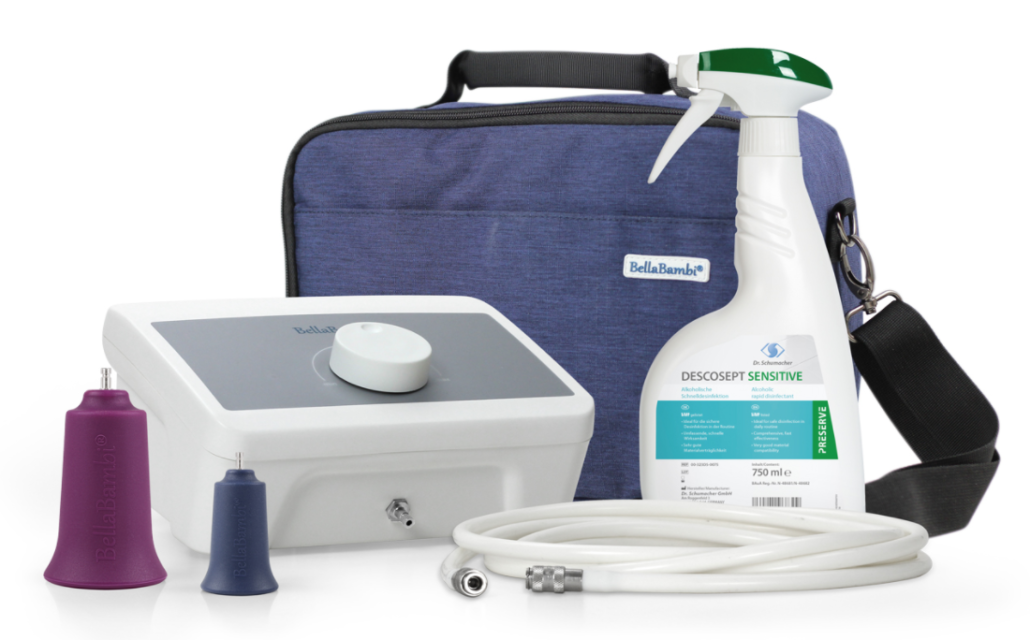
BellaBambi multi-Set, Quelle: BellaBambi.

Die unterschiedlichen Arten des Schröpfens

Wenn man sich mit dem Thema des Cuppings beschäftigt, so begegnen einem die unterschiedlichsten Begriffe, die oftmals synonym gebraucht werden. Als da wären: Schröpfen (blutig, unblutig) sowie eben der englische Ausdruck „cupping“.

Letzterer stellt im Grunde nur den englischen Begriff für die deutsche Bezeichnung des Schröpfens dar. Dennoch unterscheiden sich die unterschiedlichen Schröpf- bzw. Cupping-Arten deutlich voneinander.

Traditionelles Schröpfen wird bereits seit Jahrhunderten oder gar Jahrtausenden angewandt und hat seinen Ursprung wohl, wie sehr Vieles, in der Traditionell Chinesischen Medizin (TCM).

Der Begriff Schröpfen ist übrigens ein ausschließlich hochdeutsches Wort, das „ritzen“ bzw. „zur Ader lassen“ bedeutet. Es ist in dieser Form seit dem 12. Jahrhundert belegt. (Grimm, 1854).

Es beschreibt auch die ursprüngliche Herangehensweise dieser Behandlung. Geschröpft wurde mit Gläsern in Glocken- oder Kugelform. Diesen Gefäßen wurde dann mittels Feuer der Sauerstoff entzogen, um einen Unterdruck für den Saugeffekt zu schaffen (siehe Bild).
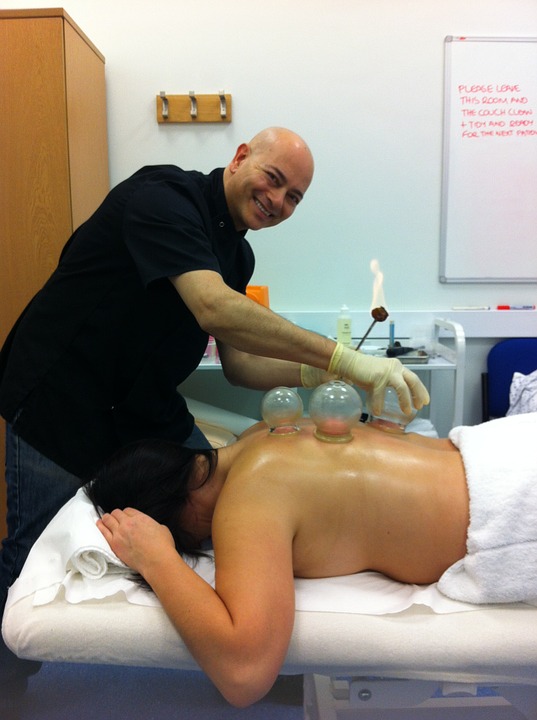
Traditionelles (Feuer)Schröpfen, Quelle: Pixabay.

Beim blutigen Schröpfen wird der Unterdruck/Saugeffekt dann noch mit einer Art des „Aderlass“ gepaart. Hierzu werden kleine Schnitte in die Oberhaut gesetzt, um Beschwerdebereiche zu therapieren.

Da nicht wirklich an einer Ader invasiv gearbeitet wird (es wird keine Ader oder Vene verletzt), stellt auch blutiges Schröpfen praktisch keinen Aderlass dar. Dennoch findet dabei eine Verletzung der Haut statt, was einen sogenannten invasiven Eingriff darstellt.

Solche Eingriffe sind, zumindest in Deutschland, ausdrücklich nur Heilpraktikern und Ärzten gestattet und bedürfen VOR Behandlung der ausdrücklichen Einwilligung und Aufklärung des Patienten!

Alle anderen Anwender, denen es an diesen rechtlichen Befugnissen mangelt, machen sich strafbar, wenn sie trotzdem invasiv arbeiten. Nicht nur beim blutigen Schröpfen!

Ebendieses ist auch per Definition kein „Aderlass“, denn ein solcher findet erst ab einer entnommenen/ausgeleiteten Menge an Blut von mindestens 500ml statt.

Eine Menge, die beim blutigen Schröpfen (solange dies sach- und fachgerecht ausgeführt wird) nicht aus- bzw. auftritt. Anders, als z.B. bei der Blutegel-Therapie (Hirudotherapie).

Beim traditionellen Schröpfen verweilen die unterschiedlich großen Schröpfgefäße in der Regel an Ort und Stelle, was bei systemischer Anwendung am Körper den Gebrauch von vielen Schröpfgefäßen erfordert (siehe Bild).
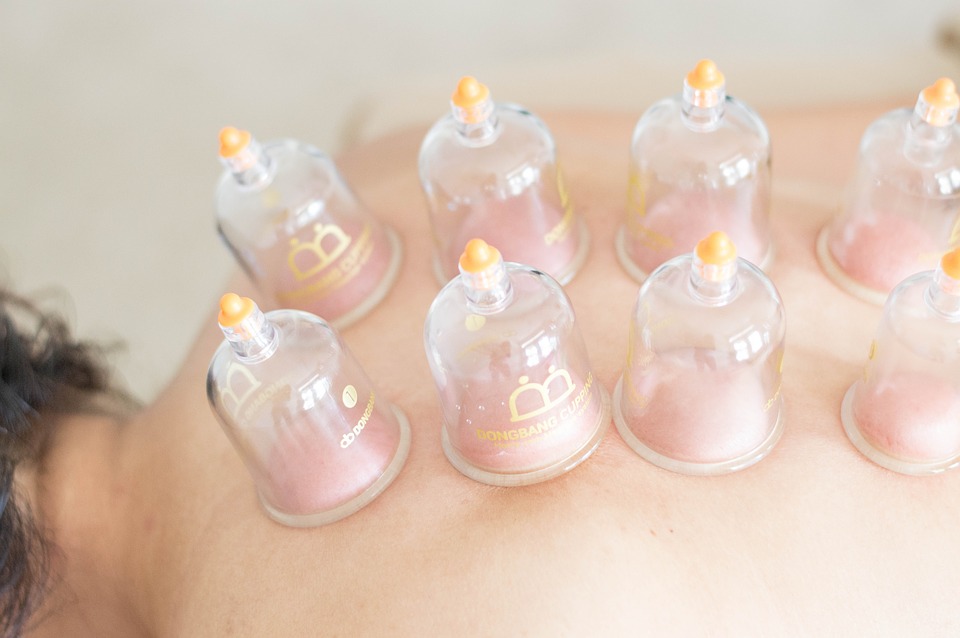
Cupping mittels Plastik-Saugglocken, Quelle: Pixabay.

Wer sich heutzutage die nicht ganz ungefährliche Arbeit mit Feuer und Glasgefäßen sparen möchte, der greift meist auf Plastik-Saugglocken zurück, die mittels Handpumpe dann einen Unterdruck erzeugen (siehe Foto).

Es existieren aber auch Gläser/Plastikgefäße, die mittels kleinem „Saugball“ direkt am Gefäß einen Unterdruck erzeugen können (siehe Foto).

In den letzten Jahren erfreut sich das Cupping, meiner Beobachtung nach, eines regelrechten Booms.

Gefühlt jeder zweite Therapeut, gleich welcher Couleur, scheint insbesondere die Plastik-Saugglocken-Methode anzuwenden.
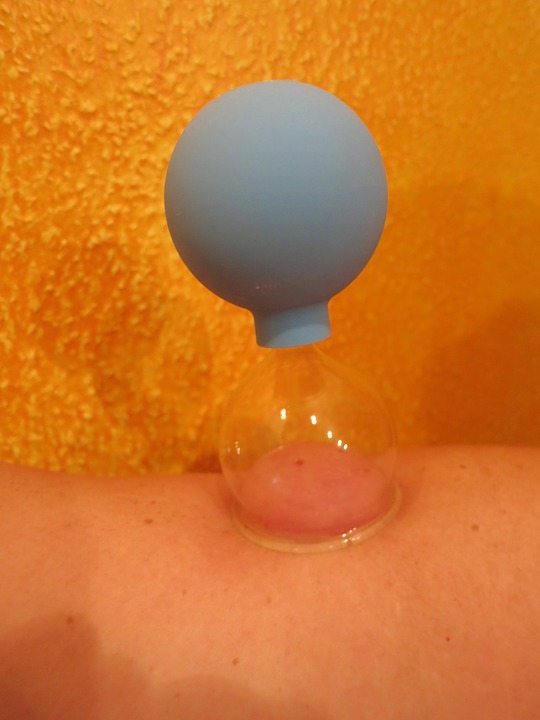
Traditionelles Schröpfen mittels “Saugball” direkt am Schröpfglas, Quelle: Pixabay.

Wieso ich diese nicht so geeignet finde und welche bessere Alternative es aus meiner Sicht gibt, darüber spreche ich im folgenden Abschnitt.

Cupping – Vorteile durch Silikongefäße

Wie eben beschrieben, stellt die Methode der Wahl, bei den allermeisten Anwendern, das Plastikglas-Schröpfen dar.

Dieses bietet, im Vergleich zu Glas, natürlich den Vorteil, dass die Gefäße weniger leicht beschädigt werden können und natürlich auch nicht so leicht auf dem Angewendeten zerbrechen können.

Allerdings ist der Rand dieser Gefäße vergleichsweise dünn (siehe Fotos). Dies sorgt dafür, dass sich nach der Anwendung oft unnötig starke Ringmuster bilden, die mehrere Tage sichtbar sein können.

Vom optischen Aspekt mal abgesehen, bleibt fraglich, ob diese starken Abdrücke eine therapeutische Notwendigkeit darstellen oder das Gewebe nicht unnötig stark belasten, ohne einen Mehrwert zu bieten.

Logischerweise muss, bei Schröpfgläsern mit schmalem Rand, der stärkste Abdruck eben durch den Rand entstehen. Denn dort liegt das Gefäß nun mal auf der Haut auf, wenn der Unterdruck entsteht.

Mit Silikongefäßen kann dieses Problem, meiner Erfahrung nach, minimiert oder oft sogar eliminiert werden.

Saugglocken aus Silikon sind deutlich weicher als ihr Plastik- oder Glas-Pendant, was zunächst schon einmal das Verletzungsrisiko auf praktisch null senkt.

Des Weiteren bietet ein deutlich dickerer und weicherer Rand weniger Potential für ringförmige Druckstellen.

Darüber hinaus können die „Silikon-Sauger“ mit Unterdruck deutlich einfacher auf der Haut hin- und her bewegt werden. Müssen also nicht an Ort und Stelle verharren, was den Einsatz mehrere Gefäße nicht zwingend notwendig macht.

Mit Silikongefäßen, wie von BellaBambi (BB), kann also bequem eine sogenannte Schröpfkopfmassage (auch unter dem Begriff der Saugwellenmassage bekannt) durchgeführt werden.

Die kleinen Gefäße aus Silikon ermöglichen es zudem, sonst mittels Glas- oder harten Plastiksaugglocken, schwer zu erreichende Stellen einfach zu behandeln.

Natürlich kann auch hier die Anwendung mehrerer Silikon-Saugglocken nötig, respektive gewünscht sein, wenn ausdrücklich eine gezielte (topische) Anwendung anvisiert wird.

Als sehr praktisch und bequem in der Anwendung hat sich für mich das BellaBambi multi (affiliate link) erwiesen.

Dieses kleine Gerät erzeugt einen stufenlos verstellbaren Unterdruck im Bereich von -130 mbar bis -280 mbar (BellaBambi, 2020).

Dadurch kann man die Intensität je nach Schmerzempfindlichkeit des Patienten oder Klienten und je nach Stärke der Gewebeverklebungen (sog. Adhäsionen) individuell wählen, was einen hervorragenden Behandlungskomfort bietet.

Was geschieht beim Schröpfen?

Wieso weshalb warum, wer nicht fragt, bleibt dumm! Doch was machen die allermeisten Menschen, wenn sie heutzutage eine Frage haben? Sie suchen im Internet.

Meistens erhalten sie dann auch ziemlich weit oben in den Suchergebnissen einen Eintrag der Wikipedia, den sie dann natürlich auch lesen.

Werfen wir also einen kurzen Blick auf das, was sich als geistiger Erguss dort finden lässt:

Schröpfen (lateinisch ventosatio) als lokales Blutsaugen ist ein traditionelles Therapieverfahren, bei dem auf einem begrenzten Hautareal ein Unterdruck aufgebracht wird. Es ist in der ganzen alten Welt von alters her bekannt.[1] Ein wissenschaftlicher Nachweis für eine medizinische Wirksamkeit des Schröpfens existiert nicht.[2] Das Schröpfen wird noch in der Alternativmedizin als ausleitendes Verfahren angewandt.[3]“ (Wikipedia, 2020).

Da man der Wikipedia, wie allen anderen Quellen im Internet übrigens auch, nicht blind vertrauen sollte, lohnt sich stets das kritische Hinterfragen aller Dinge.

Wenn diese online-Enzyklopädie also schreibt, „eine medizinische Wirksamkeit des Schröpfens existiert nicht“, dann nennt sie in ihrer Quelle den Artikel von Russel und Rovere von 2009, der sich lediglich mit den Auswirkungen des Cuppings auf Krebs beschäftigt hat!

Entsprechende Quelle habe ich unten in der Literaturangabe vermerkt.

Cupping stellt demnach also keine Hilfe gegen Krebs dar, was aber, aus meiner Sicht, keine Absage an Cupping allgemein als Behandlungsmethode für andere Beschwerden zu verstehen ist.

Wenn Cupping keine hilfreiche Methode wäre, dann hätte sie, meiner Meinung nach, auch nicht Tausende von Jahren überdauert, sondern wäre irgendwo und irgendwann in der sprichwörtlichen Versenkung verschwunden.

Cupping ist kein moderner Trend, sondern eine uralte Behandlungsmethode. Doch was geschieht eigentlich beim Cupping, respektive Schröpfen?

Durch das in den Gefäßen entstandene Vakuum wird das sich unter der Saugvorrichtung befindliche Gewebe angesogen. Dies sorgt für eine Irritation im Gewebe und eine stärkere Durchblutung, hervorgerufen durch die Sogwirkung.

Dieser Effekt erzeugt, je nach Länge und Intensität der Anwendung, kleine rote Pünktchen (sogenannte Petechien) im behandelten Hautareal und kann helfen, die Mikrozirkulation anzuregen.

Dadurch sollen, laut TCM, z.B. Muskelspasmen und Muskelschmerzen gelöst/gelindert werden können. Es soll die Muskelsteifigkeit herabgesetzt werden, die Mobilität steigern, die Durchblutung fördern und viele weitere Vorteile haben.

Auch sogenannte Adhäsionen (Verklebungen/Verhärtungen) der Muskulatur und der Faszien sollen gelöst werden können.

Ein nur 60kg schwerer Mensch besteht übrigens zu ca. 20kg aus Faszien, also etwa 1/3 des Gesamtgewichtes (Kiesling, 2020).

Im Buch von Gabriele Kiesling (“Schmerzfrei durch Cupping”) wird darüber hinaus z.B. auch die Behandlung an/um Narbengewebe beschrieben.

Narbengewebe stellt immer funktionsloses Ersatzgewebe dar. In der TCM stellen Narben nicht nur ein optisches „Manko“ dar, sondern sollen auch den Qi-Fluss behindern können.

Ein Grund mehr, ihnen bei der ordentlichen Heilung behilflich zu sein.

Achtung: Auf offenen oder frischen Narben sollte allerdings niemals Cupping/Schröpfen, gleich welcher Art, angewendet werden! Zu Kontraindikationen später mehr.

Wie reagieren Faszien auf Unterdruck?

Eine kurzes, animiertes und einfach zu begreifendes Video über Faszien und deren Reaktion auf Unterdruck durch Cupping findet man hier:

Wann setze ich das BellaBambi multi ein?

Das BellaBambi multi, respektive das Cupping setze ich meist im Rahmen meiner “Stößlein Strength” Methode ein. Eine Weiterentwicklung der sogenannten “Kinetic Chain Enhancement” Methode, die ich von meinem Strength Coach Mentor Charles R. Poliquin (R.I.P.), alias “Strength Sensei” erlernt hatte.

Zu Deutsch: „Steigerung/Erweiterung/Besserung der Kinetischen Kette“, eine nichtinvasive Behandlungstechnik, mithilfe derer tatsächlich sofort Mobilitätsbesserungen erzielt werden können.

Worum es sich dabei genau handelt, hatte ich bereits 2017 in zwei Erfahrungsberichten beschrieben:

Kinetic Chain Enhancement – Sofort mehr Mobilität

Kinetic Chain Enhancement – 7 Dinge, die ich gelernt habe

Diese Technik umfasst unterschiedliche Techniken wie z.B. Akupressur und Gua Sha.

Im Rahmen meiner Tätigkeit als Heilpraktiker, habe ich diese Technik weiterentwickelt bzw. um weitere Techniken wie z.B. Akupunktur, frequenzspezifischen Mikrostrom, Low Level Laser-Therapie, Rotlicht und eben Cupping erweitert. Daraus resultiert nun meine ganz eigene Technik, namens “Stößlein Strength”.

Somit ist der, wie Dr. Hartmut Fischer ihn nennt, „Gesundheitswerkzeugkasten“ um viele tolle „Werkzeuge“ und Methoden im Laufe der Jahre gewachsen. Denn wenn man nur einen Hammer hat, sieht sprichwörtlich gesehen alles aus wie ein Nagel…

Insbesondere Gua Sha und Cupping lassen sich, aus meiner Sicht, hervorragend miteinander kombinieren, um noch bessere Ergebnisse hinsichtlich Mobilitätssteigerung zu erreichen.

Behandlungen, aber auch das Erlernen dieser Techniken, kann jederzeit bei mir gebucht werden über meine Heilpraktiker-Praxis, unter:

info@heilpraktiker-stoesslein.de

Die perfekte Cupping Technik?

Für das „perfekte“ Cupping mit dem BellaBambi (BB) multi (affiliate link), respektive den BB Cups, ist es aus meiner Sicht hilfreich, eine bestimmte Zugtechnik anzuwenden.

Die von mir angewandte Technik kann sowohl für die kleinen (Ø 20 mm), die großen Saugglocken (Ø 34 mm) als auch für alle Intensitätsstufen genutzt werden.

Also, wie in diesem Artikel gezeigt, mittels BellaBambi multi oder ebenfalls mit den nicht maschinellen Cupping-Saugglocken.  
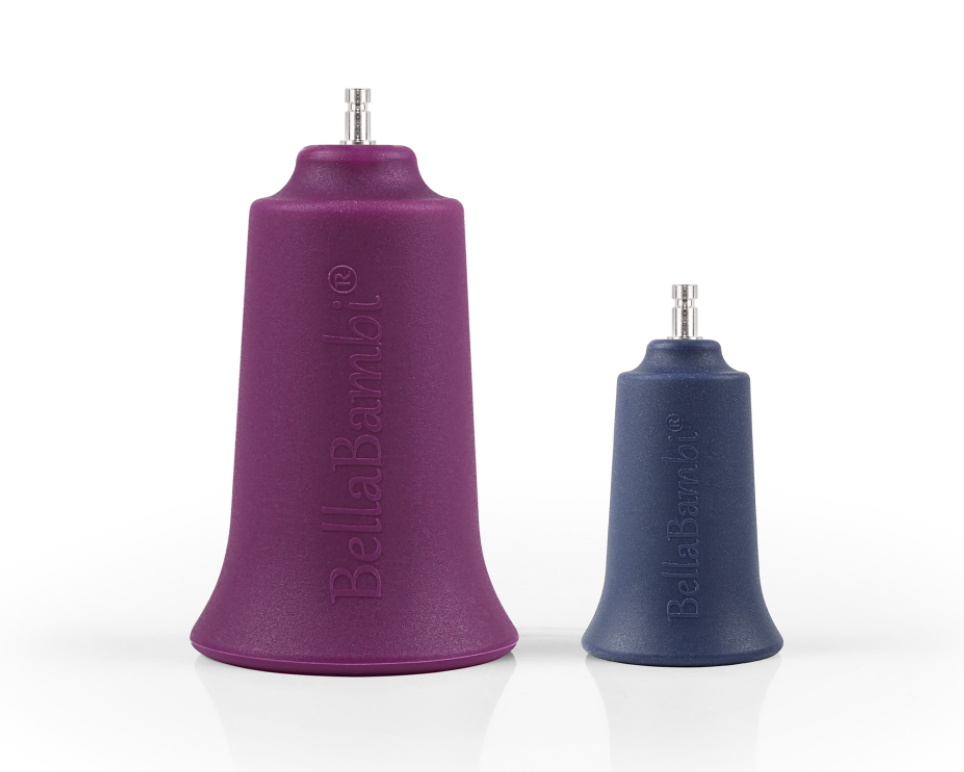
Unterdruck-Silikon-Saugglocken für das BellaBambi multi, Quelle: BellaBambi.


Wie bereits beschrieben, bieten die BB Cups die Möglichkeit, dass man sie nicht nur an Ort und Stelle belässt, sondern dass man diese auch über die Haut hin- und her bewegen kann.

Durch den Unterdruck, den das Gerät erzeugt, verformt sich der Cup. Genau an diesem Punkt, an dem sich der Cup zusammenzieht greife ich diesen, um ihn dann auf der Haut umherzubewegen (siehe Foto).

Beispielanwendung des BellaBambi multi, die Saugglocke wird entlang des Faserverlaufes des entsprechenden Muskels gezogen, Quelle: eigenes Foto.

Die Zugrichtung sollte, aus meiner Sicht,  entlang des Faserverlaufes der jeweiligen Muskeln bzw. Muskelgruppen erfolgen.

Das Cupping kann mit oder ohne Gleitmittel genutzt werden. Wie bei der Gua Sha-Behandlung nutze ich meist natives Kokosöl (affiliate link).

Die Frage nach der Intensität – Nach fest kommt ab?

Natürlich stellt sich jetzt die Frage nach der Intensität der Cupping-Behandlung.

Die Autorin des Buches „Schmerzfrei durch Cupping“ (affiliate link), Gabriele Kiesling, spricht von einem „Wohlschmerz“, den sie auf einer aufsteigenden Schmerz- Skala von 1-10 ideal mit 3 einstuft.

Letztlich ist die Schmerzwahrnehmung aber eine höchst individuelle Sache und auch davon abhängig, welcher Körperteil gerade behandelt wird und wie stark dieser mit Schmerz- (Nozizeptoren) und anderen Sensoren „besiedelt“ ist.

Diskutiert werden kann ebenfalls, wie sehr sich die Haut durch die Behandlung verändern sollte.

Aber auch dies ist, meiner Erfahrung nach, von vielen Faktoren abhängig. So z.B.:

  • Entzündungswerte im Körper (oft sehr hoch durch den Verzehr von Omega 6-lastigen Ölen, wie Raps- oder Sonnenblumenöl)
  • Ernährung (Fast Food wie Zucker, Pizza, Pasta, Pommes, Margarine, Transfette etc.)
  • Medikamenteneinnahme
  • Erkrankungen (Allergien, Hautunverträglichkeiten, Hauterkrankungen usw.)
  • Bewegungsverhalten (sehr viel oder wenig Muskeltraining)
  • Verletzungen und Narbengewebe
  • Bewegungseinschränkungen
  • Strukturelle Balance
  • Emotionaler Anatomie
  • Verhärtungen/Verklebungen (Adhäsionen)

Auftreten kann also vieles. Subjektiv starker Schmerz ohne Hautrötungen (Petechien), aber auch subjektiv niedriger oder gar kein Schmerz mit sehr starken Hautverfärbungen von dunkelrot bis hin zu bläulichen Blutergüssen (Hämatomen).

In der Regel klingen diese Reaktionen auf das Schröpfen dann aber binnen 48-72 Stunden wieder ab.

Die Verfärbung kann also nicht immer als Indikator herangezogen werden, um zu beurteilen, was genau im Gewebe vor sich geht.

Aus meiner Erfahrung kann ich aber sagen, dass insbesondere Kraftsportler, die viel Zeit „am Eisen“ verbringen, zu vielen Bewegungseinschränkungen neigen, nicht zuletzt aufgrund von Adhäsionen.

Gleiches gilt aber für alle, die oft stark körperlich, aber auch monoton arbeiten. Also immer ähnliche/gleiche Bewegungsmuster haben.

Dadurch kommt es zu Stoffwechselabbauprodukten, die mitunter dazu beitragen, Adhäsionen zu erzeugen. Diese werden dann durch die farbliche Veränderung der Haut deutlich erkennbar.

Zudem bin ich der Meinung, dass sich gerade auch im Sehnen-Bereich (Muskelansatz-Bereich) für den erfahrenen Therapeuten am Klang erkennen lässt, ob und wie stark das Gewebe „verklebt“ ist.

Weichteilgewebe, das einen „knorpelig-kratzenden“ Ton bei der Behandlung von sich gibt, weist, meiner Expertise nach, eine tendenziell starke „Verfilzung“ bzw. „Verklebung“ auf und bedarf einer Behandlung, um dem beteiligten Gelenk wieder seinen optimalen Bewegungsradius zurückzugeben.

Cupping Kontraindikationen

Natürlich ist Cupping, wie jede andere Behandlungsmethode auch, kein Allheilmittel. Es gilt auch hier einige Kontraindikationen zu beachten.

Ich würde vom Cupping/Schröpfen abraten bei/an:

  • Frischen und/oder offenen Wunden
  • Unqualifiziertem Personal, das blutiges Schröpfen anwenden will
  • Brustwarzen
  • Augen
  • Geschlechtsteilen
  • After
  • Hautveränderungen wie Warzen, starken Leberflecken usw.
  • Starken Hauterkrankungen direkt am betroffenen Gewebe (z.B. Neurodermitis)
  • Etc.

Alternative/Ergänzung

Eine tolle Ergänzung zum BellaBambi multi sind übrigens die manuellen Cups! Diese gibt es ebenfalls in unterschiedlichen Stärken und Größen. Von “Sensitive” (Gelb), über “Regular” (Orange), bis hin zu “Intense” (Rot).
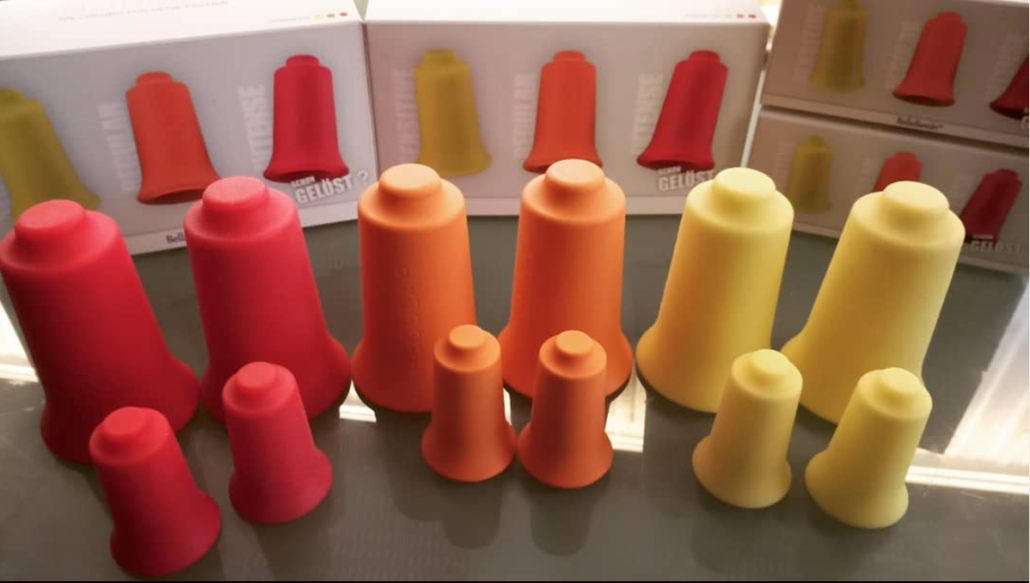
BellaBambi Cups (ohne Unterdruck), in unterschiedlichen Intensitäten, Quelle: Eigenes Foto.

Fazit/Conclusio BellaBambi multi

Das BellaBambi multi (affiliate link) ist für alle, die professionell Schröpfen wollen, meiner Expertise nach, eine echte Investition. Natürlich liegt es, im Vergleich zu herkömmlichen Cupping-Sets etwas höher im Preis, dafür bietet es aber ein deutlich größeres Anwendungsspektrum!
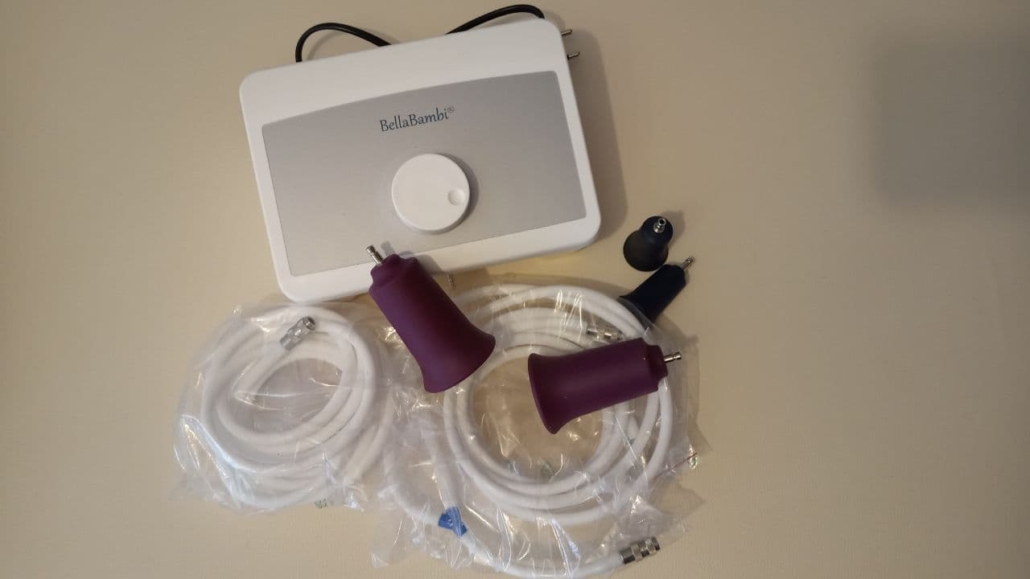
BellaBambi multi Unterdruckpumpe, samt Unterdruckschläuchen und Silikon-Saugglocken, Quelle: Eigenes Foto.

Durch die weichen Saugglocken aus Biosilikon in unterschiedlichen Größen kann man perfekt auch die Körperstellen bearbeiten, an denen das Schröpfen sonst vergleichsweise schwer fällt, wie etwa den Fingern, Zehen oder im Gesicht.

Die Cups von BellaBambi passen sich durch ihre Flexibilität perfekt der Haut an, sind einfach und schnell zu reinigen, was insbesondere den professionellen Einsatz in einer Praxis sehr komfortabel und schnell gestaltet.

Aber auch für Heimanwender ist diese Methode des Schröpfens gut geeignet. Wer nicht gleich mit einem BB multi beginnen möchte, dem empfehle ich mit einem der BellaBambi Starter-Sets loszulegen!

Cupping bzw. Schröpfen ist eine Jahrhunderte, wenn nicht gar Jahrtausende alte Behandlungsmethode, die selbst bei uns in Deutschland bereits seit mindestens dem 12. Jahrhundert bekannt ist.

In Therapie und Praxis haben die Dinge Bestand, die einfach, effektiv, jedem leicht zugänglich und kostengünstig sind. Schröpfen/Cupping ist so ein „Werkzeug“, mit dem die Gesundheit wieder ein Stück in die eigenen Hände gelegt werden kann.

Doch gute Dinge aus der Vergangenheit können durch modernes Wissen auch optimiert werden.

So geschehen durch die BellaBambi Silikon-Cups, Made in Germany! Für mich die deutlich bessere Alternative zu herkömmlichen Schröpfgefäßen aus Plastik oder Glas!

Solange einige Grundregeln und Kontraindikationen beachtet werden, stellt das Cupping wohl keine große Gefahr dar und man kann im Prinzip wenig falsch machen (von blutigem Schröpfen abgesehen!).

Wenn sich der geneigte Leser für eine Behandlung durch Cupping/Schröpfen interessiert, dann weise ich an dieser Stelle gerne auf die Kooperation mit meiner Naturheilpraxis hin.

Wenn dir dieser Artikel gefallen hat, dann teile ihn mit deinen Freunden, abonniere den Blog/Newsletter und hinterlasse einen Kommentar.

© HP Bernd Stößlein MBA in Sportmanagement


In diesem und anderen Artikeln findest du den ein oder anderen „Affiliate Link“, zu amazon. Wenn du über diesen Link etwas erwirbst, dann unterstützt du damit meine Blogartikel und schaffst Ressourcen für weitere qualitativ hochwertige Recherchen und Artikel wie diesen. Es entstehen für dich dadurch keine Mehrkosten! Alle meine grundsätzlichen Empfehlungen findest du unter: https://www.amazon.de/shop/bernd_stoesslein


Literatur

Schröpfen, Quelle: Deutsches Wörterbuch von Jacob und Wilhelm Grimm. 16 Bde. in 32 Teilbänden. Leipzig 1854-1961. Quellenverzeichnis Leipzig 1971. Online-Version vom 17.12.2020, http://woerterbuchnetz.de/cgi-bin/WBNetz/wbgui_py?sigle=DWB&mode=Vernetzung&lemid=GS17861#XGS17861, Zugriff v. 17.12.20.

Schröpfen, Quelle: https://de.wikipedia.org/wiki/Schr%C3%B6pfen, Zugriff v. 17.12.20.

Schmerzfrei durch Cupping, S. 19.

BellaBambi multi, Quelle: https://bellabambi.de/produkt/bellabambi-multi/, Zugriff v. 21.12.20.

Russell J.; Rovere A.: Cupping. In: American Cancer Society (Hrsg.): Complete Guide to Complementary and Alternative Cancer Therapies. 2. Auflage. 2009, ISBN 978-0-944235-71-3, S. 189–191.
Halswirbelsäulen (HWS)-Dekompression ist eine Methode, bei der man den Bereich zwischen den zervikalen Wirbelkörpern manuell vergrößern kann. Ein mögliches Problem für mangelnde Armkraft habe ich schon oft bei meinen Patienten und Klienten beobachtet.

Nicht selten tritt das Symptom „bizzelnder“ Hände auf. Kein Wunder, denn die Nerven im HWS-Bereich innervieren die oberen Extremitäten. In diesem Artikel gehe ich auf oftmals auftretende HWS-Symptomatiken ein und wie der geneigte Leser diese lindern oder gar beheben kann. Ich gebe einen Überblick über das Thema HWS, Nerven und den Zusammenhang der Kraft in unseren Armen.

Wie man seine Nackenmuskulatur kräftigen kann, darüber habe ich bereits in einem separaten Artikel berichtet.

Ebenfalls ausführlich dargestellt habe ich das Thema der Griffkraft, wie man diese messen kann und warum sie als Indikator für Übertraining herangezogen werden kann.

Des Weiteren gibt es einen sehr detaillierten Artikel meinerseits über die Inversion, zur Dekompressierung der übrigen Wirbelkörper.

Der vorliegende Artikel kann als Querverweis bzw. Ergänzung zu den erwähnten Blogartikeln angesehen werden und ergänzt den bereits von mir verfassten Lesestoff zu einem (noch) größeren Ganzen.

Halswirbelsäulen Dekompression

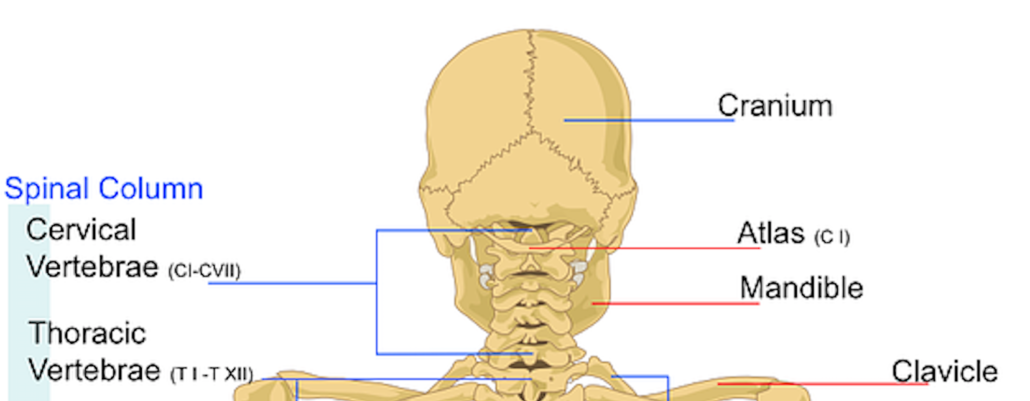
Halswirbelsäulen Dekompression: Wie in meinem Artikeln üblich, beginnen wir mit einem Überblick der Anatomie. Betrachten wir also zunächst die Halswirbelsäule ( im Bild Englisch mit „Spinal Column“ bezeichnet).

Quelle: Pixabay.

Wenn man in der Medizin von der Halswirbelsäule (HWS) spricht, dann sind damit die zervikalen Wirbelkörper gemeint, von C1 bis C7. Der erste Halswirbel wird als Atlas bezeichnet, der zweite als Axis.

Der Begriff zervical/cervical stammt von Lateinisch cervix = Hals (Becher et al., 1995).

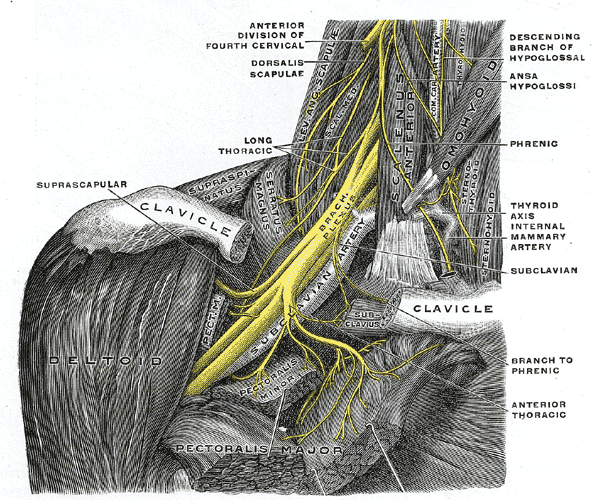
Plexus brachialis – Das Armgeflecht

Wenn wir uns mit dem Thema der Nacken-Dekompression beschäftigen, dann kommen wir um den Plexus brachialis nicht herum.

Der Begriff Plexus brachialis setzt sich zusammen aus Lateinisch plectere = flechten und Lat. Brachium = Arm (Becher et al., 1995). Wörtlich übersetzt erhält man dadurch also: „Armgeflecht“.

Der Plexus brachialis, respektive das Armgeflecht, ist wichtig, weil es die gesamten oberen Extremitäten innerviert.

Die Wikipedia bietet eine schöne Zusammenfassung, welche ich der Einfachhalthalber an einigen Stellen gekürzt habe. Es steht geschrieben:

Der Plexus brachialis (…) ist ein Geflecht aus (…) Ästen der Spinalnerven der letzten vier Hals- und des ersten Brustsegments (C5–Th1). Beim Menschen sind auch kleinere Bündel des vierten Halswirbelsegmentes (C4) und des zweiten Brustwirbelsegmentes (Th2) an der Bildung des Plexus brachialis beteiligt. (…) Diese Spinalnerven vereinigen sich (…) zu drei Hauptstämmen (…) und anschließend zu mehreren, untereinander verbundenen Strängen (…). Diese Stränge treten(…) in die Achselgegend. Aus ihnen bilden sich wiederum Nerven, die durch den Faseraustausch im Plexus nun immer Anteile von mehreren (2–3) Spinalnerven besitzen. Diese Nerven innervieren die gesamte obere (…) Extremität sowie Teile der Brustwand.“ (Wikipedia, 2020).

Quelle: Henry Vandyke Carter und ein weiterer Urheber – Henry Grey (1918) Anatomy of the Human Body, Bartleby.com: Gray’s Anatomy, Tafel 808.

Wenn ein Athlet, ambitionierter Freizeitsportler oder auch jeder andere Probleme dabei  hat, die Muskeln in seinen Armen „anzusteuern“, dann kann dies auch daran liegen, dass es Komplikationen in dem Bereich der HWS gibt, die „nervlich“ für den  oder die entsprechend schwachen Muskeln verantwortlich sind.

Mehr dazu gleich, weiter unten, im Abschnitt der Dermatome.

Wie kann man die HWS behandeln?

Möglichkeiten zur Behandlung sind mannigfaltig und reichen von Selbstanwendung über professionelle manuelle Techniken (wie z.B. Chiropraktik, Gua Sha etc.) bis hin zur Operation.

Da diese, aus meiner Sicht, immer nur das allerletzte Mittel zur Wahl darstellt, werde ich mich in diesem Artikel auf nicht-operative Möglichkeiten der Halswirbelsäulen Dekompression beschränken.

An dieser Stelle sei betont, dass man im Bereich der HWS stets größte Sorgfalt walten lassen sollte!


Vor jeder Eigentherapie empfehle ich also stets einen Fachmann des Vertrauens aufzusuchen. Sei es ein Heilpraktiker, Physiotherapeut, Chiropraktiker, Arzt etc. Alleine aus dem Grund, da man viele manuelle Techniken nicht an sich selbst anwenden kann!

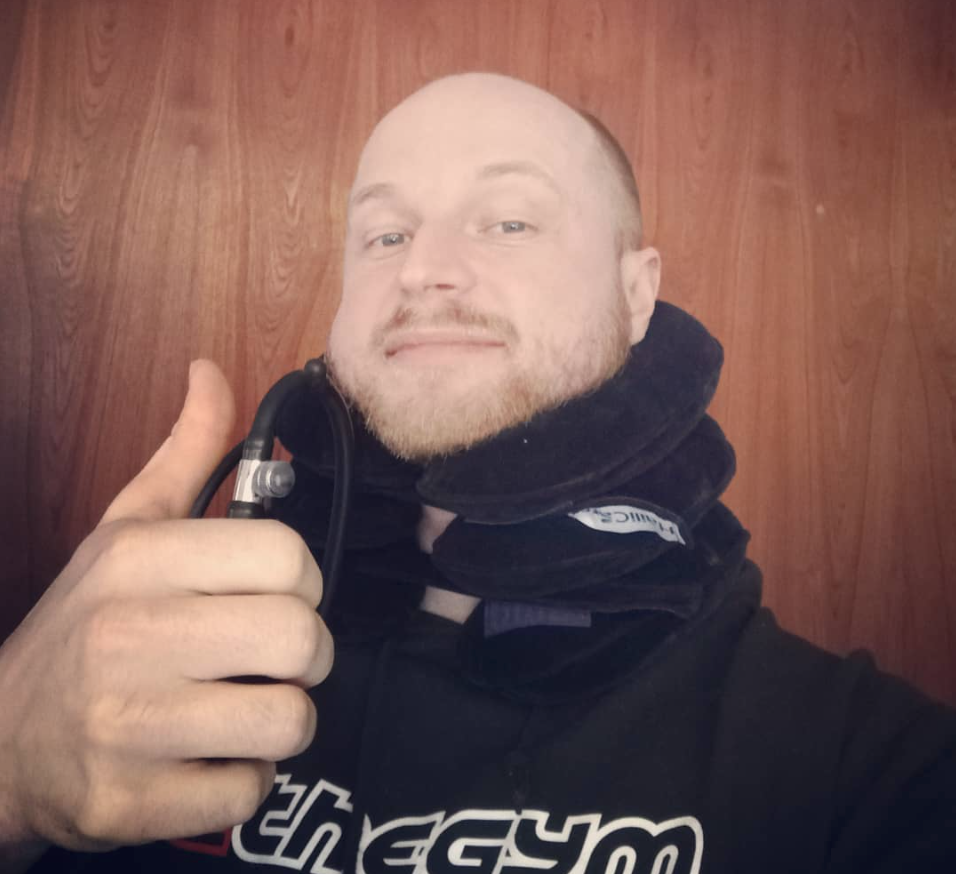
Was sich für mich bewährt hat und oft schon für wenige Euro (unter 30€) zu haben ist, ist ein aufblasbares Kissen, das um den Hals gelegt und aufgeblasen werden kann. Das System funktioniert wie bei einer Blutdruckmanschette.

Hierzu legt man sich das „Nackenkissen“ einfach um den Hals, schließt es an der Vorderseite mit Klettverschlüssen und kann es zur Traktion/Dekompression der HWS dann praktisch stufenlos aufpumpen, mit einer eingebauten Handpumpe (siehe Bilder).

Äquivalent zu einer manuell bedienbaren Blutdruckmanschette, kann man die Luft dann ganz einfach durch das Aufdrehen eines Ventil-Rädchens entweichen lassen.

Quelle: Eigenes Foto.

Wer also seinen Hals recken will, der sollte beim Anlegen etwas experimentieren, bis er seine optimale Haltung gefunden hat. Ich empfehle eine möglichst neutrale Haltung (Kopf gerade, mit Blick nach vorne).

Beim Aufpumpen würde ich langsam, behutsam und Schritt für Schritt vorgehen. Sich erst einmal an die Streckung/Traktion/Dekompression der HWS heranarbeiten.

Von Anwendung zu Anwendung kann die Höhe des Kissen sowie die Anwendungszeit dann intensiviert werden.

Angesichts der Tatsache, dass die meisten Menschen heutzutage unter einer zu schwachen Nackenmuskulatur (insbesondere der Streckmuskulatur) leiden, nicht ganz einfach.

Von Geburt an werden wir in Flexion (Beugung) geboren und unser modernes Leben fordert, haltungstechnisch, auch seinen Tribut.

Permanente Innenrotation der Schultern (Computerarbeit, aufs Smartphone starren, Autofahren etc.) führt dazu, dass sich der Kopf oft nach unten/vorne Richtung Sternum beugen muss.

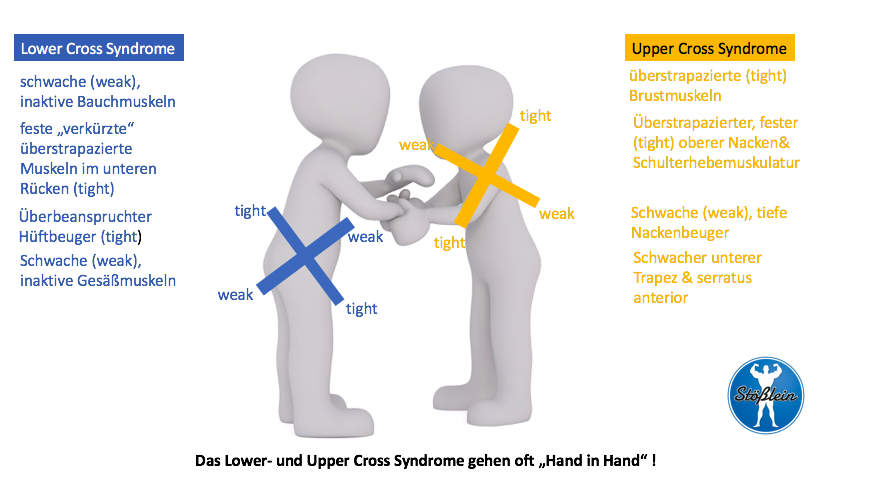
Mittelfristig führt dies nicht selten zum sogenannten „Upper Cross Syndrome“, über das ich ebenfalls schon detailliert in meinem Artikel  über meinen Stehschreibtisch berichtet habe, sodass es an dieser Stelle nur der Vollständigkeit halber erwähnt sei.

Im Rahmen der vorliegenden Thematik empfehle ich ebenfalls meine Artikel:

Rehabilitation of the Spine

Brain Coach Performance

Aufgrund des permanenten “nach unten Sehens” kann es A: zu einer einseitigen Abnutzung der Wirbelkörper (Keilbildung) samt  Bandscheiben und B: zu einer Kompression/Quetschung der im Halsbereich verlaufenden Nerven kommen.

Gelegentlich kann es dann auch zu einer Unterversorgung des Gehirns mit Sauerstoff kommen, weil der arterielle Zufluss eingeschränkt wird.

In Folge dessen kann es zu einem Phänomen namens „nitrosativem Stress“ kommen, der in Verbindung mit sogenannter „sekundärer Mitochondriopathie“ steht.

Diese Erkrankung, die sich insbesondere auf die Mitochondrien (Kraftwerke unserer Zellen) auswirkt, wird sehr oft auch durch eine Fehlstellung der ersten beiden Halswirbel (mit)verursacht. Halswirbelsäulen Dekompression ist also ein wichtiges, aber all zu oft noch übersehenes Thema.

Dermatome und deine Arme

Wie weiter oben bereits beschrieben, liegt es am Plexus brachialis, ob und wie stark die Muskeln unserer Arme innerviert bzw. „angesteuert“ werden können. Man kann sich dieses komplexe Phänomen ganz einfach vorstellen, wie Überland-Stromleitungen.

Die Stromleitungen sind an dieser Stelle unsere Nerven(bahnen). Diese entspringen einer größeren Verteilerstation/Traffohäuschen (= Plexus brachialis). Dieses wiederum hat seinen Ursprung aus dem „Hauptkabel/Überland-Starkstromleitung“ (= Rückenmark).

Der Strom läuft also von einem Hauptkabel (=Rückenmark) in eine Verteilerstation/Traffohäuschen (= Plexus brachialis) und von dort weiter an die einzelnen Haushalte (= Muskeln) in den Armen.

Kommt nicht ausreichend Strom in den Haushalten (=Muskeln) an, dann kann dies an einer (oder mehreren) beschädigten Leitungen (= Nerven) liegen.

Damit der Strom ohne Behinderung fließen kann, ist es also vonnöten, dafür zu sorgen, dass nirgends Blockaden entstehen und/oder diese, soweit vorhanden, zu beseitigen.

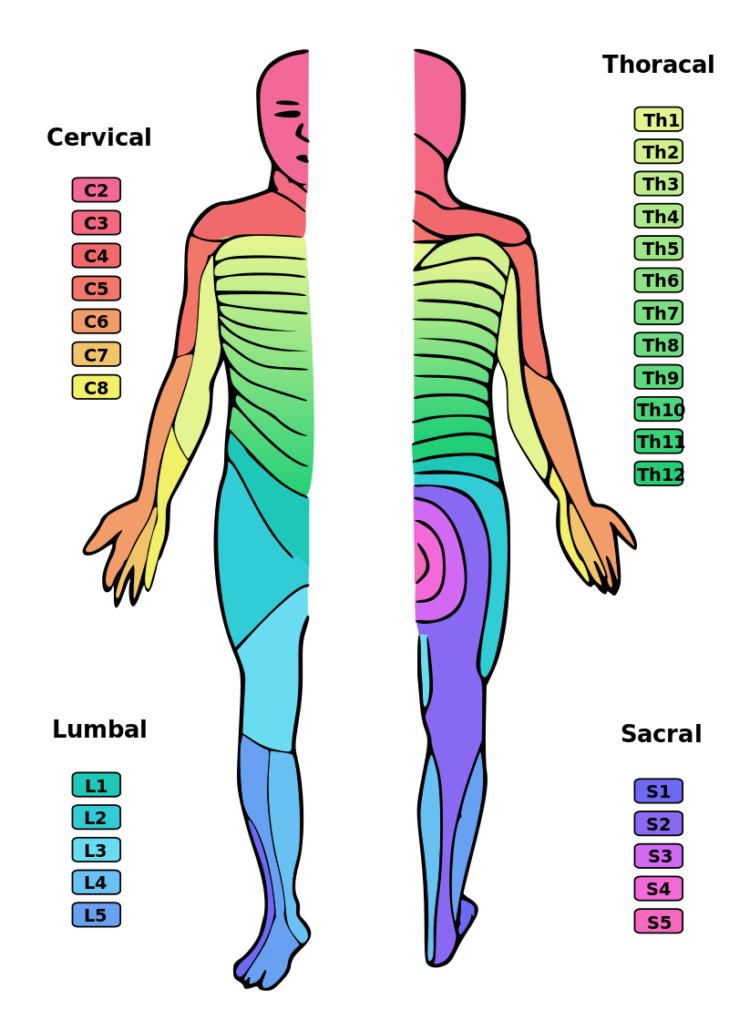
Welcher Bereich der Wirbelsäule, respektive der dort aus dem Rückenmark entspringenden Nerven welche Körperbereich „innervieren“ (also in unserem Beispiel mit Strom versorgen) kann man anhand sogenannter Dermatome grundsätzlich relativ genau ablesen.

Quelle: Ralf Stephan (mailto:ralf@ark.in-berlin.de) – http://www.ark.in-berlin.de/senszonen.svgz (https://web.archive.org/web/20080525104214/www.ark.in-berlin.de/neuropics.html).

Wichtig: Die in diesem Schaubild dargestellten Dermatome sind nicht 100% präzise und können von den Tatsächlichen, in Hinblick auf Präzision und Lokalisierung, abweichen!

Das Bild soll dem geneigten Leser lediglich grafisch vor Augen führen, welche Bereiche der HWS (C2-C8) welche Bereiche der Arme nerval versorgen.

In den Händen/Fingern sind das dann: C 6, C 7 und C 8!

Interessant finde ich Dermatome schon alleine deswegen, weil diese aufzeigen, dass dort, wo es manchmal schmerzt, „zwickt oder zwackt“, nicht zwangsläufig auch die entsprechende Ursache zu finden ist!

Ähnlich funktioniert es auch in einem Automobil. Wenn im Tacho ein Warnlämpchen aufleuchtet, dann gibt dieses lediglich einen Status wieder und ist nicht selbst für eine Fehlfunktion verantwortlich.

Trainings-Tipps – A blast from the past

Von meinem Mentor, Charles R. Poliquin, alias „Strength Sensei“ (R.I.P.) hatte ich damals gelernt, direkt vor einer Übung (insbesondere der Arme) die HWS zu dekompressieren, um mehr Gewicht bewegen zu können.

Charles war der Meinung, dass mangelnde Armkraft ihren Ursprung oft in einem zu sehr gestauchten HWS-Bereich hat.

Fazit/Conclusio – Halswirbelsäulen Dekompression

Aufgrund der Tatsache, dass mein Instagram-Beitrag bezüglich der HWS-Dekompression so reges Interesse geweckt hatte, entschloss ich mich nun doch, einen kleinen, aber hoffentlich dennoch feinen, Artikel darüber zu schreiben.

Für einen Instagram-Beitrag war das Thema zu komplex, für einen kompletten 2500 Wörter-Artikel, in Anbetracht meiner zahlreichen bereits vorhandenen Artikel zum Thema, wohl etwas zu kurz.

Deshalb, an dieser Stelle, zwar ein etwas kürzerer, aber ergänzender Artikel in Sachen Dekompression. Insbesondere in Bezug zu meinem Artikel über die Inversion.

Abschließend sei noch einmal betont, dass die HWS kein Spielzeug ist! Vor einer Behandlung/Therapie sollte ein medizinischer Experte aufgesucht werden.

Gerne kann dies in meiner Heilpraktiker-Praxis geschehen. Bei Interesse einfach einen Termin vereinbaren, unter: info@heilpraktiker-stoesslein.de

Wer danach auch zu Hause seine HWS dekompressieren möchte, der braucht sich dafür nicht gleich in Unkosten stürzen. Einige Geräte sind auf amazon schon für unter 30€ zu haben.

Wenn dir dieser Artikel gefallen hat, dann teile ihn mit deinen Freunden, abonniere den Blog/Newsletter und hinterlasse einen Kommentar.

© HP Bernd Stößlein MBA in Sportmanagement


In diesem und anderen Artikeln findest du den ein oder anderen „Affiliate Link“, zu amazon. Wenn du über diesen Link etwas erwirbst, dann unterstützt du damit meine Blogartikel und schaffst Ressourcen für weitere qualitativ hochwertige Recherchen und Artikel wie diesen. Es entstehen für dich dadurch keine Mehrkosten! Alle meine grundsätzlichen Empfehlungen findest du unter: https://www.amazon.de/shop/bernd_stoesslein


Literatur

Lateinisch-griechischer Wortschatz in der Medizin, S. 49.

Lateinisch-griechischer Wortschatz in der Medizin, S. 55.

Lateinisch-griechischer Wortschatz in der Medizin, S. 173

Plexus brachialis, Quelle: https://de.wikipedia.org/wiki/Plexus_brachialis, Zugriff v. 10.12.20.

Power Plate myMove – ist für alle, welche die Vorteile des Power Plate-Trainings, insbesondere auch zuhause, auf einer großen Auflagefläche, mit einem geringen Platzbedarf anstreben. Die myMove ist leicht genug, um von Raum zu Raum getragen zu werden, aber dennoch robust, um mit über 130 kg belasten zu werden. Durch die sechs variablen Frequenzeinstellungen und die zusätzlichen Haltebänder kann jeder ein effizientes  Workout auch von zu Hause aus durchführen. In meinem ersten Erfahrungsbericht zeige ich, wie ich die myMove in meine Krafttrainings- und Regenerationsroutine integriert habe. Des Weiteren habe ich einige interessante Studien zusammengefasst, die die Power Plate-Training in Verbindung setzen, mit gesteigerter Verbrennung von Viszeralfett.  Darüber hinaus zeige ich euch einige meiner Routinen und mehr!

Power Plate fürs Krafttraining?

An dieser Stelle möchte ich ein klein wenig ausholen, um meinen eigenen sportlichen Hintergrund und den Weg zur Power Plate zu erklären. Bereits im Alter von drei Jahren habe ich am Kinderturnen teilgenommen und später zum Leistungsturnen gewechselt.

Daneben habe ich Leichtathletik gemacht und noch als Teenager dann mit dem Krafttraining/Muskelaufbautraining begonnen. In beiden Sportarten habe ich über die Jahre viele Wettkämpfe absolviert, sogar im Bodybuilding.

Hinzu kommt auch die israelische Selbstverteidigungs-Technik Krav-Maga. In dieser gibt es zwar keine Wettkämpfe, aber sogenannte Level-Tests.

Warum ich das erwähne? Weil ich dem geneigten Leser zeigen möchte, dass ich in den unterschiedlichsten Sportarten viel praktische Erfahrung besitze und von meinen 34 Jahren seit über 31 Jahren in Folge sportlich sehr aktiv bin.

Zur praktischen Erfahrung kommen unzählige internationale Aus- Fort- und Weiterbildungen, meine Arbeit in eigener Praxis als Heilpraktiker usw.

Alle meine Qualifikationen (Stand November 2020) können bei Interesse nachgelesen werden.

Als ich noch aktiver Bodybuilder war, gab es für mich im Grunde nur „old school“ Training. Als Idealvorstellung natürlich im Stil des originalen Gold’s Gym in Kalifornien, während der „Golden Area“, zusammen mit Arnold, Franko, Ken und Co.

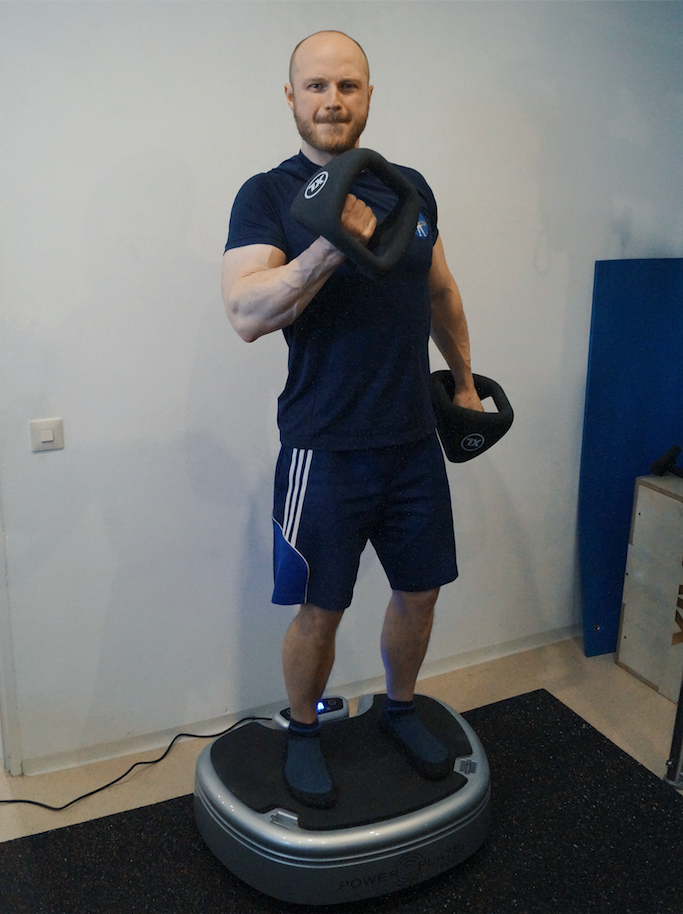
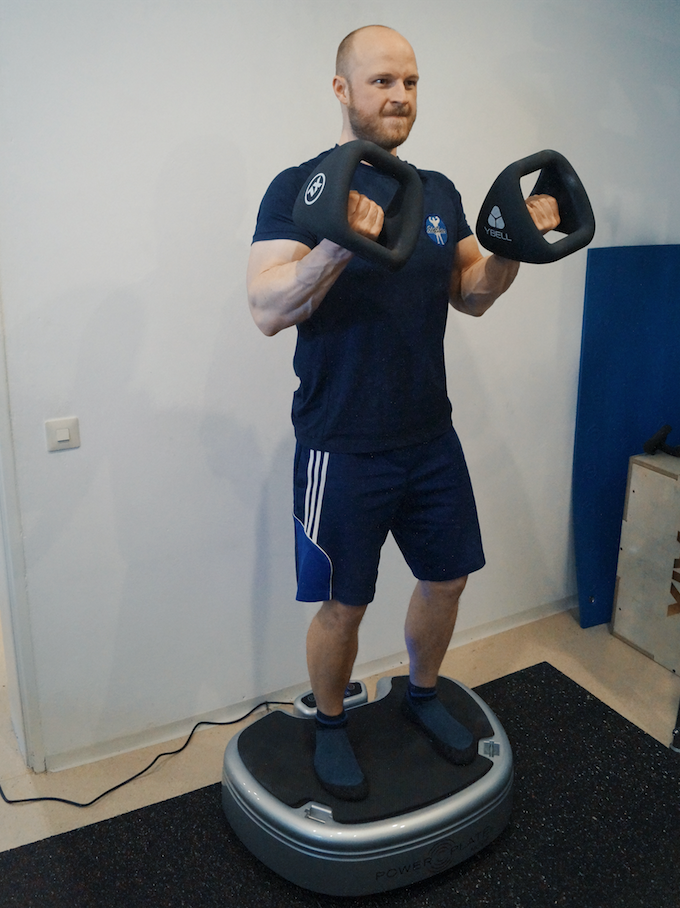
Stehende Kurzhantel Bizeps Curls, auf der Power Plate myMove, Quelle: Eigenes Foto.

Um ehrlich zu sein, hätte ich damals über das Training an einer Power Plate nur gelacht. Nicht besser wissend, wären dann solche Sprüche gekommen wie: „Einfach nicht hardcore genug“ oder ähnlich Unwissendes und mit Vorurteil behafteten Unsinn.

Ehrlicherweise muss ich gestehen, dass ich das Training auf einer Power Plate nicht einmal hätte ausprobieren wollen.

Doch wie das im Leben so ist, entwickelt man sich weiter. Der Horizont wächst und endet nicht länger an der eigenen Stirn! Ich habe erkannt, dass ich nur zwei Dinge mit absoluter Sicherheit wissen kann:

  1. Ich weiß nichts mit absoluter Sicherheit
  2. Ich weiß nicht, was ich nicht weiß
Lange Rede kurzer Sinn: Ich nehme alles zurück, was ich damals (zwar nicht gesagt), aber sicher über das Training an einer Power Plate gedacht hätte.

Heute lautet mein Motto diesbezüglich: „leave no stone unturned“, um bei Arnold Schwarzenegger zu bleiben.

Warum immer (nur) das Training an „traditionellen“ Gewichten, wenn wir uns heute auch einer Technologie bedienen können, die das Training effizienter gestalten könnte?

Nur, damit man das richtig auffasst: Ich bin nach wie vor ein großer Fan von Kraft- und Muskelaufbautraining, mit Kurz- und Langhanteln, aber warum nicht einfach das Beste aus zwei Welten kombinieren?

Das Ausführen einfacher Bewegungen auf einer Power Plate ist eine sichere, effiziente und nicht anstrengende Alternative zum herkömmlichen Krafttraining, um Muskeln aufzubauen und die Körperkraft zu verbessern.

Schließlich hat nicht jeder zum Ziel, sich auf eine Bodybuilding-Wettkampfbühne zu stellen, sondern ist auf der Suche, ein effizientes Training in seinen Alltag zu integrieren, anstatt seinen kompletten Alltag nach dem Training zu richten!

Power Plate Training ist aus meiner Sicht perfekt in die Kategorie des „Pareto-Prinzips“ einzuordnen. Diese 20-80-Regel besagt, dass mit 20 Prozent Aufwand 80 Prozent des Ertrages erreicht werden können.

Wer also keinen Platz für ein komplettes Home Gym hat, trotzdem aber ein forderndes und zielorientiertes Training absolvieren will, für den ist eine Power Plate wie die myMove bestens geeignet. Natürlich auch als Ergänzung, (nicht nur) für das eigene Home Gym!

Übrigens, eine Metaanalyse aus dem Jahr 2013 stellte Daten aus 17 randomisierten kontrollierten Studien zusammen und konnte zeigen, dass die Verwendung einer Vibrationsplatte allein oder das Hinzufügen von Vibrationstraining zu einem bestehenden Trainingsprogramm zu einer Verbesserung der Muskelkraft der Kniestreckmuskulatur und der Sprungleistung bei Gegenbewegungen führte, als bei identischen Bedingungen ohne Vibrationtraining (Osawa et al., 2013).

KH-Bizeps Curls auf Power Plate myMove, Quelle: Eigenes Foto.

Eine weitere Studie kam bereits 2003 zu folgendem Ergebnis:

Das Training auf einer Ganzkörper-Vibrationsplattform ist ein effizienter Trainingsreiz zur Steigerung der Muskelkraft.“        Ferner heißt es in dieser Studie von Delecluse et al.:

“The whole body vibration group achieved a 16.6% gain in isometric strength of knee extensors, a 9% increase in dynamic strength of the quadriceps muscles, and a 7.6% increase in vertical jump height. There were no reports of adverse side effects (…)The placebo group, using a non-functional vibration machine, did not achieve strength or power gains, although they performed the same standing knee extensor exercises. The resistance training group achieved strength gains of 14.4% in isometric and 7.0% dynamic strength respectively; there was no significant improvement in power and vertical jump height. The control group showed no improvement in any of the properties measured”.

Zu Deutsch etwa:

“Die Gruppe, die ein Ganzkörpervibrations-Training absolvierte, erzielte einen Zuwachs an isometrischer Kraft von 16,6% im Bereich der Knieextensoren, einen Zuwachs von 9% dynamischer Kraft in der Quadrizepsmuskulatur und eine um 7,6% erhöhte vertikale Spungkraft. Es gab keine Berichte über unerwünschte Nebenwirkungen (…). Die Placebo-Gruppe erzielte mit einem nicht funktionsfähigen Vibrationsgerät keine Kraft- oder Kraftzuwächse, obwohl sie dieselben Übungen zur Knieextension im Stehen durchführte. Die Krafttrainingsgruppe erzielte Kraftzuwächse von 14,4% bei isometrischer bzw. 7,0% dynamischer Kraft; Es gab keine signifikante Verbesserung der Leistung und der vertikalen Sprunghöhe. Die Kontrollgruppe zeigte keine Verbesserung der gemessenen Eigenschaften.”

Eine andere Studie, die über ein Jahr an 220 Senioren (Durchschnittsalter 67,1 Jahre) durchgeführt wurde,  berichtet, dass Ganzkörpervibrationstraining eine effiziente Alternative zum konventionellen Krafttraining bei älteren Menschen zu sein scheint (Bogaerts et al., 2009).

Folgendes wurde untersucht:

Insgesamt 220 Erwachsene (Durchschnittsalter 67,1 Jahre) wurden zufällig einer „whole body vibration“ (WBV = auf Deutsch: Ganzkörpervibrations-Gruppe), Fitnessgruppe oder Kontrollgruppe zugeordnet.

Die WBV-Gruppe trainierte auf einer Vibrationsplattform und die Fitnessgruppe führte Herz-Kreislauf-, Widerstands-, Gleichgewichts- und Dehnungsübungen durch.

Die Kontrollgruppe absolvierte keinerlei Training. Die Herzfrequenz wurde während einer einzelnen WBV-Sitzung gemessen.

Die maximale Sauerstoffaufnahme (VO2peak) und das „Time-to-Peak-Training“ (TPE) wurden während der progressiven Fahrrad-Ergometrie gemessen. Die Muskelkraft wurde mit einem Dynamometer bewertet.

Ergebnis: Die Herzfrequenz stieg während des WBV-Trainings signifikant an. Nach einem Jahr nahmen VO2peak, TPE und Muskelkraft in der WBV- und Fitnessgruppe signifikant zu.

Beide Trainingsgruppen verbesserten sich in Bezug auf VO2peak und Muskelkraft ähnlich stark. Die Fitnessgruppe verbesserte sich bei TPE signifikant stärker als die WBV-Gruppe.

Schlussfolgerung dieser Studie: Das WBV-Training bei älteren Menschen (…) scheint effizient zu sein, um die kardiorespiratorische Fitness und Muskelkraft zu verbessern.

Wie setzte ich die Power Plate myMove ein?

Diesen Erfahrungsbericht schreibe ich nach meiner ersten vierwöchigen intensiven Testphase, in der ich die Power Plate myMove nahezu täglich „auf Herz und Nieren“ habe testen können.

Ich  habe die Power Plate myMove sowohl in mein bestehendes Kraft-/Muskelaufbautraining integriert, separat daran trainiert und die Power Plate auch an trainingsfreien Tagen genutzt (wofür, erkläre ich gleich en detail).

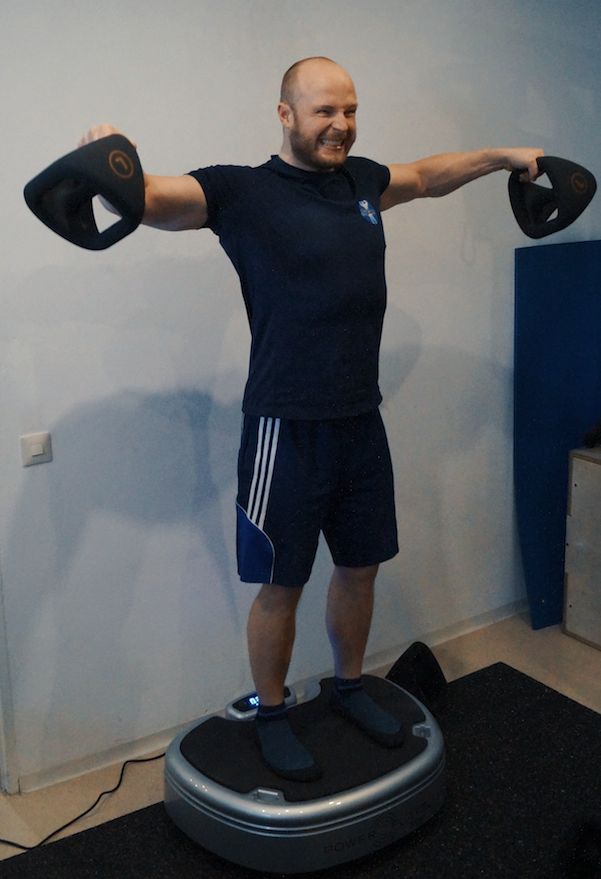
Stehendes Kurzhantel Seitheben auf der Power Plate myMove, Quelle: Eigenes Foto.

Mein Beispiel-Krafttrainingsprogramm mit Power Plate

Vom Grundsatz her gestaltete sich diese vierwöchige Trainingsphase wie folgt:

Das Training wurde mit einer Mehrgelenksübung (A) gestartet (meist „open circuit“ und „closed chain“), deren Bewegungstempo bei 4010 (4 Sek. exzentrische Phase, 0 Sek. Umkehrphase, 1 Sek. konzentrische Phase, 0 Sek. Umkehrpunkt) lag.

Wenn dir diese Trainingsparameter neu sind, dann kannst du mehr darüber in meinem Artikel

GYM – DEUTSCH; DEUTSCH – GYM: WAS BEDEUTET WAS IM FITNESSSTUDIO? TEIL I, und GYM-DEUTSCH; DEUTSCH-GYM: WAS BEDEUTET WAS IM FITNESSSTUDIO? TEIL II nachlesen.

Wie du lateinische und griechische Wörter aus Medizin und Training ganz einfach dekodieren lernst, habe ich in meinem fast gleichnamigen Artikel LATEINISCH-GRIECHISCHER WORTSCHATZ FÜR PERSONAL-TRAINER ? beschrieben.

Die Wiederholungen lagen im submaximalen Bereich des 1 R.M. (repetition maximum), mit 3-4 Wiederholungen. Die Satzzahl variierte von 5-10. Pause zwischen den Sätzen 120-180 Sekunden.

Im Anschluss folgten dann Isolationsübungen mit freien Gewichten (Kurz- und/oder Langhanteln). Demnach also sowohl „open- als auch „closed-circuit“ sowie „closed- wie auch „open chain“ auf der Power Plate myMove.

Die Wiederholungszahl wurde erhöht (8-10 Wdh.), das Tempo blieb identisch (4010), die Pausenzahl sank (ca. 75-90 Sek.). Die Übungen wurden in B1 und B2 unterteilt, und folgten direkt hintereinander.

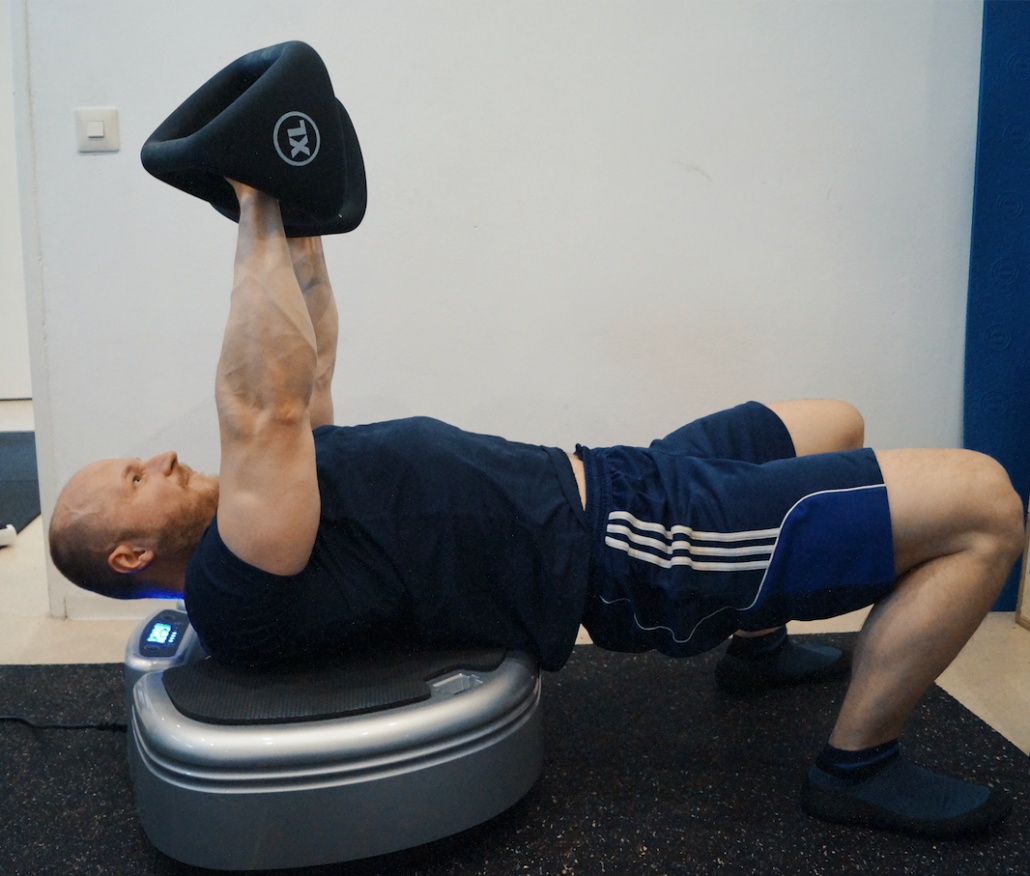
Liegendes Trizepsstrecken auf der Power Plate myMove, Quelle: Eigenes Foto.

Um dieses theoretische Konstrukt zu veranschaulichen, stelle ich dieses an einem Beispiel für ein Schulter- und Armtraining dar:

  • Stehendes (= „closed chain“) Langhantel (= „closed circuit”) Nackendrücken (Die Art der Langhantel wurde bei jedem Training gewechselt), 3-4 Wiederholungen, 5-10 Sätze, 120-180 Sek. Pause zwischen den Sätzen
  • Hockendes/Stehende Bizepscurls („closed chain“ & „open circuit”) mit Kurzhanteln auf der Power Plate. Dabei kombiniere ich gerne mehrere Griffvarianten auf einmal, um die Effizienz des Trainings zu erhöhen und, um die Trainingszeit „zusammenzudampfen“. Ich drehe die Hanteln vom Start bis zum Ende in eine Supination (Daumen zeigen nach außen). Anschließend lasse ich die Hanteln proniert (sog. Zottmancurls ) wieder ab. Durch die Kombinationen kann man unterschiedliche Muskelanteile in Bi- und Trizeps bearbeiten/erreichen/ansteuern. Optional kann man auch einige Wiederholungen in neutraler Griffstellung absolvieren. Die Art der Kurzhanteln wurde jedes Training gewechselt.
  • Liegendes Trizepsstrecken mit Kurzhanteln auf Power Plate Hier starte ich neutral (Handflächen zeigen zueinander) und ende proniert (Daumen zeigt nach innen).Dieses Effizienz-Steigerungsprinzip folgt der weiter oben beschriebenen Logik, in allen Trainingsparametern.
  • Stehendes Seitheben auf Power Plate (Trainingsparameter äquivalent zu den bereits beschriebenen Übungen B1 und B2) als C1
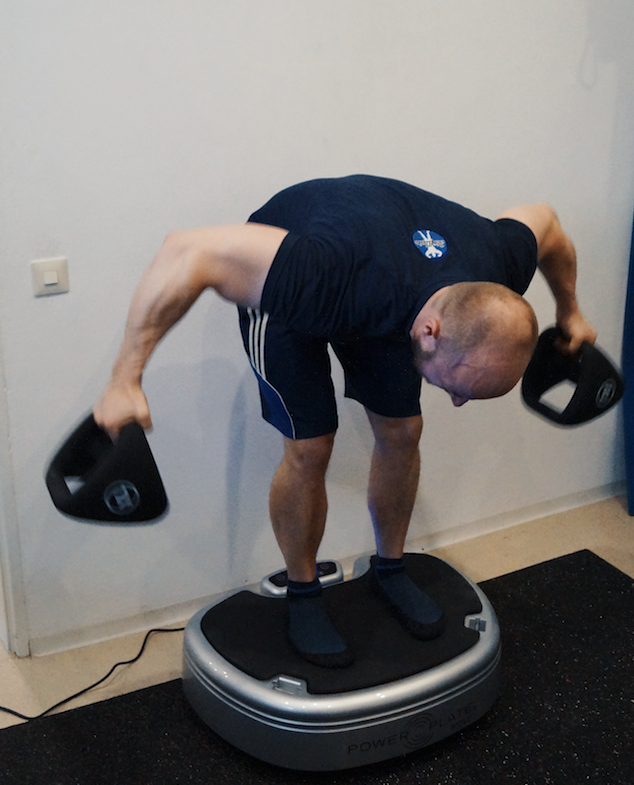
  • Stehende Reverse Curls (für hintere Schulter)als C2

Natürlich handelt es sich hierbei nur um EINE mögliche Trainingsplanung, die beliebig nach den eigenen Zielen, und Zugang zu Equipment, variiert werden kann!

Ein 6-minütiges Training auf der Power Plate, für „active Rest“-Tage von Ben Greenfield, sieht z.B. so aus:

  • 60 Sek., 30 Herz (Hz), dynamische Kniebeugen mit eigenem Körpergewicht (KG)
  • 60 Sek., 30 Hz, Liegestütze mit Bändern
  • 60 Sek., 60 Hz isometrische Kniebeugen (mit eigenem KG)
  • 60 Sek., 60 Hz, Liegestütze unten haltend (Arme gebeugt)
  • 60 Sek., 60 Hz, Rücken-Brücke (beide Beine 90° angewinkelt auf Power Plate)
  • 60 Sek., 30 Hz, Liegestütze (Winkel wie beim Schrägbankdrücken), Füßen auf Power Plate

Wie man sieht, kann man die Power Plate auch an sogenannten „active rest“-Tagen nutzen. Also an Tagen, an denen man kein Kraft-, respektive Muskelaufbautraining betreibt, sondern nur etwas Bewegung betreiben will, um die Regeneration zu unterstützen.

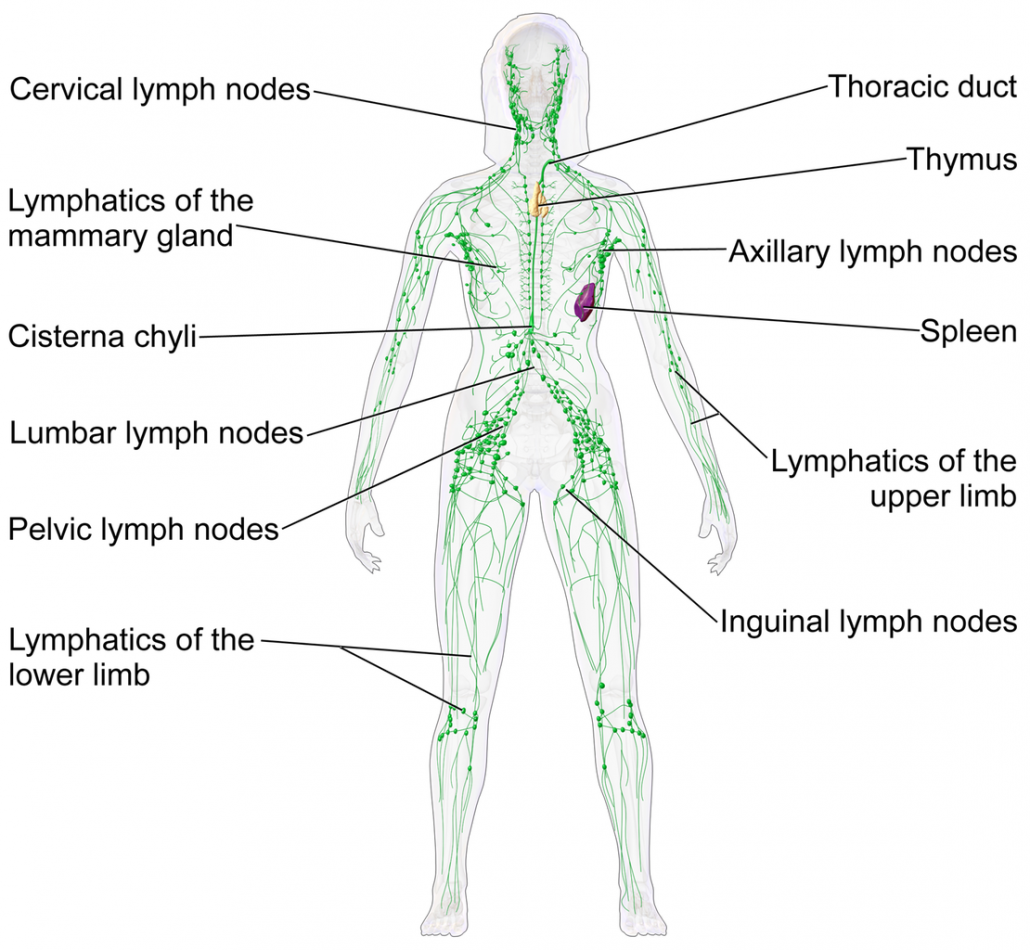
Ich habe die Power Plate übrigens in diesen ersten Wochen auch 5-9 Minuten täglich genutzt, um mein Lymphsystem bei der Arbeit zu unterstützen.

Durch die Vibration aller Zellen bin ich der Meinung, dass insbesondere das Lymphsystem ordentlich bei der Arbeit unterstützt wird.

Power Plate Training für (bessere) Körperfettreduktion?

Gerade wenn es um das Thema Körperfettreduktion geht, suchen fast alle Menschen nach der  „Zauberpille“. Nach einem sagenumwobenen Mittel, das die überflüssig angefutterten Pfunde, am besten ohne Bewegung, auch wieder in Rekordzeit dahinschmelzen lässt.

Handelt es sich bei der Power Plate myMove nun um solch ein „Wundermittel“? Natürlich nicht, aber Studien zeigen, dass Power Plate-Training eine effiziente Trainingsmöglichkeit ist, die positiven Einfluss auf die gesamte Körperzusammensetzung hat (Fjelstad et al., 2009).

Wenn ich von Körperfett spreche, dann meine ich sowohl subkutanes (Unterhaufettgewebe) als auch viszerales Fett.

Der Begriff viszeral stammt von Lateinisch viscus = Eingeweide (Bescher et al., 1995).

Sogenannte “reverse flies”, für die hintere Schulter. Ausgeführt mit Kurzhantel. Stehend, auf der Power Plate myMove, Quelle: Eigenes Bild.

Sub/kutan setzt sich zusammen aus dem Lateinischen Präfix (Vorsilbe) sub- = unter; sowie Lateinisch cutis = Haut; zusammen (Becher et al., 1995).

Das Problem mit exzessivem Körperfett ist dabei, dass es nicht einfach nur eine ästhetische Frage darstellt, sondern Fettgewebe im Grunde wie ein extra Organ betrachtet werden kann, das Einfluss auf den kompletten Stoffwechsel des menschlichen Organismus ausübt.

Besonders gefährlich ist hier letztgenanntes Viszeralfett.

Denn dieses lagert sich um unsere Organe an und wird mit Krankheiten in Verbindungen gebracht wie z.B. Herzkreislauf-Erkrankungen, Alzheimer, Diabetes Typ 2, Herzinfarkt, erhöhtem Cholesterin und/oder pathologisch (krankhaft) erhöhtem Blutdruck.

Viszeralfett soll auch mehr von denjenigen Proteinen produzieren, die zu einer (chronischen) Inflammation (Entzündung) und anderen Problemen wie z.B. Gefäßobstruktionen (Verengungen) führen sollen.

Arnold Schwarzenegger wird der Spruch zugeschrieben: „Wenn es wabbelt, ist es Fett“. Viszerales Fett ist aber nicht „wabbelig“ und auch nicht auf den ersten Blick sichtbar!

Wie kann man es also wieder loswerden? Nun, der erste Schritt ist meiner Meinung nach immer zuallererst, die Zufuhr an Toxinen (Giftstoffen) zu unterbinden.

Niemand wird „aus Versehen“ übergewichtig und Essen fliegt einem nicht, wie im Schlaraffenland, einfach in den Mund. Es ist, meines Wissens, auch noch nie passiert, dass z.B. eine Chipstüte im Vorbeilaufen einfach inhaliert wurde…

Das grundlegende Problem sind sogenannte „Lifestyle-Faktoren“ (Essen und Bewegungsgewohnheiten) und natürlich auch oft psychisch-seelische Probleme sowie eine Mischung aus den zuvor Genannten.

Doch nun zur Frage, was viszerales Fett mit Ganzkörper-Vibrationstraining zu schaffen hat.

Nun, eine Studie  konnte z.B. zeigen, dass Power Plate Training,  in Kombination mit einer hypokalorischen (unterkalorischen) Ernährung, dabei helfen kann, eine dauerhafte Gewichtsreduktion zu erreichen/zu halten. Darüber hinaus kann PowerPlate-Training viszerales Fett in übergewichtigen erwachsenen Männern stärker reduzieren als aerobes Training alleine (Vissers et al., 2010).

In einer Studie wurden vier Gruppen (Diät, Fitness, Vibrationsplatte (VP) und Kontrollgruppe) sechs Monate lang beobachtet.

In allen drei Interventionsgruppen nahm das Körpergewicht bei Messungen nach den sechs Interventionsmonaten signifikant um 5 bis 10% ab.

In den sechs Monaten nach Abschluss der Studie gelang es jedoch nur den Fitness- und VP-Gruppen, ihren Gewichtsverlust von 5% oder mehr aufrechtzuerhalten. Die VP-Gruppe hielt sogar einen Gewichtsverlust von über 10% aufrecht.

Der Hauptunterschied zwischen der VP-Gruppe und anderen Gruppen ist die Abnahme des viszeralen Fettes. Die VP-Gruppe verlor nach sechs Monaten doppelt so viel viszerales Fett wie die Fitness- und Diätgruppen.

Die Abnahme des viszeralen Fetts blieb auch in der VP-Gruppe nach 12 Monaten auf dem gleichen Niveau, während die Fitness- und Diätgruppen nach 12 Monaten zu ihren Grundwerten zurückkehrten. (Greenfield, 2020).

Eine weitere Studie (n = 55) konnte folgendes zeigen:

„In six months, the whole body vibration group exercising on Power Plate achieved a 25.7% reduction of cellulite on thighs and buttocks. The group exercised two to three times per week, in sessions of 8-13 minutes. The whole body vibration + cardio group achieved a 32.3% reduction of cellulite on thighs and buttocks, exercising two to three times per week in sessions of 8-13 minutes with whole body vibration, plus 24-48 minutes of cardio training“ (Frank und Moos, 2004).  

Zu Deutsch etwa:

Innerhalb von sechs Monaten erreichte die Ganzkörper-Vibrationsgruppe, die auf Power Plate trainierte, eine 25,7%ige Verringerung der Cellulite an Oberschenkeln und Gesäß. Die Gruppe trainierte zwei- bis dreimal pro Woche in Sitzungen von 8 bis 13 Minuten. Die Gruppe mit Ganzkörpervibrationen + Cardio erreichte eine 32,3%ige Verringerung der Cellulite an Oberschenkeln und Gesäß, indem sie zwei- bis dreimal pro Woche in Sitzungen von 8 bis 13 Minuten mit Ganzkörpervibrationen plus 24 bis 48 Minuten Cardio-Training trainierte.

Power Plate Fazit/Conclusion

Diesen Erfahrungsbericht über die Power Plate myMove schreibe ich nach einer ausführlichen ersten Testphase von vier Wochen. Einen zweiten Bericht werde ich nach einer längeren Testphase, nach insgesamt sechs Monaten, publizieren.

An dieser Stelle also nochmal eine Zusammenfassung und ein Ausblick auf das, was noch kommen wird.

Denn schließlich ist ein einzelner Artikel von 2500 Wörtern viel zu kurz, um alle positiven Eigenschaften und potenziellen Vorteile des Power Plate Trainings abzudecken.

Wie so oft in meinen jüngeren Jahren, hatte ich mir auch zum Thema Power Plate eine vorschnelle Meinung gebildet. Noch schlimmer, ich hatte einfach etwas angenommen, OHNE es eigenständig zu hinterfragen und zu überprüfen!

Solche Attitüden konnte ich im Laufe des Lebens aber ablegen und, wieder einmal, wurde ich eines Besseren belehrt. Deshalb kann ich nur alles zurücknehmen, was ich damals gedacht hatte.

Eine Power Plate ist, aus meiner Sicht, ein echtes Investment. Nicht nur für „hardcore“ Kraftsportler, sondern für die ganze Familie, unabhängig vom Alter und Leistungsgrad.

Auch Senioren, die autark, fit, stark und selbstständig fit werden/bleiben wollen, können mit dem Power Plate-Training ein effizientes Training absolvieren.

Die Forschung ist sich einig, dass die Investition in eine Vibrationsplatte (Power Plate) sich positiv auf die Gesundheit von nahezu jedem auswirken würde – von Spitzensportlern über ältere Menschen bis hin zu Personen, die keine traditionellen Krafttrainingsübungen durchführen können und allen dazwischen.

Last but not least: Der kleine, aber bekanntlich feine Unterschied einer Power Plate zu anderen Vibrationsplatten ist gar nicht so klein!

Denn die Power Plate nutzt, meines Wissens, als einzige Vibrationsplattform eine sogenannte triplanare Bewegungstechnologie. Das bedeutet, dass die Plattform sich multidimensional (in diesem Fall dreidimensional) bewegt.

Wer sich an den Geometrieunterricht der Schulzeit erinnert, der kann sich ein Koordinatensystem mit x-,y- und z-Achse vorstellen.

Andere Vibrationsplattformen können dies nicht! Somit sparen sie immer eine „Vibrationsdimension“ aus, was den Effizienzgrad des Trainings senken könnte.

Es bleibt spannend. Freut euch auf meinen zweiten Erfahrungsbericht!

Die Power Plate App birgt einen enormen “Trainings-Schatz”, Quelle: Eigenes Foto.

Übrigens: Wenn du auch mit dem Power Plate Training beginnen möchtest, aber noch unerfahren bist, dann probiere doch, mit der Power Plate-App zu starten.

In der Power Plate App gibt es über 100 Fitness & Healthcare Programme mit über 1.300 detaillierten Übungsvideos! 📲 Mehr Infos zur App gibt’s hier: 👉🏻www.powerplate.de/App

Natürlich kannst du mir auch eine Mail schreiben, um ein online/offline Power-Plate-Workout/Coaching zu buchen!

Fortsetzung folgt…

Hat dir dieser Artikel gefallen? Dann teile ihn mit deinen Freunden, hinterlasse einen Kommentar, abonniere den Newsletter/Blog und/oder schreibe mir eine E-Mail, an:

info@bernd-stoesslein.de

© HP Bernd Stößlein, Master of Business Administration in Sportmanagement.

In diesem Artikel findest du den ein oder anderen „Affiliate Link“, zu amazon. Wenn du über diesen Link etwas erwirbst, dann unterstützt du damit meine Blogartikel und schaffst Ressourcen für weitere qualitativ hochwertige Recherchen und Artikel wie diesen. Es entstehen für dich dadurch keine Mehrkosten! Alle meine grundsätzlichen Empfehlungen findest du unter: https://www.amazon.de/shop/bernd_stoesslein


Literatur

Lateinisch-griechischer Wortschatz in der Medizin, S. 65.

Lateinisch-griechischer Wortschatz in der Medizin, S. 216.

Lateinisch-griechischer Wortschatz in der Medizin, S. 247.

Whole-body vibration augments resistance training effects on body composition in postmenopausal women, Maturitas 2009 May 20;63(1):79-83.

Power Plate Training Shown to Reduce Abdominal Fat in Overweight and Obese Adults, The European Journal of Obesity. Vol. 3(2). 2010. By Vissers, D., A. Verrijken, I. Mertens, C. van Gils, A. van de Sompel, S. Truijen, and L. van Gaal University of Antwerp, Belgium.

Can You Really “Vibrate” Away Excess Fat? (Or Get Any Real Benefits From Whole Body Vibration Machines?, source: https://bengreenfieldfitness.com/article/fitness-articles/whole-body-vibration/?utm_campaign=bgf-article&utm_content=fitness&utm_medium=social&utm_source=instagram-bgf, Zugriff v. 30.10.2020.

Whole Body Vibration and Reduction of Cellulite, SANADERM Professional Clinic for Skin Disease and Allergology, Bad Mergentheim, Germany (May-November, 2004), Dr. Horst Frank and Dr. Birgit Moos.

The effects of whole-body vibration on muscle strength and power: a meta-analysis, J Musculoskelet Neuronal Interact 2013; 13(3):380-390.

Effects of whole body vibration training on cardiorespiratory fitness and muscle strength in older individuals (a 1-year randomised controlled trial), Age and Ageing, Volume 38, Issue 4, July 2009, Pages 448–454.


Zelter Shelter is a dream of every outdoor-fan and biohacker! In a nutshell, it’s a wearable tent!  Of course you can sleep INSIDE the tent, but you can also WEAR this tent as a poncho! In this article I will tell you why the Zelter Shelter is now part of my bug out bag, in my car and why everyone should have this fast, simple and reliable personal shelter!  You always fall down to your level of preparation. That’s why you should always go prepared! As I bonus you will find an interview with Lee (the mastermind behind the Zelter® Shelter) an me, chatting about his idea, philosophy and upcoming products of the Zelter® brand!

Zelter Shelter – Every Biohacker’s dream?

As you might not know, I not only work as a Strength and Conditioning Coach/Personal- Trainer but also as a “Heilpraktiker” (Complementary and Alternative Medicine Practitioner) as well as a Consulting-Biohacker. 

So, why am I writing about a special kind of tent/tarp? Well, because I think that biohacking is a skill, as much as survival. 

According to the Merriam Webster Dictionary biohacking is defined as:

“biological experimentation (as by gene editing or the use of drugs or implants) done to improve the qualities or capabilities of living organisms especially by individuals and groups working outside a traditional medical or scientific research environment”.

Let’s go a little deeper to get to know into this biohacking stuff and what it actually has to do with a wearable tent… 

The word Biohacking is a construction of the old Greek word bios = life (Becher et al., 1995), and the English suffix: to hack which could be used in different meaning, like “to gain access” to something (computer network, etc.). 

Let’s stick to those explanations. If you fuse both together you get a literal translation of: “to gain access to life”. 

Being a bio/hacker means that your effort/aim/goal is to decode life – and all its situations – to its deepest core.  Furthermore, you are not following a narrative you’re being told but have learned to question things. 

You might also be a “truth seeker” and probably you are a so-called “prepper”, too. That means that you are trying to be prepared for any situation whatsoever.

To keep this straight, this does not mean that you are necessarily a tinfoil-hat-wearing conspiracy theorist, although lots of former conspiracy “theories” in history turned out to be true!

You are probably someone who has more foresight than others, and that’s exactly why you should consider equipping yourself with a Zelter Shelter!

No matter when and how…you are most likely to encounter a “Shit Hits Your Fan” (SHTF) situation. Some might be worse than others but something inevitably will happen to you. 

So, let’s talk how at least to be safe from “wind and weather”, as we say in German.

Zelter Shelter – What it is and why I got one

When you’re reading this article you have probably searched the net for a review about the Zelter Shelter (ZS). That’s why we don’t have to start from scratch. 

You most likely know that it is a “unique new wearable personal shelter for the outdoors” (Zelter Shelter, 2020). So what is all the fuss about? 

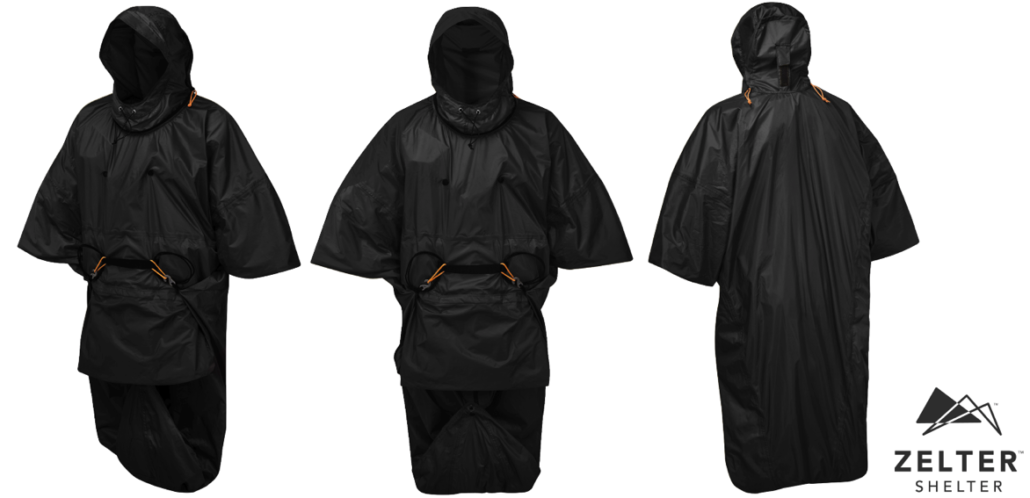
Zelter® Shelter – wearable mode, source: © Zelter® Shelter.

Well, I will tell you. As already mentioned the ZS is not only a tent you can sleep INSIDE but which you can also WEAR, as a kind of poncho!

This is important because think of this:  you’re in the middle of nowhere and – for which reason whatsoever – you cannot find a proper shelter, nor do you have the time (or skills) to build one. That’s where the ZS comes into play. 

It is so small that it perfectly fits into almost any backpack. I even consider it being mandatory for every car driver!  I, for myself, never ever drive my car again without my SZ in my trunk! 

The above mentioned scenario could strike you not only in the middle of nowhere. It could happen anytime, anywhere. Even in an urban setting! You could be stuck in a traffic jam, overnight, without heating etc. 

Just pull out your SZ and you have a 10K waterproof poncho that is light weight and RET12 breathable! It comes in a signal color (“flame orange”), if you want to use it as an emergency device or you go for “mystery green” or, like me, “midnight black” (limited edition). 

Zelter® Shelter – Tent-mode, source: © Zelter® Shelter.

That might depend on what you want to use it. I prefer black as you can use it in any situation whereas military cameo and or just green would look too much paramilitary.

If you don’t want to address people’s attention immediately or even want to avoid it, black is good to go (and hide, if you wish to in a the scenario that makes it necessary).

As you see, the ZS is not only for outdoor use in the woods, but also for urban scenarios. Just think of a blackout, rioting, tumults or even worse things. 

You might end up stuck in a foreign country, in a lockdown, without enough money for both accommodation AND food.

Sure that is a very harsh scenario but the year 2020 has shown that you have to expect the unexpected. Therefore: “always go prepared”!

But back to the features of the Zelter Shelter:

Let’s say you do not want to wear it but use it as a tent, respectively tarp. No problem. You don’t need anything except a strong breath. 

In less than one minute you can inflate the three stays of the ZS. No poles needed (although you can also use them if you want, as they’re included). 

The Zelter Shelter has a built- in valve with a little hose that are used to inflate the stays. The cap of the valve can’t be lost as everything is built together. To open or close the valve you simply turn it. 

So, you do not need to carry extra equipment like a pump or compressor. You are independent wherever you need to set up your shelter!

To be honest, I was really surprised how much space there is in this one-man tent/tarp. There is plenty of space to turn around. If you are a regular- built human you will perfectly fit into the tent, except maybe you’re extremely tall, and/or super fat 😉 

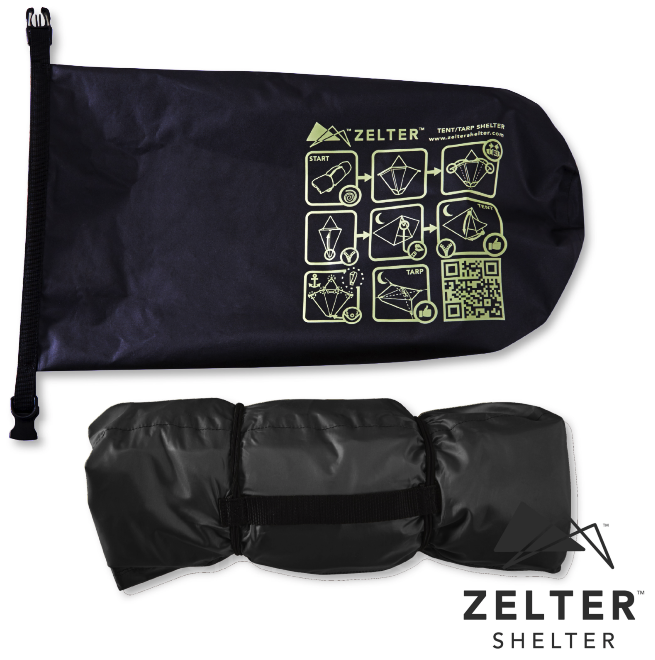
To store the ZS, it comes in a nice water proof carrying bag with an instruction printed on how to use it.

Even in case of repeating myself, I must tell you again and again: please don’t wait for a

scenario in which you need shelter to save your life, by all means: practice, practice, practice!

First thing I did when my ZS arrived was to read the instruction and then I spent the next

couple of nights sleeping in it! Yes, IN my flat. Why? Because when SHTF I want to be able to

set up the Zelter Shelter “blindly”. 

Really really bad, if you don’t know how to use/operate equipment in a serious situation! Use your ZS right away. Inflate/deflate it, wear it and learn to store it in your bag!

Technical details:

Quality: ISO 9001:2008 standard
Packing size: 35 x 15cm
Weight: 1.2 – 1.3 Kg (in total)
Material: 75D Nylon
Set up time: < 1 minute (after having practiced)
BivouacSize: 2.3m L x 1.1 B x 1.0 H

Zelter® Shelter – folded together, outside of its bag, source: © Zelter® Shelter.

Zelter Shelter – Best equipment for your EDC and Bug Out Bag

I have already mentioned that I never leave my house by car without my Zelter Shelter anymore. Therefore you could consider it part of my Every Day Carry (EDC). 

Another great way how to use the SZ is in your Bug Out Bag (BOB). I highly recommend you to have one for every family member. Meaning, if you have kids, you create a BOB that fits the size and strength of every individual family member. 

In this article I won’t go further into detail of what you should store in your BOB except for one thing: shelter! Most tents are simply too big and/or too heavy to carry. 

The Zelter Shelter is really light-weight and could even be stored in a child’s backpack!  So, if you (and your family) haven’t set a BOB, I highly recommend you to do so! 

Even if you’re a business man and on the road a lot, please store one of these in your car. It is super affordable and you get it starting from £169.95 (flame orange), which is about 186€ (October 2020).  The Wearable version in Mystery Green is available with International shipping from Amazon DE/UK (affiliate link).

Zelter Shelter – what can it do?

Okay, now you have heard some ideas of how to use the ZS. Of course that’s not all, I bet you can come up with other great useful implementation. Please feel free to share your ideas in the comment section below this article. 

Besides the fact that you can wear the SZ and use it as a kind of regular tent there are further options. 

You can use it as a two person tarp with use of a trekking pole! An in depth video explanation of how this is done can be found in this video. 

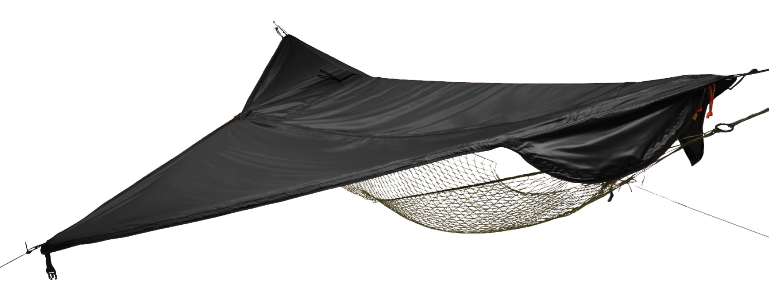
Moreover, there’s another option. You might use the Zelter Shelter as a “regular” tarp, i.e. to cover a hammock or something else you’d like to protect from the weather.  A simple, short and cool demonstration can be found in this video. 

How to cover a hammock with the Zelter® Shelter, source © Zelter® Shelter.

As it is waterproof, you might also use it in a real emergency situation/survival situation to collect and transport water or other stuff you need for your camp etc. 

Even the SZ’s bag can be repurposed to carry water and other materials. Just be creative! The possibilities are endless!

Zelter Shelter – The man behind the idea

I had the chance to do an interview with the mastermind behind this great product.  In our interview we talk about how the Zelter Shelter was folded into existence and what’s Lee’s philosophy behind the ZS. 

Enjoy my chat with Lee here:

Zelter Shelter Review Conclusion

To draw a conclusion, I’d like to answer the question whether the Zelter Shelter is THE best tent/tarp out there. Well, as you probably know, there is no such thing as THE best, as everything is always a matter of perspective.

Nevertheless, I’d say that the Zelter Shelter, from my point of view, is probably one of the best when you’re looking for the most bang for your buck.

Following the Pareto-Principle (20:80 rule) the ZS is probably one of the best outdoor/biohacking/survival essentials out there. 

Please remember its almost unbelievable versatility!  You can sleep IN it, UNDER it and even WEAR it!! Plus all the aforementioned other potential features.

For me the Zelter Shelter has more than just a “price” – it has a value!  Invest under 200 € for a device that is waaaaay more than just a “cool tool”! 

The version that is for sale now has had some design improvements added with upgraded comfort and weatherproofing features that will benefit any user.  

Available now from Amazon DE/UK (Affiliate Link) and Mountainmen.ch in Switzerland.

Conclusion:

Go get one immediately and (at least) put it in your car!


Literature

Biohacking, Source: https://www.merriam-webster.com/dictionary/biohacker, access:

20.10.20. 

Lateinisch-griechischer Wortschatz in der Medizin, S. 47.

Zelter Shelter, source: https://www.zeltershelter.com/, access: 20.10.20.

Barfußschuhe – Wunderwerk oder Witzfigur? Nicht nur in der Fitness- Gesundheits- oder Biohackerszene erfreuen sich die unterschiedlichsten Modelle von Barfußschuhen immer größter Beliebtheit. Da ich diese selbst seit über 7 Jahren trage, Grund genug für mich, dieses Thema ein weiteres Mal etwas genauer zu beleuchten. In diesem Artikel gehe ich auf einige der mannigfaltigen Gründe ein, warum ich ein großer Advokat des Tragens dieser Schuhe bin.

Des Weiteren gebe ich meinen Erfahrungsbericht über zwei unterschiedliche Modelle zum Besten.

Es dreht sich um Barfußsandalen der Marke „Shamma“ und sportliche Halbschuhe der Marke „Xero Shoes“. Beide habe ich über gofreeconcepts.de (Werbung) bezogen.

Barfußschuhe – Ein Oxymoron?

Der Begriff des Barfußschuhs ist im Grunde ein Widerspruch in sich. Denn entweder man läuft baren Fußes oder man trägt eben Schuhe, beides gleichzeitig geht nicht. Das wäre in etwa so, als würde man duschen und sich gleichzeitig abtrocknen wollen…

Um genau zu sein, stellt ein Barfußschuh ein sogenanntes Oxymoron dar.

Werfen wir einen ersten Blick auf die bekannteste Online Enzyklopädie, die hierzu folgendes schreibt:

Ein Oxymoron (Plural Oxymora; altgriechisch τὸ ὀξύμωρον, aus oxys ‚scharf(sinnig)‘ und moros ‚dumm‘) ist eine rhetorische Figur, bei der eine Formulierung aus zwei gegensätzlichen, einander widersprechenden oder sich gegenseitig ausschließenden Begriffen gebildet wird, z. B. „alter Knabe“. Häufig werden Oxymora in Form von Zwillingsformeln geprägt. Einzelne Wörter, Begriffe und selbst ein oder mehrere ganze Sätze können ein Oxymoron bilden. Das Stilmittel wird verwendet, um beispielsweise dramatische Steigerungseffekte zu erreichen oder kaum Auszudrückendes oder gar Unsagbares in ein Gegensatzpaar zu zwingen und dadurch zum Ausdruck zu bringen.“ (Wikipedia, 2020).

Am spannendsten finde ich hier den letzten Satz. Denn dieser beschreibt sehr schön, was man sich unter einem Barfußschuh vorstellen kann.

Ein Schuh, der dem Laufen mit baren Füßen am nächsten kommt! Simpel, aber nicht einfach, denn es kommt auch bei Barfußschuhen nun mal drauf an!

Auf dem Markt existieren Modelle in Hülle und Fülle. Viele erheben den Anspruch, ein sogenannter Barfußschuh zu sein, doch wann ist dies überhaupt gegeben?

Wird ein Barfußschuh schon zu einem solchen, wenn er einfach eine ganz flache Sohle besitzt? So wenig Material wie möglich zwischen der eigenen Fußsohle und dem Untergrund auf dem man sich gerade bewegt oder gibt es da womöglich noch weitere Kriterien?

Nun, aus meiner Sicht gibt es ein paar Kriterien, die jeder Barfußschuh erfüllen sollte. Diese werde ich in diesem Artikel darbieten. Der geneigte Leser ist dann aber wieder angeraten zu überprüfen, ob er sich dieser Bewertungsformen bedienen möchte oder nicht.

Barfußschuhe – Unterschiedliche Modelle im Test

Barfußschuhe durfte ich schon einige Testen. Bereits vor etlichen Jahren habe ich die berühmt-„berüchtigten“ „Zehenschuhe“ von Vibram getragen. So schlüpfte ich damals, sprichwörtlich, in die Welt der Barfußschuhe. Mit jedem Zeh einzeln.

Diese Vibram Modelle gibt es mittlerweile in zahlreichen Ausführungen und für die unterschiedlichsten Zwecke.

Wer sich mit dem Thema der Körperhaltung beschäftigt, ob nun professionell oder einfach aus eigenem Interesse, der stößt früher oder später auf das „Problem“ mit modernen Schuhen.

Dieses habe ich bereits in meinem Artikel über die „Tarpan“ Barfußschuhe beschrieben, wo es in Gänze nachgelesen werden kann.

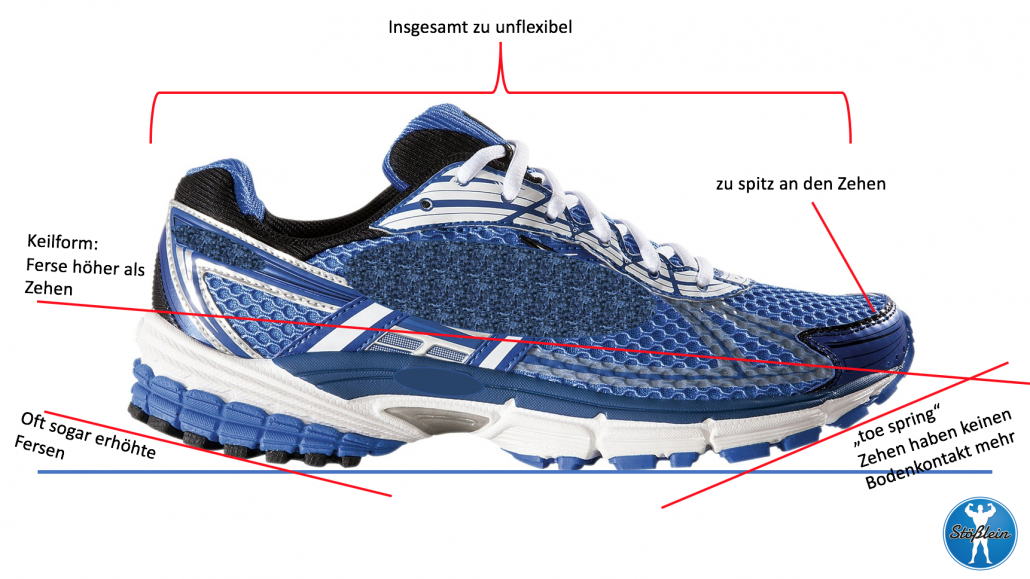
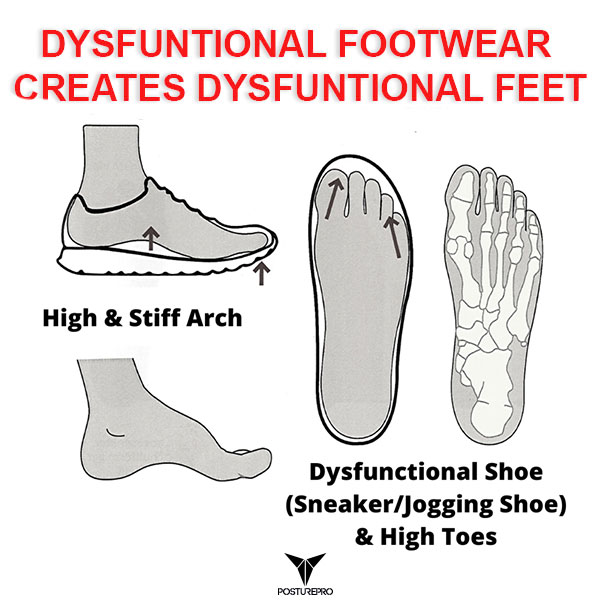
An dieser Stelle sei nur ein Bild zur schnellen grafischen Veranschaulichung eingefügt.

Die “Probleme” mit modernen Sportschuhen, Quelle: Eigene Darstellung.

Des Weiteren habe ich seit mehreren Monaten ein geschlossenes Barfußschuh-Modell sowie Barfuß-Sandalen getestet, um die es sich in diesem Erfahrungsbericht vornehmlich drehen wird.

Beide Modelle habe ich von dem Online-Händler gofreeconcepts(Werbung), der in seinem Shop Barfußschuhe der unterschiedlichsten Marken für verschiedene Gelegenheiten anbietet.

Bei den von mir getesteten Modellen handelt es sich um Schuhe der Marke „Xero Shoes“ und um Sandalen der Firma „Shamma“  

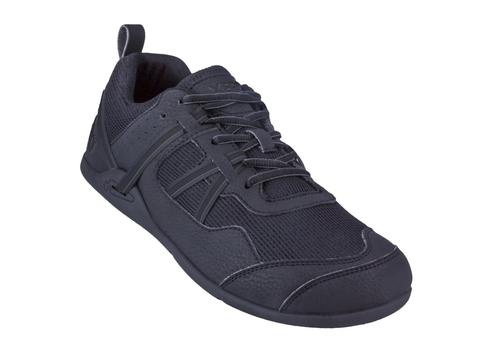
Die Vorteile eines Barfußschuhes möchte ich nun exemplarisch am Beispiel meines Xero Modelles „Prio“ einmal erläutern.

Von mir getesteten Xero Shoes, Modell: Prio, Quelle: © goFree Concepts.

Im Grunde wird der Unterschied zu herkömmlichen (Sport)Schuhen auf den ersten Blick deutlich. Denn Barfußschuhe weisen eine flache Sohle auf und laufen im Bereich der Zehen nicht konisch zu.

Stattdessen bieten sie jede Menge Platz, damit sich die Zehen „entfalten“ können, respektive nicht eingeengt werden, was zu Fuß- bzw. Haltungsfehlstellungen beitragen könnte! Eine flache Sohle ist insofern wichtig, als dass somit Ferse und Zehen Kontakt zum Boden haben.

Vergleicht man einen Barfußschuh mit dem von mir gezeigtem Bild eines herkömmlichen Sportschuhes, so werden die Unterschiede noch deutlicher und man kann deren Bedeutung in den Kontext des Sports besser einordnen.

Aus meiner Sicht sind moderne Sportschuhe gänzlich ungeeignet, insbesondre fürs Kraft- bzw. Muskelaufbautraining.

Natürlich bieten sie, mehr oder weniger ausgeklügelte, Dämpfungssysteme, die Stöße abfangen sollen, doch zu welchem Preis?

Wenn man ein Problem zu eliminieren versucht, dafür aber ein neues kreiert, ist dem Menschen wenig geholfen. So bringt es schließlich auch nichts, wenn man die Pest kuriert, sich dadurch aber mit Cholera ansteckt, um mich eines sehr plakativen Beispiels zu bedienen.

Ob es einer Stoßdämpfung durch physiologisches Schuhwerk wirklich bedarf, bleibt also fraglich. Vielleicht sind viele Pseudo-Athleten und „weekend-warriors“ besser beraten, wirklich professionellen Rat zu suchen und sich einen neuen Laufstil (Vorderfuß) anzueignen.

Ebenfalls zu hinterfragen bleibt an dieser Stelle stets der Punkt der Arbeitsmoral, denn wer eine 10€-Einstellung hat, der wird auch in 100€ Schuhen keine gute Figur machen, und schon gar keine nennenswerten Trainingserfolge erzielen!

Das Schöne an modernen Barfußschuhen ist aus meiner Sicht, dass sie optisch nicht so extrem auffallen, wie es z.B. die erwähnten „Zehenschuhe“ tun.

Wer zu seiner Gesundheit beitragen möchte, aber kein extrovertierter Schuhfetischist ist, der fällt mit den auf dem Mark erhältlichen Modellen kaum auf.

Obgleich Barfußschuhe eine super Möglichkeit als Einstieg in eine Konversation bieten. Schließlich weiß beileibe nicht jeder etwas mit dem Term des Barfußschuhs anzufangen.

Dass dem Leser dieser Artikel wieder als Impuls dienen soll, darf er sich natürlich gerne der erwähnten Wortbedeutung, respektive des Oxymorons bedienen, um stets ein eloquenter Gesprächspartner zu sein….oder, um von Unwissenden fragend angestarrt zu werden 😉

Barfußschuhe – Welche Kriterien sollten erfüllt sein?

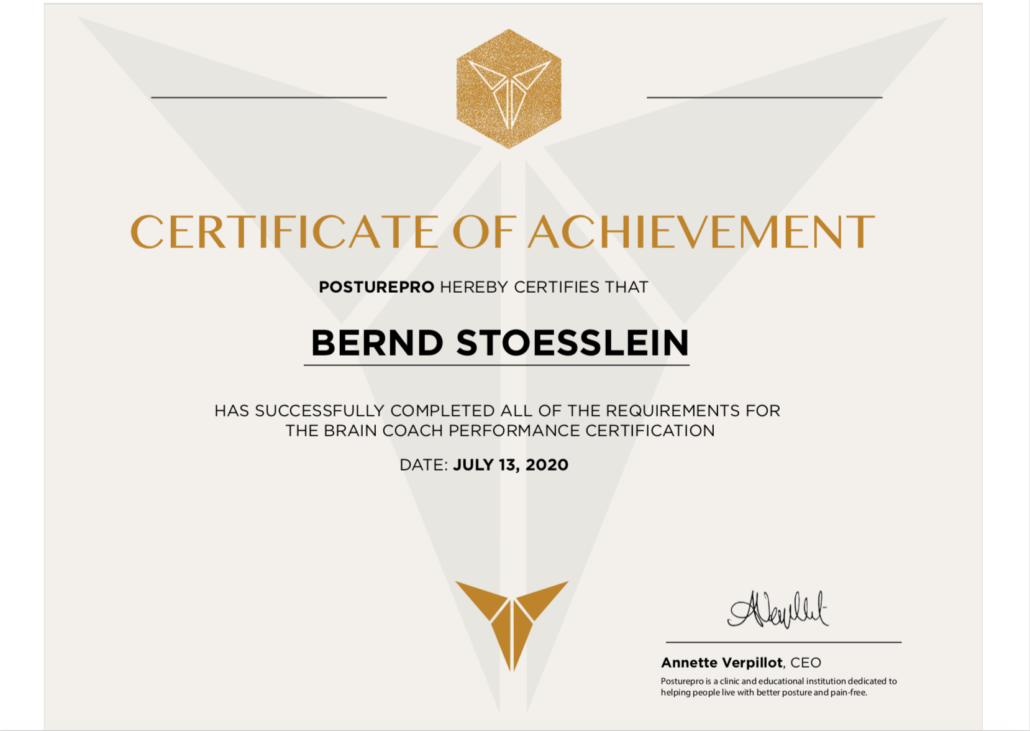
Während meiner Weiterbildung zum zertifizierten „Brain Coach“ von Posturepro habe ich erneut die Bedeutung von „optimalem“ Schuhwerk für die Körperhaltung erfahren.

Mehr zu diesem Thema, und welchen Einfluss das Gehirn auf die Körperhaltung hat, kann man (auf Englisch) sehr ausführlich in folgendem meiner Artikel nachlesen:

 POSTUREPRO BRAIN COACH PERFORMANCE CERTIFICATION REVIEW

Unfunktionelles Schuhwerkt, Quelle:
© Posturepro.

Die falschen Schuhe können also, wie bereits erwähnt, zu einer falschen bzw. pathologischen Körperhaltung beitragen. Dies wiederum kann zu zahlreichen Beschwerden führen, von A wie Atlantoaxialgelenk-Probleme bis Z wie Zehendeformitäten.

Denn durch das Tragen unterschiedlicher Schuhe entsteht auch eine unterschiedliche Verteilung des Körpergewichts, was wiederum Einfluss auf die Knochen sowie Muskeln, Sehnen, Faszien und anderen Weichteilgeweben hat.

Dies stellt insbesondere, aber nicht ausschließlich, ein Problem für Frauen dar, beim Tragen von Stöckelschuhen, wie das folgende Bild verdeutlicht:

Gewichtsverteilung, je nach Absatzhöhe, Quelle: © Posturepro.

Das Pendel zeigt dabei die prozentuale Gewichtsverteilung des eigenen Körpergewichtes auf unterschiedliche Bereiche des Fußes.

Doch es geht bei Weitem nicht nur um die Kräfte, die mechanisch auf unsere Füße einwirken. Laut der traditionell chinesischen Medizin (TCM) existieren auch sogenannte Fußreflexzonen.

Also Bereiche, die mit Organen des Körpers in Wechselwirkung stehen.

Somit stellt sich also die, aus meiner Sicht, berechtigte Frage, ob wir uns mit dem falschen Schuhwerk nicht nur unsere Füße, sondern auch andere, internistische, Bereiche unseres Organismus nachhaltig schädigen könnten!

Dies darf auch gerne in den Kommentaren konstruktiv diskutiert werden.

Barfußschuhe – auch im Sommer?

Wie sieht es eigentlich mit Barfußschuhen im Sommer aus? Ergibt es Sinn, diese auch in den warmen Monaten des Jahres zu tragen? Nun, das kommt wieder ganz auf die eigene Präferenz an und wie stark der eigene Konformitätsdruck ausgeprägt ist.

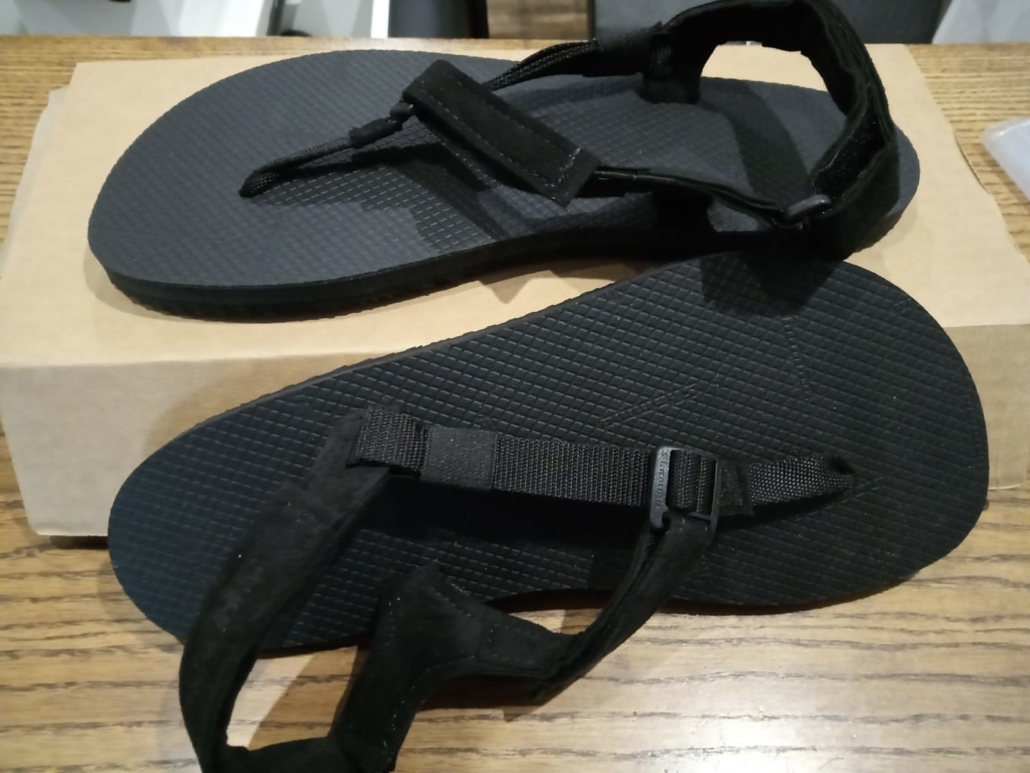
Meine “Shamma” “Mountain Goats”, von goFree Concepts, Quelle: eigenes Bild.

Wer will und kann, der sollte natürlich so oft wie möglich barfuß laufen, auch im Hinblick auf das immer mehr in das Bewusstsein des „Mainstreams“ rückende „Earthing“ bzw. „Grounding“.

Wer mehr über dieses spannende Thema erfahren will, kann dies in einem meiner Blogartikel nachlesen. Bereits vor einigen Jahren hatte ich mich diesem Thema gewidmet:

EARTHING/GROUNDING – WIE ERDEN DICH ZURÜCK ZUR NATUR FÜHREN KANN

Wer allerdings einem Beruf nachgeht, in dem er einer bestimmten Kleiderordnung unterliegt, der kann nicht einfach barfuß durch die Welt stolzieren. Außerdem lauern, nicht nur in urbanen Gefilden, zahlreiche Verletzungsgefahren für Barfußläufer, die ihre Fußsohlen für das natürliche Laufen ohne Schuhwerk noch nicht abgehärtet haben!

Hier können Barfußschuhe, insbesondere dann Barfußsandalen, eine echte Alternative darstellen.

Ich selbst habe diesen Frühling/Sommer solche Sandalen getestet, von der Firma „Shamma“.

Um genau zu sein, das Modell „Shamma Mountain Goats mit UltraGrip Fußbett“.

Dieses und andere Modelle sind ebenfalls über gofreeconcepts.de (Werbung) erhältlich.

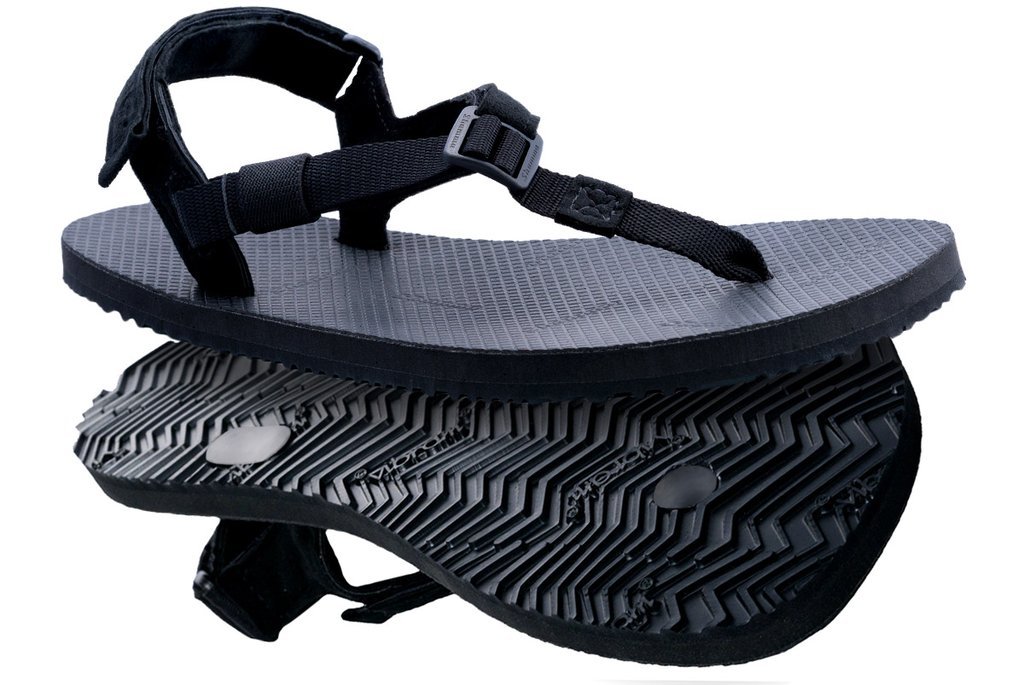
Die von mir getesteten Sandalen der Marke “Shamma”, Modell “Mountain Goats”, Quelle: © goFree Concepts.

Soweit es die Witterungsbedingungen zuließen, habe ich den kompletten Sommer hindurch sehr gerne meine „Shammas“ getragen. Der Tragekomfort war wirklich sehr hoch und das Bändchen zwischen den Zehen hat, wiedererwartend, kein unangenehmes Gefühl erzeugt!

Die Sohle dieses Sandalenmodells ist 1cm dick und damit die robusteste Variante des Modells. Alternativ stehen aber z.B. auch Ledersohlen zur Auswahl.

Was kann ich sonst über diese tollen Sandalen sagen? Sie kommen dem Barfußlaufen sehr nahe, aber man hat – dank des Fersenriemens – stets einen festen Antritt, auch wenn man mal etwas sportlicher unterwegs ist.

Apropos Sport, man kann diese Sandalen übrigens auch zum Krafttraining tragen. Dies habe ich mehrfach erfolgreich getestet! Man sollte natürlich stets darauf achten, dass die Riemen ausreichend festgezurrt sind, sodass man stets einen festen Halt hat!

Eine super Alternative zum Training baren Fußes.

Dies ist zwar toll, aber in kommerziellen Sportstudios nicht gerne gesehen bzw. sogar untersagt. Wer dennoch Schweißfüße umgehen möchte, dem bieten die „Shammas“ eine tolle Alternative.

Barfußschuhe Fazit/Conclusio

Was kann ich abschließend nun für ein Resümee über Barfußschuhe ziehen?

Zum einen, dass ich, soweit möglich, nur noch diese Sorte von Schuhen tragen und empfehlen werde.

Zum anderen, dass ich mit diesem Artikel Bewusstsein über die Bedeutung eines ordentlichen Schuhwerkes schaffen möchte.

Barfußschuhe kosten nicht mehr als andere (Sport)Schuhe bekannter Hersteller, sondern eher sogar weniger.

Auch wenn Barfußschuhe vielleicht nicht zu den allerschönsten Schuhen zählen, so findet man mittlerweile auch eine Vielzahl an tollen Modellen.

Schlussendlich heißt es ja bekanntlich „de gustibus non est disputandum“, zu Deutsch: Über Geschmack lässt sich (nicht) streiten.

Sobald man sich also von lächerlichen Modezwängen befreit hat, kann man sich auf die Socken machen und nach ein paar tollen Barfußschuhen suchen.

Eine große Auswahl und kompetente Beratung gibt’s bei gofreeconcepts.de(Werbung).

Hat dir dieser Artikel gefallen? Dann teile ihn mit deinen Freunden, hinterlasse einen Kommentar, abonniere den Newsletter/Blog und/oder schreibe mir eine E-Mail, an:

info@bernd-stoesslein.de

© HP Bernd Stößlein, Master of Business Administration in Sportmanagement.

In diesem Artikel findest du den ein oder anderen „Affiliate Link“, zu amazon. Wenn du über diesen Link etwas erwirbst, dann unterstützt du damit meine Blogartikel und schaffst Ressourcen für weitere qualitativ hochwertige Recherchen und Artikel wie diesen. Es entstehen für dich dadurch keine Mehrkosten! Alle meine grundsätzlichen Empfehlungen findest du unter: https://www.amazon.de/shop/bernd_stoesslein


Literatur

Oxymoron, Quelle: https://de.wikipedia.org/wiki/Oxymoron, Zugriff vom 6.10.20.

Bellicon – das beste Trampolin? In meinem Erfahrungsbericht gehe ich dem auf den Grund.

Das lymphatische System/Lymphsystem – ein Wunderwerk der menschlichen Anatomie.

Das Thema „Entgiftung“ (engl. detox) ist derzeit in aller Munde und wird schon inflationär gebraucht.

Es gibt bereits unzählige „Detox-Produkte“, von Nahrungsergänzungsmitteln bis hin zu Kosmetika, die angeblich zur „Entgiftung“ deines Körpers beitragen sollen. Chlorella, Spirolina, Moringa und Co. sind mittlerweile vielen ein Begriff und selbst in zahlreichen Lebensmittel-Discountern zu haben.

Für jedes Organ gibt es bereits spezielle „Entgiftungs-Produkte“, die vermeintlich Abhilfe  bei Giftstoffen wie z.B. Rückstände von Chemikalien, Schwermetallen (Aluminium, Blei etc.) und der berühmt-berüchtigten „Schlacke“ schaffen sollen.

Doch hast du dich im Kontext dieser vermeintlichen „Entgiftung“ und der Produktvielfalt überhaupt einmal eingehend mit deinem Lymphsystem beschäftigt?

Erfahre, welche Bedeutung dein Lymphsystem in Bezug auf die „Entgiftung“ deines Körpers hat und wie du ihm, – m.M.n. – etwas „auf die Sprünge“ helfen kannst…

Das lymphatische System – primär und sekundär lymphatische Organe

Beim sogenannten lymphatischen System/Lymphsystem handelt es sich – wie auch beim Blutgefäßsystem – um ein Transportsystem innerhalb des menschlichen Organismus.[1]

Die Wortbedeutung „Lymphe“ kommt dabei übrigens von altgriechisch „Lympha“ und bedeutet Wasser, klares Fluß- und Quellwasser und/oder Flüssigkeit der Lymphgefäße“. [2]

Der Begriff Lymphgefäß (Vasa Lymphatica) – wie wir ihn heute noch in der medizinischen Fachsprache gebrauchen – stammt übrigens von dessen „Entdecker“ bzw. dem bekanntem Erstbeschreiber, dem dänischen Arzt, Thomas Bartholin (1616-1680). [3]

Das Lymphsystem hat grundsätzlich drei Aufgaben:

  1. Immunabwehr
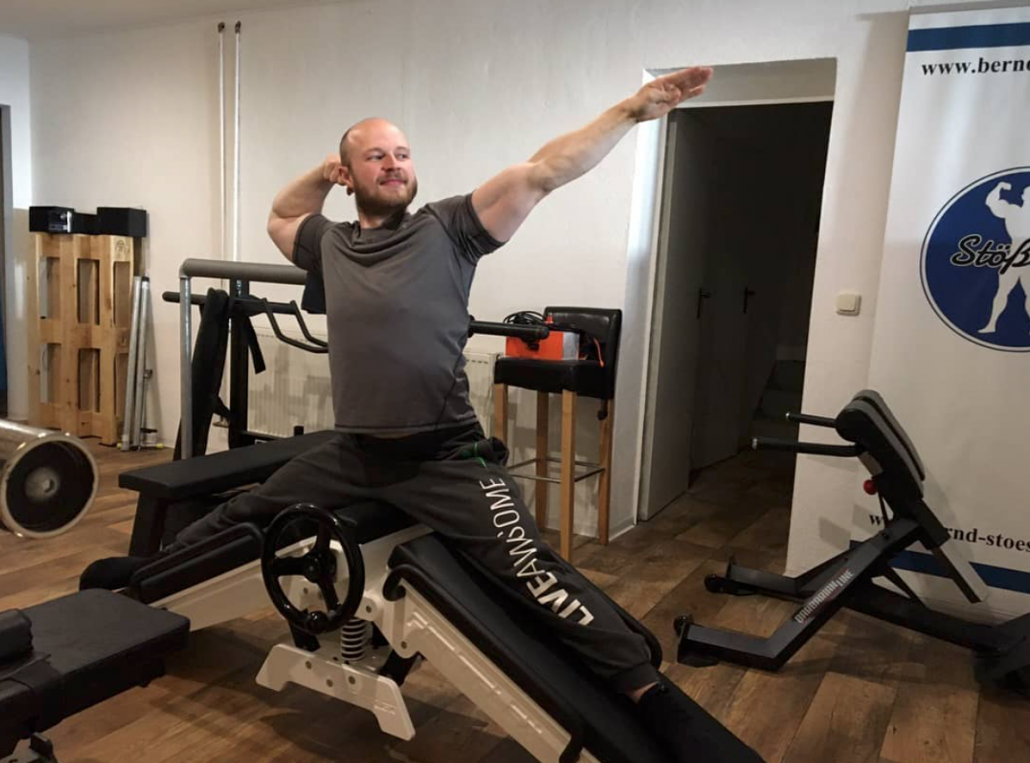
  2. Nährstofftransport
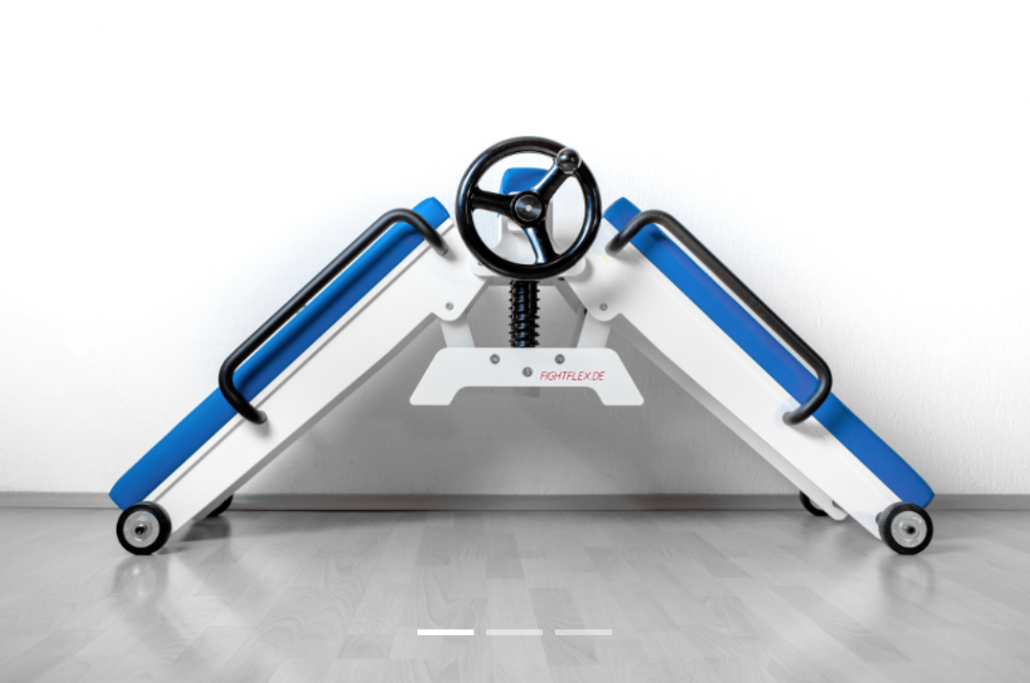
  3. Rückführung der interstitiellen Gewebeflüssigkeit in den Blutkreislauf

Im Gegensatz zum Blutkreislauf handelt es sich beim Lymphsystem allerdings nicht um ein geschlossenes, sondern um ein „offenes“ Kreislaufsystem. Die Lymphgefäße weisen nämlich einen recht permeablen (also vergleichsweise durchgängigen) Wandaufbau auf!

Es wird dabei zwischen  primären und sekundären lymphatischen Organen unterschieden.

Zu den primären Organen des lymphatischen Systems zählen:

  1. Das Knochenmark
  2. Der Thymus

Zu den sekundären Organen des lymphatischen Systems gehören:

  1. Die Milz
  2. Die Lymphknoten

Je nach Literatur versteht man also unter einem Lymphsystem ein komplexes Netzwerk, das sich aus lymphatischen Organen und einem feinsandigen Lymphgefäßsystem zusammensetzt.

Im Lymphsystem wird die Lymphflüssigkeit gebildet und auch transportiert. Der Mensch hat etwa dreimal so viel Lymphflüssigkeit wie Blut.

Während das Blut allerdings konstant durch deinen Herzschlag im Fluss gehalten wird, hat das Lymphsystem keine direkte Pumpe, um die Flüssigkeit zirkulieren zu lassen, obgleich die Lymphgefäße allerdings auch Klappen – zur Weiterleitung/zum Transport – besitzen und in ihrem Aufbau somit Venen ähneln.

Die Lymphflüssigkeit sammelt sich in Gewebespalten wo sie in den Lymphknoten gefiltert und anschließend in den Blutkreislauf zurückführt wird.

Lymphsystem reinigen – Alles sollte im Fluss sein           

Da die Lymphflüssigkeit nicht durch deinen Körper gepumpt wird, „steht“ sie quasi, dennoch ist sie aber eigentlich dafür verantwortlich, deine Zellen, ganz einfach gesagt, zu „waschen“. 

Du kannst dir dies bildlich wie einen Fluss vorstellen, der aufgestaut wird. Wird der Fluss des Gewässers nun behindert und dort eine Menge Gift hineingeleitet, dann wird alles in diesem Fluss nach und nach absterben.

Ähnliches geschieht auch in deinem Lymphsystem, wenn du dieses nicht – wie gesagt -„im Fluss hältst“.

Wofür ist das Lymphsystem zuständig?

Die Kapillaren des Lymphsystems befinden sich mitten im Gewebe, vergleichbar etwa einer Struktur eines Netzes und sie beginnen einfach „blind“.

Deine Lymphkapillaren sorgen für den Abtransport des „groben“ Abfalls (aufgenommene Nahrung, eingeatmete Luft, etc.), der sich in deinem Körper ansammelt.

Zu diesem Abfall gehören u.a. Bakterien(gifte) – und wie bereits erwähnt – Schwermetalle und Chemikalienrückstände, aber auch Viren, Pilze, entartete und/oder auch alte Zellen usw.

Diese Gifte/Stoffwechselabbauprodukte etc. müssen dann natürlich auch abtransportiert werden. Dies geschieht – wenn dein Lymphsystem im Fluss ist – in der Lymphflüssigkeit (der sog. Lymphe) bzw. in den sogenannten Lymphknoten.

Da aber – wie bereits erwähnt – im Gegensatz zum Blutkreislauf das Lymphsystem kein in sich geschlossener Kreislauf ist, wird die (im Idealfall) von Giftstoffen gereinigte Lymphflüssigkeit dann zum sogenannten „Venenwinkel“ transportiert und  gelangt von dort aus in den venösen Teil des Blutkreislaufes (siehe Bild).

Methoden zur Lymphfluss Aktivierung

Durch eine tiefe „Bauchatmung“ oder aerobes Training wie z.B. Schwimmen oder Fahrradfahren kann dein Lymphsystem „in Gang“ gehalten werden. Wie du eine solche „Bauchatmung“ trainieren kannst und welche nützlichen „Werkzeuge“ du dafür nutzen kannst, erfährst du in meinem Artikel:

OXYGEN ADVANTAGE, BESSER ATMEN?

Eine weitere ganz einfache – wenngleich auch aus meiner Sicht hocheffiziente – Übung zur Unterstützung des Lymphsystems ist das Schwingen oder Springen auf einem Trampolin.

Dr. Leonard Coldwell empfiehlt – zur Aktivierung der Selbstheilungskräfte –  hierzu dreimal am Tag exakt sieben Minuten auf einem – wie er es nennt – „Rebounder“ (Minitrampolin) zu schwingen , um das Lymphsystem „auf Trapp“ zu halten. [4]

Ein solches Trampolin ist praktisch und nimmt nicht viel Platz weg.

Angebote von Herstellern  finden sich wohl mittlerweile wie Sand am Meer. Selbst die Lebensmitteldiscounter sind ja mittlerweile auf den „Fitness-Trend“ aufgesprungen und bieten regelmäßig entsprechende Produkte an.

Ich empfehle dir aber auch in diesem Fall wieder in ein qualitativ hochwertiges Produkt zu investieren, denn an diesem hast du immer länger deine Freude!

Außerdem lässt sich hier der Unterscheid zwischen einer Ausgabe und einer Investition deutlich erkennen.

Ich selbst nutze z.B. für meine tägliche Morgen- & Abendroutine*, ein Trampolin bellicon. DerVorteil dieses Modelles liegt ganz klar in der Belastbarkeit und der Anwendbarkeit für viele unterschiedlich gebaute Benutzer.

Bellicon – bestes Trampolin?

Gleich vorweg: Als passionierter und professioneller „Consulting Biohacker“ und Heilpraktiker habe ich bereits Trampoline der unterschiedlichsten Hersteller ausprobiert, bevor ich auf mein aktuelles Modell von bellicon gestoßen bin.

Ich gehe deshalb so ausführlich auf dieses Modell ein, weil ich die, aus meiner Sicht wichtigen Unterschiede, zu preislich deutlich günstigeren Trampolinen herausarbeiten möchte.

Mein bellicon in meinem Wohnzimmer. Der Haltesteg mit Griff kann jederzeit an- oder abmontiert werden. Quelle: eigenes Bild.

Bei Trampolinen ist es, wie überall, man erhält das, was man investiert. Ich schreibe bewusst „investiert“ und nicht bezahlt, weil ein Minitrampolin, meiner Meinung nach, eine Investition in die eigene Fitness, respektive Gesundheitserhaltung darstellen kann.

Als ich vor einigen Jahren auf das Thema Minitrampolin und die bereits erwähnten potentiell positiven Auswirkungen auf den menschlichen Organismus gestoßen bin, hatte ich mir ein sehr günstiges Trampolin aus einem bekannten online Versandhandel geordert.

Dieses war mit Metallfedern als Suspension ausgestattet…Sicher unnötig zu erwähnen, dass sich Abfedern auf diesem Trampolin anfühlte, als würde man auf Beton landen. Keine gute Investition und sicher nicht zweckdienlich!

Besagtes Trampolin verschwand dann auch gleich wieder in der „Versenkung“ und ich war auf der Suche nach einer neuen, besseren Version, mit Gummiseilen als Federung.

Gesagt, getan, so ergatterte ich ein solches Produkt, für gut 100€, bei einem Online Fitness-Händler. Dieses war dann, zugegebener Maßen, auch deutlich weicher in der Abfederung als das Metall-Springfeder- Modell, welches ich zuvor nutzte.

Optional konnte man sogar einen Haltestab montieren. Sehr praktisch, vor allem wenn ich mit Kunden und/oder Patienten arbeite, die (noch) wenig Gleichgewichtssinn besitzen oder diesen erst wieder erlernen müssen/wollen.

Das Problem an besagtem Trampolin war aber, dass lediglich ein einziges, langes Gummiseil „verbaut“ wurde, um die Federwirkung zu erzeugen.

Das ging so lange gut, bis dieses Seil, wie sollte es auch anders sein, riss. Damit war natürlich das gesamte Trampolin unbrauchbar und ich musste mir einen Ersatz zusenden lassen.

Warum berichte ich darüber so „en detail“? Um dem geneigten Leser möglichst deutlich zu beschreiben, warum er deutlich beschwingter von einem bellicon Trampolin profitiert.

Da man den Unterschied erleben, respektive „erspringen“ muss, bleibt mir über das Medium des Blogartikels nur eine möglichst virtuose Beschreibung des Ganzen.

Reden wir nicht lange um den heißen Brei, ein bellicon Trampolin ist um einiges teurer als Trampoline, die man in Discountern, Online-Versandhäusern oder dem Sportladen „um die Ecke“ erstehen kann.

Das Modell „classic“ z.B. startet ab 399€. Damit ist es, auf den ersten Blick, der nur einen Preis und keinen Wert kommunizieren kann, fast viermal so teuer wie vergleichbar große Trampoline.

Lange Rede kurzer Sinn: Ja, die Investition lohnt sich.

Mein bellicon, das ich gerne zusammen mit anderen “mobility tools” nutze, z.B. in einer Routine. Quelle, eigenes Bild.

Sicher, das stellt nur meine subjektive Sicht der Dinge dar, aber aus meiner Expertise als Strength and Conditioning Coach, Personal-Trainer, Heilpraktiker, Produkterfinder und Biohacker, maße ich mir einfach mal an, den Unterschied zwischen einem hochwertigen und  einem minderwertigen Fitnessprodukt erkennen zu können.

An dieser Stelle möchte ich aber auch, wie stets, mit Nachdruck betonen, dass der Leser mir nicht einfach blind glauben sollte, sondern sich seine eigene Meinung, in diesem Fall, „erspringen“/“erschwingen“ sollte! Dann sollte der Unterschied deutlich werden.

Was die bellicon Modelle so genial macht, ist deren Liebe zum Detail. So gut wie alles kann an diesen Trampolinen den eigenen Bedürfnissen entsprechend angepasst werden.

Von der Größe des Trampolins, über die Farbe und die Stärke der Gummifedern bis hin zu den Standfüßen (optional einklappbar).

Begeistert hat mich, aufgrund meiner bereits erwähnten Erfahrung mit günstigeren Produkten und gerissenen Gummiseilen, dass man die Gummizüge des bellicon separat austauschen kann.

Das bedeutet, dass sehr viele kleine Gummizüge verbaut werden, statt eines langen Seils!

Die separate Gummizug-Befestigung ermöglicht einen einfachen und schnellen Wechsel. Die Stärke der Federwirkung kann bei bellicon ebenfalls ausgewählt werden. Hier im Bild die kleinen gelben Gummis, Quelle: eigenes Foto.

Sollte, wieder erwartend, doch mal eines reißen, so lässt sich dieses schnell, einfach und kostengünstig austauschen! Eine klasse Sache!!!

Eine nette Spielerei ist übrigens auch die Möglichkeit, das Trampolin farblich den eigenen Wünschen anzupassen. Neudeutsch nennt sich das ja mittlerweile „customizing“.

Mein bellicon hat, in der von mir gewählten Konfiguration, übrigens einen Wert von etwa 740€. Übertrieben, mag der ein oder andere nun denken.

Doch ich nutze das Trampolin, wie gesagt, nicht nur für mich selber, sondern es kommt auch professionell zum Einsatz, in meiner Naturheilpraxis bzw. meinem Personal-Training Studio!

Das Training ist nichts, der Wille ist alles! Gleich danach kommt der Trainingserfolg, von vielen anderen Parametern natürlich auch abhängig von den Möglichkeiten (in diesem Fall dem Zugang zu hochwertigem Trainingsequipment)!

Aus diesem Grund steht bei mir nun auch ein Minitrampolin von bellicon.

Wer sein Trampolin verstauen mag/muss, der hat optional die Möglichkeit einklappbare Standfüße auszuwählen. Quelle: eigenes Bild.

Weitere Vorteile/Einsatzmöglichkeiten des Trampolin-Trainings

Das Schwingen oder zu diesem Einsatz auch das Springen/Hüpfen auf einem Trampolin ist – aus meiner Sicht – wie Krafttraining, aber quasi auf „Zellebene“.

Durch das Schwingen/Springen/Hüpfen werden – m.M.n. – alle etwa 100 Billionen Zellen des menschlichen Organismus „durchgepumpt“ bzw. „trainiert“.

Sehr gut gefällt mit in diesem Zusammenhang auch der Begriff des „Cellercising“ (David Hall) also eine Wortkreation aus den englischen Worten „cell“ für Zelle und „exercise“ für Übung. Also zu deutsch: „Zelltraining“.

Des Weiteren gibt es beim Schwingen eine, vergleichsweise, sehr geringe Gelenkbelastung (Hüftgelenke, Kniegelenke etc.), was den Einsatz auch für Menschen denkbar macht, die z.B. an Arthrose, Arthritis, sekundärer Mitochondriopathie leiden oder vielleicht künstliche Gelenke haben.

Wer keine Lust auf monotones Cardiotraining hat, der kann auch über eine Alternative auf dem Trampolin nachdenken. Denn, mal ehrlich, wem macht es keinen Spaß, auf einem Trampolin zu hüpfen?! Training sollte einem ja auch Freude bereiten.

Da gerade viele Kraftsportler keine Anhänger von Herz-Kreislauftraining sind, wäre ein Cardio-Trampolin-Training ja mal vielleicht eine Abwechslung zum stupidem, monotonem Ergometer-Strampeln, oder?

Somit ist also quasi für jeden der Einsatz einen solchen Trampolins denkbar und die Einsatzmöglichkeiten sind durchaus vielfältig!

* Meine Morgenroutine sieht folgendermaßen aus:

  1. Toilettengang
  2. 7 Minuten Schwingen auf dem Trampolin
  3. Mindestens 500 ml gefiltertes, ionisiertes (alkalisches/basisches), strukturiertes und mit Biophotonen angereichertes Wasser, mit einer Prise Himalaya Salz, trinken
  4. Duschen, mit gefiltertem und strukturiertem Wasser
  5. Eventuell Frühstück. Wenn, dann dazu meine hochwertigen Nahrungsergänzungsmittel

*Meiner Abendroutine sieht folgendermaßen aus:

  1. Ab etwa 21 Uhr, tragen einer „Blue Blocker“ Brille (Affiliate Link)
  2. 7 Minuten Schwingen auf dem Trampolin
  3. Etwa 45-minütige Meditation
  4. Zähneputzen
  5. 4-6 Kapseln Multi Magnesium 7 mit Vitamin C (siehe Online-Shop/Link in Morgenroutine)
  6. Schlafen gehen

Wie kann man das Lymphsystem noch anregen?

Neben aerobem Training – also Training unter Sauerstoffgewinnung – wie z.B. Intervalltraining auf einem Air-Bike, Schwimmen oder dem Schwingen auf einem Trampolin, gibt es noch die „klassische“ Methode der bekannten manuellen Therapiemethode: die Lymphdrainage.

Therapeuten (meist speziell ausgebildete Physiotherapeuten oder Masseure), die Lymphdrainage anbieten, findest du mittlerweile fast in jedem Ort, nutz dazu einfach eine Internet Suchmaschine deiner Wahl, um jemanden in deiner Nähe zu finden.

Wann ist eine Lymphdrainage sinnvoll?

Grundsätzlich ist die Reinigung deines Lymphsystems – m.M.n.  – immer von größter Wichtigkeit.

Denn du bist nicht das, was du isst, sondern letztlich wohl das, was dein Körper an Giftstoffen nicht auszuscheiden vermag! Oder wie Wade Lightheart zu sagen pflegt:

„The solution to polution is dialution“

Zu Deutsch etwa:

„Die Lösung für Verschmutzung ist Verdünnung/Verwässerung/Ausleitung“.

Die Lymphdrainage kann aber auch akut immer dann helfen, wenn sich Lymphflüssigkeit im Gewebe anstaut und dadurch Schwellungen verursacht.

Dein Lymphabfluss kann aber auch häufig nach einer Operation behindert sein, wenn während der OP Lymphbahnen durchtrennt oder gar entfernt worden sind.

Weitere Anwendungsgebiete für eine Lymphdrainage bzw. die Reinigung des Lymphsystems durch eigene Anwendungstechniken (wie Trampolinschwingen) sind Sportverletzungen oder z.B. auch Venenschwäche.

Kein Fluss – kein Leben ?  

Ist dein Lymphsystem nicht „im Fluss“ (Lymphstau), d.h. ist es verschlackt oder durch andere Umstände beschädigt, so hat dies sicher auch Auswirkungen auf deine physische und psychische Leistungsfähigkeit.

Ein Lymphstau (Lymphödem) kann z.B. folgende Auswirkungen haben:

  • Schwellungen (Ödeme)
  • Cellulite
  • Infektionen
  • Vergiftung
  • chronische Erkrankungen
  • Krebs

Mein Lymphreinigungs-Protokoll

Wie gehe ICH vor, um MEIN Lymphsystem optimal zu reinigen?:

  • Regelmäßige Überprüfung meiner Darmgesundheit und Ausschluss möglicher Erkrankungen, wie z.B. „Leaky Gut“. Anschließend eine ausreichende Reinigung des Darms, verbunden mit einer Optimierung der Darmflora.
  • Danach erst eine Reinigung meines Lymphsystems, um dieses nicht zusätzlich mit Giftstoffen zu belasten.
  • Regelmäßiges Krafttraining (mindestens 3 Mal pro Woche) und die oben beschriebenen Methoden (wie Trampolinschwingen), um aktiv einem Lymphstau vorzubeugen bzw. dessen Reinigung zu unterstützten.
  • Konsum ausreichend „guter“ Flüssigkeit (am besten strukturiertes, gefiltertes, ionisiertes Wasser). Am besten gefiltertes Wasser ohne Rückstände (keine Plastikflaschen mehr und kein Leitungswasser!) Mehr zum Thema Plastik-Wasser findest du in vielen verschiedenen Artikeln auf meinem Blog. Nutze dafür einfach die Suchfunktion.
  • Kompletter Verzicht auf jegliche Art von Fluoridquellen. Mehr über Fluorid findest du ebenfalls auf meinem Blog.
  • Regelmäßiger Konsum hochwertigen Cistus Incanus (Zistrosen Tee)
  • Eigenbehandlung mit frequenzspezifischem Mikrostrom (Bioelektrizität)

Fazit/ Conclusio

Aus meiner Sicht ist das Lymphsystem/lymphatische System eine Art „Kläranlage“ deines Körpers.

Neben all den „tollen“ Produkten, die sich unter dem Schlagwort „Detox“ subsummieren, wird sich m.M.n. viel zu wenig um unser Lymphsystem gekümmert.

Obwohl das Thema der „Entgiftung“ mittlerweile schon Mainstream-Charakter hat, wird dennoch das Lymphsystem allzu oft vernachlässigt bzw. übersehen. Dabei ist – m.M.n. – ein gesundes Lymphsystem für deine psychische und physische Leistungsfähigkeit unabdingbar.

Da wir Mitteleuropäer fast alle viel zu flach atmen, wird auch unser Lymphsystem nur noch unzureichend „im Fluss“ gehalten. Dies ist aber wichtig, da das Lymphsystem – wie beschrieben – kein in sich geschlossenen Regelkreis besitzt und über keine „ große Pumpe“, sondern nur über ein Klappensystem verfügt.

Ob das Herz wirklich eine Sog- Druckpumpe ist, muss auch hinterfragt werden; aber dies ist wohl Stoff für einen Extra-Artikel 😉

Zusammenfassend ist es um so wichtiger, dass du aktiv für die Aufrechterhaltung des „Flusses“ der Lymphe sorgst, um deine Lymphknoten bei der Reinigung deines Organismus zu unterstützen und für ein ausreichend starkes Immunsystem zu sorgen.

Ich nutze – wie bereits erwähnt – hierfür u.a. ein Mini-Trampolin und empfehle – wie immer – diesbezüglich die Anschaffung eines hochwertigen Gerätes. Meine Wahl fiel deshalb, wie oben ausgeführt, auf das Trampolin von bellicon.

Hat dir dieser Artikel gefallen? Dann teile ihn mit deinen Freunden, hinterlasse einen Kommentar, abonniere den Newsletter/Blog und/oder schreibe mir eine E-Mail, an:

info@bernd-stoesslein.de

© HP Bernd Stößlein, Master of Business Administration in Sportmanagement.

In diesem Artikel findest du den ein oder anderen „Affiliate Link“, zu amazon. Wenn du über diesen Link etwas erwirbst, dann unterstützt du damit meine Blogartikel und schaffst Ressourcen für weitere qualitativ hochwertige Recherchen und Artikel wie diesen. Es entstehen für dich dadurch keine Mehrkosten! Alle meine grundsätzlichen Empfehlungen findest du unter: https://www.amazon.de/shop/bernd_stoesslein


Literatur

Body acceleration distribution and O2 uptake in humans during running and jumping,

A. Bhattacharya, E. P. McCutcheon, E. Shvartz, and J. E. Greenleaf, Quelle: https://doi.org/10.1152/jappl.1980.49.5.881, Zugriff v. 20.09.2020.

Human lymphocyte activation is depressed at low-g and enhanced at high-g

A CogoliM ValluchiJ ReckM MüllerW BrieglebI CordtC Michel

[1] Vgl. W. His: Die anatomische Nomenclatur. Nomina Anatomica. Der von der Anatomischen Gesellschaft auf ihrer IX. Versammlung in Basel angenommenen Namen. Verlag Veit & Comp., Leipzig 1895.

[2] Vgl. Lateinisch-griechischer Wortschatz aus der Medizin, S. 128.

[3] Vgl. Nikolaus Mani: Lymphe, Lymphgefäße. In: Werner E. Gerabek, Bernhard D. Haage, Gundolf Keil, Wolfgang Wegner (Hrsg.): Enzyklopädie Medizingeschichte. De Gruyter, Berlin/New York 2005, ISBN 3-11-015714-4, S. 875.

[4] Vgl. https://www.youtube.com/watch?v=qZ_18LsM0pE, Zugriff vom 1.1.19.

Neck Flex – Due to my observation, expertise neck training, besides grip training, is one of the most neglected and underrated parts of strength training. In amateur as well as in professional sports! Just keep in mind, that only because someone pretends to be, or even is, a professional athlete (which is even worse and also embarrassing for his or her trainer) they are not necessarily doing professional workouts! Prepare for some serious neck attacks in this article! I’ll show you how you can proceed from a pencil neck to getting “yoked” with a cool neck training tool, the Neck Flex Pro, and the according techniques.

Let’s get yoked…

Neck Flex  – The Story behind the tool

I communicated with the very friendly staff from Neck Flex as I wanted to know more about what drove them to create their stunning neck training tool. They said:

The co-founders of the Neck Flex both had varying backgrounds in fitness when coming together with the ideals which supported the need for a new and innovative approach to neck training and development.”

They further stated that:

“There was an obvious need for attention to be drawn towards athletes and the importance of neck strength in order to ideally prevent neck and head injuries. The more research that was conducted, the more it became apparent how vital neck strength truly was in preventing these common neck and head injuries that often occur within the field of contact sports and also within the military.”

Moreover they told me:

“As all this research came flooding in, it was then and there that it was decided to create the most effective and versatile neck training device. Everybody is mostly familiar with the standard methods of neck training, such as plate loading with chained head harnesses, machine based neck stations, bridging, and also isometrics.”

In addition to that they wrote:

“So based off the those standard methods, a design was orchestrated that could not only provide a limitless range of motion and resistance, but also provide a very high level of safety in which virtually any gender, age, or background could easily use the product.“

According to that they continued with:  

“After a couple years of testing and development the Neck Flex was finally ready for action. Every step was taken to ensure that the Neck Flex was of the highest quality and a step above all others that have come before.”

Concluding they added:

“The ultimate goal of Neck Flex is to promote and provide the means in which to effectively and efficiently train the neck for everyone from contact sports, military members, youth sports, fitness enthusiasts, and also to those just looking to simply firm or tone their necks. Whatever your training goal is… Neck Flex has got you covered.” (Neck Flex, 2020)

Neck Flex MMB Pro Series, source: Neck Flex.

Neck Training – Last but (not) least?

As you know the saying normally goes: “last, but NOT least”. Unfortunately when it comes to the training of the neck it is probably the opposite!

Of course some bodybuilders build their traps (as traps are supposed to be the “new” abs) but most often only emphasize the upper part of the m. trapezius, which is only ONE of many muscles that enable the movement of your neck!

Moreover, from a sport-specific training point of view, lots of athletes suffer from something that Charles R. Poliquin, aka “Strength Sensei” (R.I.P.) used to call structural balance deficiencies.

According to that it is not uncommon for athletes suffering from faulty movements and/or bad posture.

What your brain has to do with your movements, how your eyes, respectively your sight influence your posture etc. can be found in depth in my article:

POSTUREPRO BRAIN COACH PERFORMANCE CERTIFICATION REVIEW

There are literally thousands of tests to perform/asses restricted movements and or postural deficiencies/disbalances and exercises to correct them. But, how many (ever professional) athletes have you seen performing proper neck training?


It is hardly done and sadly overlooked too often! Why? To be honest I don’t know! Neck training and grip training are probably the two most overlooked things, when it comes to (professional) strength and conditioning training.

More about how to become a certified strength and conditioning coach can be found in my article:

NCSF CERTIFIED STRENGTH COACH REVIEW

Back to the neck: When you are training in a sport specific manner it differs way from what people like to call “fitness” training. Fitness training is more about burning (as much as possible) calories, i.e. in order to lose excessive body fat.

Sport specific strength on the contrary focuses on sparing calories while improving an athlete’s economy, depending on the sport he/she wants to perform (team sport vs. individual sport).

Depending on that, it makes sense that you must train an athlete not only to be strong or to be “in good shape” (lean, and muscular) but in a manner that he/she is able to perform at his/her best during a competition.

That is important as it emphasizes that neck training, in the first place, is not meant to be an aesthetical integration into e.g. a bodybuilding routine.

Remember, as Louie Simmons from Westside Barbell quoted: “big ain’t strong. Strong is strong”. Furthermore, being muscular does not necessarily mean that someone is strong, too!.

But what actually is strength? Well, as this is not the main topic of this article I’ll only give you a very short explanation:

Physical strength is determined by the cross-sectional area of muscle fibers as well as the intensity of so called “motor-unit” recruitment (quality and quantity).

In a nutshell, strength does not equal power, power is not the same as work and/or force and so on.

As you can see, strength and conditioning training is far more complicated than simple “pumping up” in the gym.

You must assess and correct an athlete’s weakness, and create a proper structural balance.

That’s where neck training comes into consideration, as a “pencil neck” won’t be able to enhance an athlete’s performance through increased strength nor enable improved shock absorption capacities in sports with lots of collisions, like American Football or Rugby.

Using the Neck Flex on a cable pulley, source: own picture.

Neck issues and its correlation to chronic fatigue syndrome?

Besides being a Strength and Conditioning Coach/Personal-Trainer & Consulting Biohacker I’m also working in Germany as a “Heilpraktiker”, too.

A proper translation would be something like “complementary and alternative medicine practitioner”. I’m allowed to diagnose and treat disease (with restrictions) and i.e. use invasive techniques, e.g. injections and/or i.v. infusions.

I see lots of patients in my practice who are complaining/suffering from chronic fatigue syndrome, aka “secondary mitochondropathy”. Now I can hear you asking: “What might have mitochondria and a syndrome to do with the training of the neck?”

Well according to Dr.Dr. Kuklinski (affiliate link) an instability of your neck can cause a wide range of (severe) symptoms you normally would not automatically associate with your neck!

Accidents (trauma) and overstretching can damage ligament structures in the neck joint which might lead to a permanent hypermobility in the neck!

Depending on the  head’s postures, this hypermobility might lead to circulatory disorders in the brain, e.g. dizziness, rapid heartbeat or visual field deficits.

Often this isn’t  noticed at all or, as mentioned before, not associated with “issue in the tissue” of your neck.

In addition to that, these circulatory disorders may also occur during sleep, depending on your head resting position.

The brain cells then will start to “panic”, in fear of suffocating, due to lack of oxygen. In response to the circulatory disorder, they release large amounts of nitric oxide (NO).

Dr. Dr. Kuklinski calls this: “nitrosative stress”. The excessive release of NO might lead to the destruction of intracellular vitamins and might excrete micronutrients through the urogenital tract.

This is such an interesting topic, but it is not the main part of this article! I just, again, wanted to show you how many facets the training of your neck “kaleidoscope” has ! And most of them are overlooked.

Like all of my blogposts this one is intended to give you some impulses and to be used as a springboard to your own research!

The only thing I can do is aid you how to help yourself.

Neck Flex – How to attack your neck?

Like in most of my articles about training devices, I like to make a short  but necessary excursion into functional anatomy. Just to give you an overview of how the Neck Flex can be usefully integrated in a structured training program

So, let’s have a look at the neck!

Most important muscles of your neck:

  • M. rectus capitis posterior minor (tilt the head to the same side & dorsal extension)
  • M. obliquus capitis superior (ipsilateral head tilting & double sided dorsal extension)
  • M. rectus capitis posterior  major (ipsilateral turning of head & double sided dorsal extension)
  • M. obliquus capitis  inferior (ipsilateral turning of head & double sided dorsal extension)
  • M. sternocleidomastoideus caput mediale & laterale (unilateral contraction, tilting the head to the same side, turning the head to opposite side, dorsal extension)
  • M. trapezius (pars descendens)

As you can see, the neck is quite a “tricky part”. The above mentioned list is, by all means, not complete and there are much more deep-lying muscles that should be considered!

Neck Flex – How I use it

Neck flex manufactures two different types of neck-training devices. The “original” Neck Flex and the “Neck Flex Pro”. This review focuses on the latter.

Using the Neck Flex, for neck extension, source: own picture.

The USA-based company itself describes their product as followed:

The Neck Flex MMB Pro Series is truly game changing in all aspects of design. It was developed with the unwaivering intention of producing a harness and kit which surpasses all others in terms of versatility, function, and construction. The MMB Pro Series was designed in close collaboration with Mike Bruce, and thus it proudly bears his initials out of our tremendous respect for all he has accomplished and contributed towards the pursuit of neck strength and conditioning. The MMB Pro series takes our patented Neck Flex platform and introduces”dog ear” anchor points, which allows for the integration of plate loading applications as well as resistance band applications. No other head harness in the world can lay claim to such a design. However the ground breaking design is just one feature of the MMB Pro Series. Our construction materials and methods also adhere to the highest standards of quality. This includes diamond embossed neoprene padding, heavy duty nylon webbing, and all buckles are composed of polished metal. We set forth to raise the bar, and after much time and effort we are proud to present the MMB Pro Series.” (Neck Flex, 2020).

For the Neck Flex Pro the company charges around 110$ which, from my perspective, is a really fair price! Besides the neck harness you’ll get:

  • Heavy Duty Chain for plate loading
  • Carabiners for chain attachments
  • Bodylastics Patented 19 lb (=8,6kg) Resistance Band
  • Bodylastics Door Anchor
  • Neck Flex Tote Bag

Of course the other, priceless, advantage of the Neck Flex is its portability. You can store everything in your gym bag and take it with you when hitting the road and train, in different gyms or even a hotel room! A very versatile approach!

Door mount option of the Neck Flex MMB Pro Series, source: Neck Flex.

Neck Flex/Neck Training Conclusion

As Strength and Conditioning Coach I highly recommend professional athletes to incorporate neck training into their strength training. Of course there are myriads of possibilities how you can train your neck.

With machines, other devices or even only your bodyweight. Incorporating a Neck Flex though might be the most bang for your buck-approach if you don’t have a lot of space/budget for machines or other fancy equipment to get “yoked”.

Integrating neck training into your workout routine might be the “missing link” you’ve been looking for to break plateaus and/or boost your performance. No matter if you’re just a “weekend-warrior” or a professional athlete!

© HP Bernd Stößlein, Master of Business Administration in Sportmanagement.

If you liked this article please share it with your friends, subscribe to the newsletter and the blog.

If you like to book a professional online/offline consultation please feel free to contact me:

 info@bernd-stoesslein.de


Literature

Neck Flex, About us, source: https://www.theneckflex.com/about-us-1, access from 10.09.2020.

Neck Flex, mmb-pro-series, source: https://www.theneckflex.com/mmb-pro-series, access from 11.09.2020.

WristBall was originally designed as a special tool for improving your technique, respectively strength for arm wrestling. As I always point out: I like to think very much: to think outside of the box and grip training. So, why not fusing too cool things together? Although not being an arm wrestler, I implemented the WristBall into my own training and the one of my clients and patients. Why? Because I think this “cool tool” is very versatile and a true enrichment for everyone who is trying to work on improving grip strength. In this article I’ll cover furthermore how you might also use the WristBall besides from grip training!

WristBall: 70mm, source: © ArmSprot.

WristBall Review – All good things come in threes?

Special thanks to Misha from Israel who was kind enough to send me not only one of his WristBall trainers but also a pair of his Cone Grips, as well as his WristMax! So, kudos to Misha, respectively his company called “ArmSport”.

If you want to read my other reviews of the aforementioned tools, please feel free to read it in my extensive reviews, here:

WRIST MAX – EQUIPMENT REVIEW

CONEGRIP FOREARM TRAINER REVIEW

WristBall – THE most versatile gripping device?

As mentioned before, I’m a huge advocate of training grip strength. Why? Well, besides neck training and training to improve electromechanical delay, grip strength training is probably one of the most underrated aspects in Strength and Conditioning training!

If you want to know more about the importance of training in regards of electromechanical delay and why it is especially important in esports, I highly recommend to read my detailed article:

STRENGTH AND CONDITIONING TRAINING FOR ESPORTS

So, why might the WristBall be at least one of the most versatile tools for improving grip strength? I’ll give you my expertise.

First of all, the WristBall is suuuuper pricey! They do sell these things (depending on the diameter of the ball) starting from 39.90 (medium, 60mmÆ)-41.90 (large, 70mmÆ)$. Pretty economic, if you ask me!

I emphasize the fact that I chose the words economic and pricy over cheap, as “cheap” usually has a more negative connotation. Regarding the versatility of the WristBall it’s rather pricy, respectively more an investment than an expense!

To make a long story short, the WristBall is, as the name describes, a ball, attached to some kind of seat-belt-like material with the possibility to attach a carabiner.

Therefore you can mount it on anything that can hold a carabiner, such as any cable pulley and/or so-called loading pins.

Grip Training with the WristBall, source: own picture.

WristBall – Let’s do some functional anatomy

What makes the WristBall super versatile are its multiple options. You can train:

  • Wrist extension
  • Wrist flexion
  • Hand abduction
  • Hand adduction                    
  • Finger opposition
  • Thumb flexion

Which muscles can be trained? Well, as always, that depends. Literally, on the one HAND on your flexibility (Range of Motion = ROM) restriction and/or on the other HAND other pathologies that might prohibit one or more of the aforementioned functions.

Let’s say you don’t have any issue in the tissue, bones or whatsoever and no problems with structural balance, here’s a list of muscles that can be trained in your hand (and of which you might probably have never heard of):

  • M. abductor pollicis brevis
  • M. opponens  pollicis
  • M. flexor  pollicis brevis Caput superficiale
  • M. flexor  pollicis brevis Caput profundum
  • M. adductor  pollicis  Caput transversum
  • M. adductor  pollicis Caput obliquum
  • Mm. lubrivales I-IV
  • Mm. lubricales III-IV
  • Mm. interossei  palmares  I-III
  • Mm. interossei dorsalis I-IV  
  • M. aductor digit minimi
  • M. flexor digiti minimi brevis
  • M. opponens digiti minimi
  • M. palmaris brevis

That should cover pretty much all of our major hand muscles. If you want to know where all of them are located, you can use this publication as a springboard for your own little research!

Well, wait a second. It is called WRISTBall and not HANDBall, right?! Correct! But all of these muscles do play an important role when it comes to gripping!

According to that, it might be helpful to have at least  heard of them. Of course you can also train your forearm muscles with the WristBall, as mentioned above.

WristBall – Other exercises

Which other exercises, besides the already mentioned, can be performed with the WristBall? Maybe a myriad, but I’ll give you only an impulse of what can be done. You should always use your own fantasy and think outside of the box.

You could perform the following:

  • Single arm standing/seated rows
  • Chin ups (if you have a pair of WristBalls)
  • Biceps curls (you need a loading pin)
  • Triceps extensions in all variations (on cable pulley)
  • Butterflies on a cable machine (pair of WristBalls needed)
  • Spider curls (pair of WristBalls needed)
  • Reverse Flies (single/double handed)
  • Lateral raises (single/double handed)
  • Front raises (single/double handed)
  • Grip help for front squats (pair needed)
  • Internal/external rotation for shoulders/rotator cuff
  • Much more

As you can see, you can use the WristBall for quite a bunch of exercises, and that’s just what I came up so far. There are probably lots of more usabilities to this “cool tool”.

I’d be happy if you share your ideas with me and others in the comment section.

WristBall – Round and round it goes?

We haven’t discussed the most obvious fact of the WristBall, its shape! Compared to other grip tools, which are normally cylindrically shaped, the WristBall, of course, is round…sure, as it’s a ball!

Yet, you must understand that in terms of training/gripping round is actually better than cylindrical! Why? That’s due to its great transfer effect to everyday life. Most things you grip are rather round than cylindrical.

Furthermore, if you train sport specific, for first responders, for self-defense sports (e.g. Krav Maga) and/or law enforcement you need to grab your opponent. Therefore your life literally might depend on a strong grip!

WristBall review Conclusion

In my obligatory conclusion I’ll provide you with my expertise, being a Personal-Trainer, Strength and Conditioning Coach, Consulting Biohacker and Heilpraktiker (Complementary and Alternative Medicine Practitioner), with (2020) over 13 years of professional experience in the Health and Fitness- Industry.

Should you use a WristBall? Well, as mentioned earlier, that depends. Are you a novice lifter with less than two years of “training age” you probably don’t need it yet, as you are trying to build some foundations first. A WristBall could be too specific yet!

I think, besides the fact of its original purpose, you could benefit from incorporating a WristBall in your training, especially in prehab and rehabilitation phases, i.e. if you’re suffering from something called “Tennis- and/or Golfer’s arm”.

If you’re looking for new input for your training for constant progression, you could also benefit from integrating the WristBall and, of course, if you are trying to get a stronger grip!

© HP Bernd Stößlein, Master of Business Administration in Sportmanagement.

If you liked this article please share it with your friends, subscribe to the newsletter and the blog.

If you like to book a professional online/offline consultation please feel free to contact me:

 info@bernd-stoesslein.de

Synctuition – Meditation is a spiritual technique of relaxation and introspection that has been practiced in many cultures for thousands of years. It teaches you to reach a state of mental quietness, “no mind” as Eckhardt Tolle calls it, respectively inwardly directed concentration and attention. Using suitable meditation techniques, you are able to influence or shape your external perceived and experienced, subjective “reality” by reprogramming your subconscious beliefs and stored behaviors. In this article you will find out why everyone should meditate, how you can benefit healthily and spiritually from it, and how you can use meditation techniques, like Synctuition to strengthen both your mind and your body. Because you don’t perceive the world as it is, but only depending on your own current inception! Let’s take a look inside yourself and you’ll be surprised what you might discover…

Synctuition Review – Why you should start meditating!

Meditation will make you more powerful than ever before!

If you follow my fitness blog, you will surely have already gained experience with training your physical body. But how about the training of your mind or your “consciousness”?

You are probably already dealing with the different facets of physical training, such as various training methods, training parameters, food supplements, forms of nutrition or special “tools”.

Everything including influences from your external (environment) world. But have you ever dealt with your internal influences? The power of your thoughts and how they have an impact on your life?

“Your inner world creates your outer world” (T. Harv Ecker)

Your thoughts create your reality

You can like him or not, but not only because of his sporting achievements everyone can learn from Arnold Schwarzenegger, even if you have no competition ambitions yourself. He is credited with the following quote:

Bodybuilding is like any other sport. To be successful, you have to dedicate yourself 100% to your training, your diet and your mind. “

In this art icle we want to address the last point mentioned – the mind – and how you can take it to a whole new level through meditation.

Because only when your body and mind form a unit (are coherent) you can develop your full potential.

In addition to all the external influences that you can have on your body, it is the mind that is mostly neglected or underestimated. But a truly strong body is also animated by a strong spirit!

Meditation and sport

What do (strength) sport and meditation have in common?

At first you might not think much. Concentrated, motionless sitting with inward-directed attention (meditation) on the one side and lifting dumbbells on the other.

However, if one does not allow oneself to be confused by the obvious and looks deeper, not only common denominators can be recognized, but also additions and mutual influence / support.

By meditating regularly you can direct your focus from your outer to your inner world. You will learn to access your subconscious and to find out what moves you and which beliefs and behavioral patterns you live by.

All good things come in threes – even within the human brain

As is well known, all good things come in threes. It is the same – or similar – with your brain or your brains. Most because your brain is basically made up of three big parts.

Neocortex = 1. brain, Limbisches System = limbic system = 2. brain, Cerebellum = 3. brain, source: own picture.

The neocortex (first brain), the limbic system (midbrain / second brain) and the cerebellum (cerebellum / third brain). There are of course different structures of the brain depending on the literature, for the sake of simplicity we will limit ourselves to the above-mentioned ones in this article.

Why we are concerned with the structure (simplified) of a human brain at this point is because we have to understand that we are not our thoughts, and much of what happens to us every day is attracted by unconscious thoughts/behavior patterns, respectively is not consciously thought/devised.

Your mind rules over matter (or the reality you perceive), but positive thinking alone is usually not enough; you should then use meditation or suitable meditation techniques for this.

Why positive thinking alone is probably not enough

The diagram above shows you the large area of ​​the so-called neocortex, the seat of your conscious thinking. This makes up about 5% of your “consciousness”.

The remaining 95% are almost completely in the cerebellar convolutions (see picture).

Since this is a very complex topic, I don’t want to go into the structure of the brain too much in the context of this article.

However, it can be seen that – if your Conscious Mind is only 5%, positive thinking alone is not enough to realize or manifest actual changes in your life.

Example:

You exercise because you don’t want to be thin. So you say to yourself every day “I don’t want to be thin, that’s why I lift weights”. So now 5% of the neocortex is working (conscious thoughts that you are actively thinking).

In your subconscious, however, you have adopted something else, perhaps due to an experience / a belief system dating back decades, for example: “I am a failure and a weakling”.

This creates a huge inner conflict, in which the 5% of the new “positive” thinking have to face a superiority of 95% of the old “negative” thinking.

A hopeless fight? Not necessarily. Because through meditation you learn to access your subconscious mind (the divine in you), to determine old thought patterns / beliefs and to eliminate or replace them with new ones.

Meditation cleans your “hard disc drive”

Think of your brain as your body’s software / operating system (“computer”).

During meditation you will learn to search the operating system for “viruses” and then to clean your hard drive (brain). A process that will not work overnight, but should be carried out regularly.

The topic of body detoxification or “detox” as it is now called in modern German is on everyone’s lips these days and is used almost inflationary! Of course, this is useful and important and you can find out more about it here.

But when was the last time you “washed” your brain? (Of course in a positive sense) Never? The time has come! But not by mass media, the news manipulate you and tell you what to do and think, but by yourself.

 Not by daily news and co., but by your own “inside look”!

“reset” you mind, source: pixabay.

Which meditation is the “right one”?

As with so many things, there is no “right” or “wrong” in meditation. Ultimately, it is rather about ascending/transforming through/after a meditation as a different human being.

It is important for any meditation to do it free of distractions. Regardless of whether it is by family, friends, pets, cell phones, computers, etc. This time should only be yours and always take place in the same place, preferably in a dark place, free from wind, noise etc.

If you like, use a blindfold to keep your eyes away from visual distraction. Using a blindfold is much more convenient during meditation than just closing your eyes. Especially for beginners!

To answer the question of what’s the “best” meditation I would recommend you synctuition!

Why? Let me explain. Synctuition is probably the “most bang for your buck”. No matter if you are a complete novice to the topic of meditation or if you have already tried lots of meditational stuff.

Synctuition will probably blow my mind. I have been using it quite a while before writing this article and have already recommended it to clients and patients. 

Working as a Strength and Conditioning Trainer and “Heilpraktiker” (Complementary and Alternative Medicine Practitioner) I see lots of people who are in a chronically stressed state (sympathicotone).

I always recommend them to integrate a form of daily meditation to find a simple but effective and non-supplement based approach of coping with the stressors in their lives.

But why Synctuition you ask? Well, because it follows the “Pareto Principle” (80-20 rule). You can choose every day among different meditations but I would recommend you just to follow the journey Synctuition has prepared for you.

Each meditation lasts about 25 minutes and you are not recommended to do more. You can only log into your account, respectively the meditational sounds once every 12 hours.

That’s an approach I really like, as more is not always better. Same when it comes to discovering your hidden potential and going on a quest/journey to your inner self. According to that Synctuition is a very clever, smart AND effective way of meditation.

What else is special? Well, they recommend you to do a short recording of your own voice initially.

This is to convert the meditation tracks into “tailor made” tracks for your brain, incorporating your own voice and using special (gamma) brain-waves, so-called “binaural beats”, to enhance your meditational experience!

Synctuition even claims that 25 minutes of their meditation is as equally effective as a 4 hour “conventional” meditation technique.

Well, to be honest, I cannot give you proof of that, but what I can tell you, from my own experience is: the 3D sounds they’re using are aaaaamaaaaaaaaaaazzzzzzing!

Of course you should not trust me, go and make your own experience. Synctuition will give you the possibility to test them 7 days for free!

Meditation is head and heart energy – together they stand

Thoughts in the brain – whether consciously or unconsciously – always run electronically or electrochemically. You can find out more about this here. Your heart rate is magnetic.

Through meditation you will learn to bring your head and heart back into harmony. Because if you think something but do not have the appropriate emotion (and vice versa) your wishes will not come true.

Unfortunately, many people are too trapped in their minds these days, that’s why we all too often only understand things but do not understand them!

The addiction to (unconscious) behavioral patterns

The reason why most people don’t develop is because their body is addicted to certain states of being.

So you think e.g. “I’m weak, a failure, I can’t do it anyway” etc. Each of these (or other thoughts) has a chemical influence on your organism / body, e.g. permanent stress hormones such as adrenaline or cortisol are released.

If this happens over days, years, months, years, decades, your body gets used to it in the truest sense of the word and recognizes this as the status quo, i.e. as normal.

If you now begin to determine such destructive behavior patterns / beliefs by meditation and to dissolve them using suitable techniques, your body will of course resist at first! Like a nicotine addict longing for his next cigarette.

But don’t let that confuse you and the best is to do your meditation every day!

By meditating daily you will not only improve your focus and all other areas of life during your training, but you will also learn to live in the “here and now”.

No more concentration problems, no more fears of thinking about a future you don’t want or a past that is long gone.

Synctuition – Synchronicity meets Intuition

There’s one point I haven’t mentioned so far.

What does “synctuition” actually mean? Well, being a true nerd of linguistics I looooove to decrypt terms! Therefore I’ll give you quite an etymological explanation of the constructed term Synctuition, from my perspective.

Synctuition derives from synchronicity and intuition. Pretty sure you figured that out on your own.

But what is a syn/chronicity? The term synchronicity derives from the Latin prefix syn = with, together, at the same time; and the Greek suffix chronos = time (Becher et al., 1995).

Therefore, a literal translation would be. “with time”…

According to the “father of synchronicity” Carl Gustav Jung, this term yet is described as:

the coincidental occurrence of events and especially psychic events (such as similar thoughts in widely separated persons or a mental image of an unexpected event before it happens) that seem related but are not explained by conventional mechanisms of causality (…)” (Merriam-Webster).

Intuition, of course, and how could it be otherwise, also derives from Latin. Can it also be further decrypted? I’ll give it a try. To be fair, this is not backed up with 100% linguistical proof!

From my point of view in/tuition can further be broken down into the Latin prefix in = “into something”, on (Becher et al, 1995); and Latin tuitio = protection (Frag Cäsar).

Interesting. According to that, intuition would mean something like “ into protection”. Does this make sense? I think so! Think of intuition…what else could it be as your “inner voice” that prevents you from doing mistakes?

Of course Synctuition could also just mean syn = with + (in)tuition  à Synctuition. Anyhow, I think it’s always interesting to know what all the terms mean in the context of meditation and beyond.

Synctuition Meditation Conclusion

Meditation, source: pixabay.

As you can see, meditation is an extremely complex topic and the length of a single blog article is by far not sufficient to adequately present such an exciting but also multi-layered topic.

This article is intended to give you a first glimpse of this extremely useful and invigorating technique of “looking inside”.

Do not let yourself be influenced too much by your external world and learn that ultimately everything is a manifestation of your conscious / unconscious thoughts.

A very exciting field that even leads you into the world of quantum physics, in which you learn that all possibilities of our “reality” ultimately exist at the same time and that our idea of ​​linear time is most likely wrong.

You decide for yourself how deep you want to go down the “rabbit hole” and you will be surprised and fascinated by what awaits you on your spiritual journey.

As an introduction to this topic I highly recommend you to start with Synctuition. Is it worth the investment? Well, there’s always only a subjective answer to such a question. Nevertheless, I think it is an investment as it could bring you a huge return on investment!

Investing 25 minutes a day could lower your stress-levels, might support your immune system, could contribute to discover your own subconscious beliefs and sooooo much more.

Synctuition charges about 100$ per year, which makes it about 8,33$/month. If you stick to the program and meditate every day this is about 1,92$/week, which will “cost” you 0,275$/single meditation! This is a ridiculous amount of 0,010997$/minute of meditation!!! Think of that!

© HP Bernd Stößlein, Master of Business Administration in Sportmanagement.

If you liked this article please share it with your friends, subscribe to the newsletter and the blog.

If you like to book a professional online/offline consultation please feel free to contact me:

 info@bernd-stoesslein.de


Literature

Lateinisch- griechischer Wortschatz in der Medizin, S. 59.

Lateinisch- griechischer Wortschatz in der Medizin, S. 102.

Lateinisch- griechischer Wortschatz in der Medizin, S. 218.

Synchronicity, source: https://www.merriam-webster.com/dictionary/synchronicity, access from 21.08.2020.


Tuitio, source: https://www.frag-caesar.de/lateinwoerterbuch/tuitio-uebersetzung.html, access from 21.08.2020.

Esports players should train like “normal” professional non-esport related athletes! Every professional gamer should invest in a professional Strength and Conditioning Coach, and there are at least a ton of reasons to do so!

Esports players benefit from strength and conditioning training as it is a sport specific performance coaching, consisting of a special nutrition designed diet, posture improvement, musculoskeletal efficiency enhancement, brain coaching for faster neural processing and so much more!

Regarding how much money pours into esports, it would be simply stupid not to consider, and treat, pro gamers as professional athletes! But just like any other professional athlete they should hire a professional strength and conditioning coach to get a winning edge!

This article is primarily designed for professional esport players, those who want to make a living out of pro gaming and how the collaboration with a professional Strength and Conditioning Coach will enhance their game.

My article is also intended to show Strength and Conditioning Coaches how they can work with professional athletes they might never have thought of and how and where they might start to work with them.

Ok, what does a Strength and Conditioning Coach for professional esports do? Well, pretty much the same he does with all his other professional clients, too. He trains them in a sport specific manner, to make them better athletes in their particular sport.

Esports – The relentless training of professional gaming stars

If you’re reading this because you’re a professional esport gamer, respectively athlete, I won’t have to explain you how relentless and hard you’re training to be(come) one of the world’s best.

For all my other readers I will give a brief overview of how intensive a pro-gamer’s training routine is:

It’s not uncommon for professional esport athletes to perform gaming for more than 12 hours daily, on a regular basis, respectively every day!

In an industry in which the fraction of a second can decide over hundreds of thousands of dollars, the margin for errors is thinkable small!

Esport is not a sport?! That’s probably what lots of non-gamers might think now. What’s the deal? You sit all day long in front of a computer, watching your ass getting bigger and bigger? Everybody can do that…

Something like that is what you usually hear, when you talk about people who are not related to sports of any kind and particularly not to esports!

Esports – the fastest gamer wins!

From a traditional point of view esport gamers/athletes are not what you have in mind when you think of an “athlete”. A bunch of guys sitting in their mom’s basement thriving on junk food and energy drinks to stay awake as long as possible.

You might change your stereotype view!

Esports have evolved in the last decades to a multi-million, respectively multi-billion dollar industry!

Their top athletes have sponsoring contracts, earn hundreds of thousands of prize money and are followed by a huge fanbase. Just like other professional non esport athletes as well!

Being a pro esport gamer requires you being able to process information as fast as possible to make the winning move!

That means that it is not only some typing on a keyboard and scrolling around with the cursor of your mouse. It is about the speed of information<—>reaction time!

How fast can you absorb, realize, interpret your esport related environment (game) AND how fast you can take action!

According to that there are lots of points that have to be taken into consideration:

  • Range of Motion (ROM) improvement
  • Information processing capacity in total
  • Neuromuscular control
  • Fine motor skills
  • Sensory perception (especially visual and auditive)
  • Alignment of musculoskeletal system
  • Neuronal efficiency
  • Motor control efficiency
  • Firing rate of motorneurons
  • Nutrition
  • Supplementation
  • Biochemistry (Neurotransmitter !)
  • Much more
  • Physiology & psychology

As you can see there are lots of things you can optimize with an athlete. Please bear in mind that the list above, by all means, is NOT complete! It’s just to give you a glimpse of what you can work on with a professional Strength and Conditioning Coach!

Esports and brain performance optimization

Of course every pro gamer wants to be the best. A simple yet effective way of improving an esport athlete’s performance is to “rewire” his/her brain!

This does not mean that you haywire some neurons…it’s a metaphorical meaning!

How can you do that? Well, I’ll give you a little glimpse of how I do it, by correcting/improving visual perception.

As I write more in detail in my article about my Brain Coach Performance Certification:

“ (…) it simply has to do with basic human anatomy and how your brain is wired. How you observe and process the world you live in, particularly visually. What you see, in terms of sensory impulses, and HOW this information is perceived and processed in the correspondent part of your brain (visual cortex) determines your motoric actions!

According to that, postural problems are not always and only limited to misalignments of your musculoskeletal system, but most likely due to neuromuscular problems, especially problems with sensory perception through the eyes.” (Stoesslein, 2020).

In a nutshell, this means if an esport athlete receives misaligned information due to eye divergence, this will result in asynchronous visual information procession. This, in turn, will lead to slower information processing which inevitably will lead to slower reaction time.

And we all know that in esports it’s all about speed! You might have the best reaction time on your hardware (super-fast screen and keyboard) but if you are simply not performing on your best due to slow neuromuscular control, bad neurotransmitter distribution, diet issues etc. (the list is long) you will waste a lot of potential optimization!

Esports – Secret to success

Nowadays people are always looking for short-cuts. They don’t want to learn something properly but want to know how something works, explained best in just one sentence.

According to that, and the drastically decreasing attention span I’ll give you (at least some “ingredients”) of my “magic formula”, concerning strength training for esports:

  • Grip strength
  • Neck strength
  • Electromechanical delay

In a nutshell, these are, by far, the most neglected and overlooked factors when it comes to esport performance. Of course an esport athlete doesn’t have to be as “yoked” as Mike Tyson at his prime but a “pencil neck” won’t do the job either.

Especially when we think 20 years ahead, when the average retiring age of professional esport athletes might rise from mid-twenties to, let’s say around 40 or even above.

Considering posture and grip strength might even predict the longevity of an individual, not only in esports. There are countless studies which say that grip strength is a better vital parameter for longevity than blood pressure!

More about the importance of grip strength, how to measure and implement it in a strength and conditioning training (for esports), can be found in my article:

HANDKRAFT MESSEN – HAST DU ALLES IM GRIFF? (German)

If you like to receive an English translation, please email to: info@bernd-stoesslein.de

The third “ingredient” on my list is something called “electromechanical delay”, in human skeletal muscle under concentric and eccentric contractions. Think of the following:

In contraction of skeletal muscle a delay exists between the onset of electrical activity and measurable tension. This delay in electromechanical coupling has been stated to be between 30 and 100 ms.”(Cavanagh & Komi, 1979).

Wouldn’t it make sense to improve/maintain/enhance that speed? Remember, the margin between winning and losing in esports is super small! Therefore optimizing the fracture of a second will determine whether you win or lose a lot of money!

Of course there is a ton more of optimization potential. Lots of more useful tools and techniques, but you will understand that this article is supposed to “whet your appetite” for more!

If you want to get a professional coaching/consulting (online/offline) please feel free to contact me:

info@bernd-stoesslein.de

Esports Performance Continuum

Of course a single blog article is far too short to tell you all about Strength and Conditioning Coaching for esports. Yet, I’d like to give you some input how to start and what the most important things are, from my expertise.

Considering the training of an esport athlete, a very important point comes into play! The periodization of the athlete’s training. What do you train when and how? Is there an in-season, and off-season, how do you schedule strength training etc. etc. etc….

I will give you my basic PERFORMANCE CONTINUUM FOR ESPORTS on which you can build on specific programming:

  1. Assess and Correct
  2. Enable full ROM
  3. Stabilize full ROM
  4. Load full ROM
  5. Load & Link bodily segments
  6. Load segments & start focusing on improving velocity
  7. Load segments + further increase velocity
  8. Unload segments + keep on increasing velocity

Esports and Soft Tissue Treatment

When it comes to esports there is one big issue every professional Strength and Conditioning Coach must pay attention to: How to assess and correct movement restrictions!

This is my Number One on my PERFORMANCE CONTINUUM FOR ESPORTS!If you fail to assess and correct a pro gamers movement restriction all the other listed points cannot be addressed in a proper fashion! Therefore “first things first”!

Remember this blog article is the “finger in the eye approach” of how and where to start if you either want to coach professional esport athletes or you are/want to become a pro gamer and are searching for info how to get coached.

The best, so called Instrument Assisted Soft Tissue Mobilization (IASTM) tool, due to my expertise, is the Heskiers All-In massage tool.

Heskiers All-In-One massage tool + method is a special designed IASTM tool and soft tissue treatment, developed by Danish acupuncturist and designer Martin Heskier.

So, you might wonder if the Heskiers tool is just another IASTM tool out there. To make a long story short: it is, BUT it is one of a kind!

How do I know? Because besides working as a strength coach/personal-trainer, I do also work as something that is called “Heilpraktiker” in Germany. A proper translation in English would be something like “complementary and alternative medicine practitioner”.

It’s a unique profession that, in this constellation, is only available in Germany and in modification in Switzerland. You’re allowed to diagnose and treat patients (with restrictions), even with invasive techniques, i.e. like giving injections, infusions etc.

Therefore, I’m also allowed to treat patients with acupuncture- and of course acupressure-techniques. According to that I’ve been using lots of IASTM tools in all kinds of variations + massage guns and other devices.

I’ve also been certified by my mentor Charles R. Poliquin aka “Strength Sensei” (R.I.P.) as a Certified Kinetic Chain Enhancement Practitioner.

Esports  – The most important task of a Coach

So, with all the info you already received, what do you think is THE most important task of a Strength and Conditioning Coach for esports? It’s to keep the athlete save from injuries and ready to perform at his/her best!

Strength and Conditioning Coaching is different from coaching “joe average”. A coaching that focuses on athletics intents to spare energy instead of trying to burn as much calories as possible!

You must pay attention to the energy system that are used during an esport competition and how you can improve an athlete’s movement economy!

These energy systems have to be considered:

  • Phosphagen
  • Glycolytic
  • Aerobic

Considering the fact that esports are most of the time done while sitting, the aerobic system won’t be competition winning thing to focus on, right? Wrong!

Training the aerobic system will also benefit the anaerobic (phosphagen and glycolytic) systems!

Just by giving you a glimpse of the myriads of things that can be improved in a professional gamer’s life, should open your eyes on how much potential is hidden in this sport.

Both, for the Strength and Conditioning Coach AND the pro gamer! Due to my experience and expertise neither the Coach nor the esport athlete.

Most likely that’s the case as they come from different ends of the continuum of sports, or maybe really from different “worlds”.  

But why not combining the best of two worlds to create something new?

I hope my article lays the foundation for the collaboration of professional Strength and Conditioning Coaches and professional esport players to work together!

Conclusion

Let’s come to a conclusion. Are esports something that can be considered to be a serious “sport”?

Well, that kind of depends on your definition of “serious” and “sport”. From the perspective of economics, esports far surpass lots of “traditional” sports.

From the perspective of a “real” athlete that has a lot more physical involvement some might say: no!

But the same could be said about other sports like horse riding, car driving or chess!

Being a professional means “leaving no stone unturned”! Who cares what other people think? If you want to be a professional game player, respectively esport athlete, go for it!

But you should/could be the one who thinks outside the box! Think of the benefits it would bring to you and your team to hire a professional Strength and Conditioning Coach!

If you like to book an online consulting with me to learn more about strength and conditioning, nutrition, brain coaching, supplements etc. for esports please feel free to send me an E-Mail to:

info@bernd-stoesslein.de

© HP Bernd Stößlein, Master of Business Administration in Sportmanagement.

If you liked this article please share it with your friends, subscribe to the newsletter and the blog.

If you like to book a professional online/offline consultation please feel free to contact me:

info@bernd-stoesslein.de


Literature

Electromechanical delay in human skeletal muscle under concentric and eccentric contractions, P R Cavanagh, P V Komi, Eur J Appl Physiol Occup Physiol . 1979 Nov;42(3):159-63. doi: 10.1007/BF00431022.

Literature

Brain Coach Performance Certification, source: https://www.bernd-stoesslein.de/2020/07/22/posturepro-brain-coach-performance-certification-review/, access from 26.08.2020.

PSO-RITE (affiliate link) is a u-shaped device designed for working on your psoas muscles. In this article I will cover a holistic view on this topic and you will gain information about where the M. psoas is located, why some people consider it to be the “soul muscle” and how you can use the PSO-RITE properly. We will also discuss the PSO-RITE’s “siblings”, the PSO-SPINE and the PSO-MINI! I invite you to join me on this “lovely dance” we’re going to perform on our journey to the “power psoas”. Hopefully, I can help you to unlock your full potential by guiding you through some psoas exercises and some spiritual impulses concerning this “miraculous” muscle.

Let’s begin…

PSO-RITE – hidden like the “dark knight”

I really like to use a little pun here and there, to give the benevolent reader a more sophisticated reading experience. The pun in the header (dark knight) is referred to the “dark knight”, better known as Batman, just in case you wondered 😉

This pun, though, has a particular reason. I chose it as the M. psoas major is really “hidden” deep inside us. It’s a muscle that cannot be seen superficially nor is it easy to be touched!

To be precise it “(…)is a long fusiform muscle located in the lateral lumbar region between the vertebral column and the brim of the lesser pelvis. It joins the iliacus muscle to form the iliopsoas. In animals, this muscle is equivalent to the tenderloin.” (Wikipedia, 2020)

But what does “psoas” actually mean and where does it come from? Well, the term psoas derives from Greek psoa = “meat of the loin”, respectively “muscle of the lumbar region” (Becher et al., 1995).

Now that we know where the medical term originates, we’ll take a look of what the psoas is supposed to do, again from an anatomical/school medical point of view.

Again, our first approach is Mr. “know-it all”, aka Wikipedia. There you will find the following:

The psoas major joins the upper body and the lower body, the axial to the appendicular skeleton, the inside to the outside, and the back to the front. As part of the iliopsoas, psoas major contributes to flexion in the hip joint. On the lumbar spine, unilateral contraction bends the trunk laterally, while bilateral contraction raises the trunk from its supine position. In addition, attachment to the lesser trochanter, located on the postero-medial aspect of the femur, causes lateral rotation and weak adduction of the hip. It forms part of a group of muscles called the hip flexors, whose action is primarily to lift the upper leg towards the body when the body is fixed or to pull the body towards the leg when the leg is fixed.” (Wikipedia).

Sounds fancy, right? But what does it mean? Well, let’s take a closer look and decrypt the most important of these medical terms.

First, ap/pendicular derives from Latin pendere = to hang, to hag, to sag (Becher et al., 1995).

The ilio/psoas is the combination of the  Latin prefix ili(o) = “belonging to the iliac bone” and the aforementioned psoas (Becher et al., 1995). Therefore the ilio/psoas is a more or less grown together of two muscles, the M. iliacus and the M. psoa becoming the: Ili(o)psoas.

How much these muscles are grown together differs from human to human.

Picture description: Anterior Hip Muscles 2.PGN, Beth ohara, CC BY-SA 3.0, 31 Jan.,2006.

The picture above will give you a quite good example of how tight/narrow the Iliacus and the Psoas Major are located plus that they are often, at least partially, grown together.

Due to reasons of volume we will keep the other displayed anterior hip muscles aside, as we’ll focus on the psoas and keep the anatomical excurse to a minimal effective dosage 😉

Just bear in mind that on top of the displayed muscles in the image above you also have different layers of abdominal muscles. That’s why it is rather hard to “get in touch” with your psoas.

As one of the major anatomical functions of the psoas is to perform a hip flexion it should be no wonder why it is often to be found too tight!

When you enter this realm, which we call earth, respectively reality, you are born into flexion. According to that, you are struggling, literally from day one to work against that. In a physical, as well as in a spiritual and psychological manner.

Just think of the English word “live” spelled backwards…take all the time you need 😉

You have to develop a proper posture, your own conscious mind and you must fight against extensive inward rotation due to prone sitting, driving, “smart phone posture” etc., you get the point.

If you want to learn more about the importance of posture and what a “proper posture” is considered to be, you may read my articles:

·      POSTUREPRO BRAIN COACH PERFORMANCE CERTIFICATION REVIEW

·      ALIGNMENT FROM 🗣️ HEAD TO TOES 👣

·      FREO FOOT CARE SYSTEM REVIEW

It is not uncommon that the Psoas is part of something called: “lower cross syndrome”. An “issue in the tissue”, and posture, that will result in an anterior pelvic tilt, a too tight (ilio)psoas, a crosswise tight erector spinae and, on the other “cross” too weak abdominals and too weak gluteus maximus.

When I write: “it is rather hard to “get in touch” with your psoas”, do you know what a great kind of transition that is?

Well in a couple of minutes I’ll hopefully contribute to your enlightenment.

PSO-RITE – Are you emotionally tight?

Speaking of the psoas you now got a glimpse of what this “bad boy” is capable of doing, at least from an anatomical point of view. Now let’s ascend and experience the psoas from a total different perspective, a spiritual one!

Can you think of muscles in a spiritual sense?! Sure, why not?

According to Liz Koch’s amazing work, the psoas is far more than a core stabilizer and/or a hip flexor muscle!

It is an “organ” of perception composed of bio-intelligent tissue and “literally embodies our deepest urge for survival, and more profoundly, our elemental desire to flourish.”

Furthermore, Koch and others have contributed to the view of the psoas as influencer to your (emotional) health, state of being and vitality.

In Yoga the psoas even is considered to be the “muscle of the soul”. Is it that absurd to think of a too tight (ilio)psoas being the result of a chronically (over) stimulated sympathic nervous system?

I wonder if a tight psoas does not only contribute to faulty posture and restricted movement patterns but ultimately reflects a “tightened” soul? Does the body function as kind of ultra-dense signal transmitter of your soul? 

Would a release of a tight psoas help in “calming” your sympathic nervous system? Resulting in a physical AND psychical/spiritual release?

I keep this open for debate and your constructive comments below this article. Please feel free to share your ideas about that approach!

Apropos, the psoas is, by all means, not the only muscle associated with your soul! The ancient Greek belief was that what we call “the soul” was also to be found within your dia/phragm. That’s what the term schizo/phrenic derives from!

As the belief goes your dia/phragm inheres your soul. Let’s use another brief decryption of those Latin, respectively Greek terms to see what that “fuzz” is all about.

The term dia/phragm is a combination of the Latin prefix dia = through and the suffix phragma, respectively Greek diaphragma = “partion wall” (Becher et al., 1995).

Moreover, diaphragm and phren describe the same muscle, on the one hand you have Latin (diaphragm) and on the other you have the Greek term  = phren (Becher et al., 1995).

In addition to that, you have another Greek term: schizein = to split, to divide (Becher et al., 1995).

Now, let’s connect schizein with phren and, voila you get: schizo/phrenic, which exactly describes what it is supposed to be: a divided/split apart personality, respectively soul!

Concerning the psoas and its “soul connection” I highly recommend you to read the books of Liz Koch, especially:

PSO-RITE – How to use it

Let’s take a look at the PSO-RITE device and how it works. It’s a specially designed, u-shaped device. Simple to describe but not always easy to use!

In the video below I show you a brief demonstration of how the PSO-RITE is supposed to work:

In case you want to skip the video, here’s my short manual:

  • Place the PSO-RITE on a non-slipping surface
  • Locate the location of your (ilio)psoas (take a look at the picture above)
  • Lay on the PSO-RITE, resting on your forearms
  • Just get a gentle feeling of the PSO-RITE “diving” into your tissue
  • Take your time and get used to the feeling, there’s no need to hurry!
  • Breath out and let the PSO-RITE sink in further
  • If you feel any pain immediately stop the exercise!
  • If you feel comfortable you might lower your upper body to the ground (keep your palms besides you, this will help you getting up more easy)
  • Try to gently move up and down as well as side-to-side with your hips
  • Limit the hold of a position to a max of 60 sec. until you get more experienced

PSO-RITE – When to use it?

Now that you have an idea HOW the PSO-RITE is supposed to be used the question arises WHEN do you best use it. Well, of course, this question has to be answered with: “it depends”.

It depends on how severe your “issue in the tissue” is. If you suffer from any pathologies like the aforementioned “upper cross syndrome” i.e. you might use it more frequently than someone with pretty good psoas flexibility.

Please, also keep in mind that a manipulation of the psoas might also contribute to a release of your emotional “traps” or at least might release constant stress by “freeing” you from a chronic state of being in “Fight- or Flight” mode!

This is only my opinion and I did not come up with that, but from a holistical point of view it makes total sense! Just don’t take my words for granted, do your own research and see if all this makes sense to YOU!

PSO-SPINE – Feeling fine?

The PSO-SPINE company didn’t stop with thinking of the psoas, they also came up with another “cool tool”, called the PSO-SPINE!

Basically it’s the opposite approach of the PSO-RITE, as its intention is to work the back muscles, especially those around your spine.

I highly recommend you to invest in the total bundle. The PSO-RITE, the PSO-SPINE and the PSO-MINI. Just because I think that you always have to see the “bigger picture”.

It doesn’t stop with just treating a too “tight” psoas. Not from a physiological, nor from a psychological/spiritual point of view. You should incorporate “the whole thing”.

According to that, it ultimately makes sense for me that “issue in the tissue” (tight erector spinae) can also be some unsolved emotional problems and/or the result of faulty movement patterns.

Therefore having the right “tools” in your “health tool box” will enhance your possibilities of working on your problems.

PSO-MINI – The all-rounder?

The PSO-MINI is not round, but it seems to be the most versatile of the three PSO-RITE products. With the other ones being specialists, the PSO-MINI is the “all-rounder”.

Due to its rather small size, firmness and shape, its strength lies in its miscellaneous usability.

I use it for working on trigger points. That’s where I see the PSO-MINI’s biggest advantage. But, again, that’s only my opinion.

Do you have special issues you could solve with this tool? I’d be happy if you share it with me and the readers of this article!

Hollywood actor Mark Wahlberg also seems to be a fan of the PSO-RITE (see picture), as well as famous Podcast-host Joe Rogan.

Picture description: Copyright PSO-RITE.

PSO-RITE REVIEW CONCLUSION

In the end you always want to know whether something is only an expense or an investment.

To make a long story short: the tools of the PSO-RITE family are a great investment, speaking from my own experience!

By the way, otherwise I would not have taken the time (as time is a kind of “energy-currency”, too) to write a whole article. I’m not that kind of human who invests time in something he doesn’t like and takes even more time telling other people why he dislikes it so much…

Thinking of the psoas as “the soul muscle” is a lovely approach that really fits well into my understanding of what we tend to call “world”, as I also work as a “Heilpraktiker” (complementary and alternative medicine practitioner).

I incorporated the PSO-RITE and the other mentioned tools into my daily routine as well as in the work with my patients and clients.

Hopefully this article contributes to your decision whether to invest in these “cool tools” in a positive manner.

Thanks for taking your precious time and reading my article, much appreciated!

I wish you an energetic time, see you soon!

© HP Bernd Stößlein, Master of Business Administration in Sportmanagement.

If you liked this article please share it with your friends, subscribe to the newsletter and the blog.

If you like to book a professional online/offline consultation please feel free to contact me:

 info@bernd-stoesslein.de


Literature

Psoas major muscle, source: https://en.wikipedia.org/wiki/Psoas_major_muscle, access from 11.8.20.

Lateinisch-griechischer Wortschatz in der Medizin, S. 68.

Lateinisch-griechischer Wortschatz in der Medizin, S. 161.

Lateinisch-griechischer Wortschatz in der Medizin, S. 167.

Lateinisch-griechischer Wortschatz in der Medizin, S. 181.

Lateinisch-griechischer Wortschatz in der Medizin, S. 196.

Optimo Fitness Ergonomics are specially designed grips to enhance your way of gripping. These “cool tools” can be used on pretty much any regular Barbell, Dumbbell and/or cable attachments. They do even work with cambered bars! In this article you will learn about these special grips and why I have them in my “special grip training toolbox”.

Optimo Fitness Ergonomics – the better grip?

Ok, if you follow my blog you will have noticed, that I am kind of obsessed with gripping devices. Why? Because, speaking from the perspective of a Strength and Conditioning Coach,  there are two things that are heavily neglected, Neck- and Grip-Training! 

If you want to learn more about thick grip implements and other special stuff, please feel free to read the following articles:

So why another pair of grips, you ask? Well, why not?! Too much cool grip implements are never enough! Progression is one of the keys to success. For me training must be fun, too, and I get bored very fast.

That’s why I need lots of “cool tools”, especially grip tools to keep my training diversified. Furthermore, having lots of grips in your “gym-toolbox” is very space-saving. You don’t need lots of space and can take your grips, like the Optimo Grips, wherever you go.

They  come in a nice mini-gym bag, really to “hit the road/gym” with you whenever you need a pump.

Optimo grips, source: own picture.

Optimo Fitness Ergonomics – Where’s the difference?

At last, now the question arises what the “fuzz” is all about these particular grips. Well, from my point of view, they’re not intended to be “fat grip” implements. That means, that they’re not designed to thicken the diameter of a bar, but to make the grip more ergonomic!

Ha ha ha, you will probably laugh. Isn’t that obvious? As their name is “Optimo”?! Well, hold your breath as we now dig into the meaning of ergo/nomic and the question WHAT “optimal” is supposed to be!

Let’s start with the etymology (word origin) of the word ergo/nomic. Everybody probably “knows” what the term ergonomic describes but could you give an actual definition?

If not, hang in there. I’ll help you out! The term ergo/nomic derives from Greek ergon = Work, act(ion), activity; and the Greek suffix nomos = custom/rite, law, act, statute (Becher et al., 1995).

Having decrypted this term, we now know that ergonomic, literally translated”, means something like “work that is done according to statutes”.

In the sense of gripping it means that a handle (Optimo Grips) is designed to properly work in “alignment” of the shape of your hands.

To put it in other words: the Optimo Grips are not only cylindrically shaped, but instead have little “wings” in order to enhance your gripping. A proper way of gripping, so to speak.

Optimo Grips on a dumbbell, source: Optimo Fitness Ergonomics.

Optimo Fitness Ergonomics – Let’s do some functional anatomy

To understand the benefit the Optimo Grips might bring to you and your training, we have to do a brief bound in anatomy.

Actually the muscles of the hand are quite numerous. Not a wonder as they have to perform a myriad of functions, especially when it comes to fine-motor skills!

Anyhow, I’d like to stick to the K.I.S.S.-Principle, Keep It Short and Simple. I also work in Germany as a “Heilpraktiker” (Complementary and alternative medicine practitioner).

Quite a unique thing that allows me (with restrictions) to diagnose and treat diseases, do invasive stuff like injections, infusions etc.

I’m writing that to show you that I have extensive knowledge in human anatomy and that this article is not written by a 15 year old “keyboard-hero” who just invested 5 minutes into some internet “copy and paste clickbait” crap.

According to my expertise – and practical implementation of them “out of the trenches”, the Optimo grips give you a cutting edge advantage when it comes to a more…let’s say “stable” grip.

How to use toe Optimo Grips, source: Optimo Fitness Ergonomics.

How does that work, you ask? Well it works by the little “wings” the grips have. These “wings” broaden the grips which results in proper support, especially of these structures, at least according to my point of view:

  • M. palmaris brevis
  • M. adductor digiti minimi
  • M. flexor digiti minimi
  • Aponeurosis palmaris (not sure)

So, according to my expertise that’s the “fuzz” of the Optimo grips and what distinguishes them from other grip implements out there!

To be honest, at first I was really sceptical and my impression was: “wow, they’re really flexible!” (compared to other grip implements, like Cone- and/or Fat Gripz).

After having tested them for quite some extensive time and with several barbells, dumbbells, and different other cable attachments I come to the resume that they do really work great!

Even on a cambered “Buffalo Bar” they perform very well.

Conclusion Optimo Fitness Ergonomics

Of course all my articles  have a conclusion in which I answer the most important question of all: “Are they worth the investment?”, and: “Should you buy a pair?” As you probably know there’s a difference between value and a price so I skip an explanation here.

Due to the fact that I am a huge grip training fan I’d say that these grips were an absolute investment. Moreover, they are very pricy. A pair of Optimos is sold for $39,95.

I highly recommend you to get a pair and enhance your “gym-toolbox” for more variety and to prevent you from stagnation.

In addition to that, as mentioned before, you probably will also experience a better support of your hand muscles, especially during pressing movements.

The muscles that are better supported, in comparison to cylindrical grips, are: M. palmaris brevis, M. adductor digiti minimi and the M. flexor digiti minimi.

If you like to book an online consulting with me to learn more about strength and conditioning, nutrition etc. please feel free to send me an E-Mail to:

 info@bernd-stoesslein.de

© HP Bernd Stößlein, Master of Business Administration in Sportmanagement.

If you liked this article please share it with your friends, subscribe to the newsletter and the blog.

If you like to book a professional online/offline consultation please feel free to contact me:

 info@bernd-stoesslein.de


Literature

Lateinisch-griechischer Wortschatz in der Medizin, S. 76.

Lateinisch-griechischer Wortschatz in der Medizin, S. 147.

Yo-Yo DESK® 120 – die Stehtischerweiterung, die praktisch jeden herkömmlichen Tisch in einen Stehtisch transformieren kann. Mittels Gasfedern lässt sich dieses „cool tool“ so gut wie stufenlos auf 15 unterschiedliche Höhen anpassen. Ein „Gesundheitswerkzeug“, das wohl nicht nur eingefleischte Biohacker-Herzen höher schlagen lässt!

In diesem, weiteren „Hinter den Kulissen-Beitrag“ zeige ich dem geneigten Leser, warum, aus meiner Sicht, das Arbeiten an einem Stehtisch wie dem Yo-Yo® DESK 120 die bessere Art des Sitzens ist! Vielleicht ist Sitzen ja auch das „neue Rauchen“? In diesem, meinem Erfahrungsbericht beschreibe ich im Detail, warum ich in meinem Arbeitszimmer nun einen Yo-Yo DESK® stehen habe, wie ich diesen für das Arbeiten und Lernen nutze und noch viel mehr.

Viel Spaß beim Lesen…

Yo-Yo DESK® 120 – Was ist eigentlich ein Stehtisch?

Da ich immer wieder danach gefragt werde, welche „Biohacking-Werkzeuge“ ich auch für meine Büroarbeit, respektive das Arbeiten am Computer, nutze, startete ich bereits letztes Jahr meine „Hinter den Kulissen“-Artikelserie.

Diese umfasst u.a. bereits Artikel über:

Mittlerweile umfasst diese also bereits so einige Artikel und das Interesse, an den von mir genutzten „gadgets“, wächst und wächst.

Da ich mir nun einen Stehtisch von Yo-Yo® DESK 120 zugelegt habe, ist dieser natürlich prädestiniert für einen weiteren „behind the scenes“-Artikel.

Doch bevor wir uns „en detail“ mit dem Yo-Yo® DESK 120 beschäftigen, klären wir erst einmal die Frage danach, was denn ein Stehtisch überhaupt ist, respektive, ob man sich nun einen komplett neuen Schreibtisch ins Arbeitszimmer stellen muss oder nicht…

Stehtische gibt es in den unterschiedlichsten Formen, weswegen ich mich im vorliegenden Artikel, aus Gründen des Umfangs, nur auf den von mir genutzten Stehtisch der Firma Sit-Stand.com, respektive das Modell Yo-Yo® DESK 120 fokussieren werde.

Für das Arbeiten an einem Stehschreibtisch empfiehlt sich ein externer Monitor, in passender Größe und Distanz!

Wer darüber nachdenkt, sich einen Stehtisch zuzulegen, dem bietet sich also die Möglichkeit, (s)einen herkömmlichen Schreib- oder auch sonstigen Tisch (passende Größe und Stabilität vorausgesetzt)  ganz einfach in einen Stehtisch zu transformieren.

Denn der Yo-Yo® DESK 120 wird einfach auf den bereits vorhandenen Tisch gestellt. Somit entfällt die Notwendigkeit, sich einen komplett neuen Tisch anzuschaffen.

Wie bereits erwähnt, existieren auch bei Yo-Yo® DESK 120 aber unterschiedliche Modelle (in Größe und Form), unter denen sich auch „echte“ Stehtische und sogar ein Yo-Yo® BIKE befinden, für die kein vorhandener Tisch benötigt wird.

Eine Auflistung aller erwerbbaren Modelle (Stand August 2020) findet der geneigte Leser unter der offiziellen Webseite von YO-YO DESK.

Doch zurück zum Yo-Yo® DESK 120 und den Fragen:

„Warum eigentlich überhaupt ein Stehtisch?“…Wieso sollte man herumstehen, wenn man, wie ich gerade, z.B. einen Blogartikel konzipiert, Rechnungen schreibt oder vielleicht andere „Büroaktivitäten“ durchführen will/muss?!

Warum nicht einfach nach einem neuen/besseren oder bequemeren Stuhl Ausschau halten??

Nun, weil (exzessives) Sitzen nun mal so seine Tücken hat! Um dies näher zu erläutern, müssen wir etwas zurückgehen, nämlich im wahrsten Sinne des Wortes an den Tag eins unserer Existenz.

Geboren werden wir alle in sogenannte Flexions- oder Embryostellung. Das bedeutet, dass wir eine Dominanz unserer Flexoren (Beugemuskeln) haben.

Bekanntlich kommen wir Menschlein ja auch recht unfertig auf die Welt, zumindest im direkten Vergleich zu anderen Säugetieren!

Das Krabbeln und den aufrechten Gang müssen wir uns ja erst erarbeiten. Doch damit nicht getan, müssen wir uns nicht nur physisch, sondern auch psychisch, emotional und spirituell in der Welt, in der wir leben, behaupten.

Wir müssen uns „gerade machen“, uns behaupten, uns ein Rückgrat „wachsen“ lassen, die Brust rausstrecken und bekanntlich den Bauch einziehen, um eine „gute“ Figur zu machen.

Sprüche und Redensarten wie diese und andere kennen wir alle. Doch an ihnen ist wirklich etwas Wahres!

Darüber hinaus leben wir nicht nur in einer Welt, in der man sich irgendwann entscheiden muss, ob man lieber Schaf oder Wolf sein will, sondern bedienen wir uns auch vieler Bequemlichkeiten.

So sind wir permanent am Sitzen, was – oh Wunder – wieder die Flexoren (Beugemuskeln) aktiviert, die uns in eine Innenrotation bringen.

Wir fahren alle zu lange und zu viel Auto, sitzen in Zügen, Bussen und anderen Transportmitteln, während der Arbeit (zumindest die Allermeisten), Zuhause, in der Freizeit und und und…ich denke der Leser hat begriffen, worauf ich hinaus will.

Nun braucht man wirklich kein Genie zu sein oder profunde Kenntnisse in menschlicher Anatomie besitzen, um zu realisieren, dass einseitige Bewegungen – ohne entsprechenden Ausgleich – auf Dauer wohl mehr Schaden anrichten als Nutzen stiften werden!

So verhält es sich, aus meiner Sicht, auch mit dem Sitzen am Schreibtisch.

Die Schwierigkeiten ergeben sich meist dadurch, dass die meisten Schreibtische und -stühle weder auf die individuelle Körpergröße noch auf die Anatomie angepasst sind.

 Wie auch? Nicht jedes Großraumbüro wird seinen, oft in winzigen Parzellen vor sich hinvegetierenden, Mitarbeitern extra Stühle und Tische anbieten. Bei solchen Zuständen könnte man, sarkastischer Weise, ja schon von „Massenmenschhaltung“ sprechen…

Zivilisationskrankheit – Upper- & lower cross syndrome

Da ich nicht nur als Strength & Conditioning-Coach/Personal-Trainer arbeite, sondern auch als Heilpraktiker,  begegnen mir in meinem Praxisalltag immer mehr Menschen, die entweder an dem sogenannten „Upper-Cross“ und/oder „Lower-Cross“ Syndrom leiden.

Was hat es damit auf sich und „leide ich vielleicht selber an diesen Syndromen“? Nun aus der Ferne sollte und darf natürlich niemand eine Diagnose stellen, oder witziger formuliert: „Durch die Hose keine Diagnose“!

Meiner Expertise und Erfahrung nach, trägt exzessives Sitzen allerdings stark zur Begünstigung der oben genannten Syndrome bei und wer viel am Schreibtisch arbeiten will/muss, der sollte unbedingt über den Einsatz eines Stehtisches wie den Yo-Yo® DESK 120 nachdenken!

Doch nun in aller Kürze zu den mysteriösen „Cross-Syndromen! Hiervon, wie möge es auch anders sein, gleich zwei an der Zahl!

Zum einen das upper-, und zum anderen, das sogenannte lower-cross Syndrome. Nicht selten treten aber beide gleichzeitig auf!

Das Upper-Cross Syndrome

Um das upper-cross syndrome (UCS) besser begreifen zu können, müssen wir einen kleine, aber notwendige Exkursion in die menschliche Anatomie unternehmen.

Kurz, und salopp formuliert, sieht man mit einem UCS (je nach Stärke der Ausprägung) aus wie der Glöckner von Notre Dame!

Ein deutlicher Buckel, nach vorne gezogene und nach innenrotierte Schultern. Woran liegt’s? Nun, an Vielerlei.

Zum einen natürlich, wie bereits beschrieben, dass wir in einer „Innenrotierten-Welt“ leben (Sitzen, Autofahren, aufs Smartphone Herunterblicken usw.) und an mangelnder „strukturellen Balance“.

Das bedeutet, dass einige Muskeln sich unter Dauerspannung befinden, wohingegen sich andere nicht (mehr) richtig „ansteuern“ lassen oder einfach zu schwach (geworden) sind.

Dadurch schränkt sich natürlich die Beweglichkeit im Schultergürtel, der Rotatorenmanschette und auch dem Kopf-Halsbereich mit der Zeit sukzessiv weiter ein!

Doch damit nicht genug. Denn wer mehr als 365 Tage in dieser, oder einer anderen Fehlhaltung verharrt, dessen Gehirn wird diesen Zustand „überschreiben“ und als „das neue Normal“ interpretieren.

Wobei es sich hier nun um Ursache und wobei es sich um ein Syndrom handelt, kommt der fortwährenden Diskussion gleich, was zuerst kam, Henne oder Ei.

Aus meiner Expertise resultiert das UCS, genau wie das lower cross syndrome (LCS) aus Folgendem:

  • Mangelnde und falsche/einseitige Bewegung
  • Schlechte (unphysiologische) Arbeitsbedingungen
  • Exzessives Sitzen ohne adäquaten Ausgleich
  • Zu wenig/kein absolviertes Krafttraining (weder muskuläre Koordination noch -kontrolle)
  • Psychische und seelische Probleme

Ein klassisches UPS äußert sich in der Regel durch zu „dichte“/verspannte Muskeln und zu schwache (weak) bzw. nicht mehr richtig „rekrutierbare“ bzw. „gehemmte“ Muskeln.

Je nach Literatur zählen zum UCS zu schwache Muskeln:

  • Tiefe Nackenflexoren (zu schwach)
  • Muskeln des „mittleren“ Rückens (Rhomboiden, serratus anterior)

Zu starke/überbeanspruchte Muskeln

  • Brustmuskulatur (pectoralis major)
  • Oberer Rücken (Trapez, levator scapulae)

Das lower cross syndrome

Das lower cross syndrome (LCS) ist, ganz einfach erklärt, das Pendant zum UCS, nur eben nicht im Schulter-, sondern nun im Beckengürtel. Äquivalent zum UCS zeichnet sich auch das LCS durch überkreuzt zu schwache und zu starke/überbeanspruchte Muskeln aus.

Je nach Literatur zählen zum LCS zu schwache Muskeln:

  • Schwache (weak) Abdominalmuskulatur (Bauchmuskeln)
  • Schwacher (weak) Gesäßmuskel (glutaeus maximus)

Zu starke (tight)/überbeanspruchte Muskeln

  • Unterer Rücken (errector spinae)
  • Hüftbeuger (Iliopsoas)

Mehr über die Besonderheit des (Ilio)psoas und was dieser mit dem Sitz der Seele zu tun hat, erfährt der geneigte Leser in einem anderen meiner Artikel.

Link Psoas Artikel

Selbst wer mit den medizinisch-anatomischen Begrifflichkeiten nicht vertraut ist, der hat nun sicher erkannt, dass es sich sowohl beim upper- wie auch beim lower cross syndrome um zwei Ausprägungen des selben (Zivilisations)Problems handelt – exzessives Sitzen ohne geeigneten Ausgleich!

Doch was kann man nun dagegen unternehmen? Nun, zum einen natürlich für ausreichend Bewegung sorgen. Sinnvoll strukturiertes Krafttraining ist aus meiner Sicht hier entscheidend, doch dies soll nicht Gegenstand dieses Artikels sein.

Aufgrund dessen empfehle ich jedem, der mehr darüber wissen will, sich die über 150 meiner anderen kostenlosen Blogartikel durchzulesen. Hier ist mittlerweile nahezu zu jedem Thema etwas dabei.

Tonnenweise Informationsmaterial, wohlgemerkt alles kostenfrei! Selbstredend existiert ferner die Möglichkeit einer Konsultation meinerseits (entweder on- oder auch offline). Sowohl im Rahmen meiner Trainertätigkeit (info@bernd-stoesslein.de) oder als Patient meiner Heilpraktiker-Praxis (info@heilpraktiker-stoesslein.de).

Doch zurück zur Frage, was man nun tisch-technisch zur Vorbeugung der genannten Syndrome unternehmen kann?

Nun, die Frage ist wohl eher rhetorischer Natur, da es sich im vorliegenden Artikel ja um (m)einen Erfahrungsbericht eines Stehtisches handelt 😉

Nachdem ich den Yo-Yo® DESK 120 vor Publikation dieses Artikels ausführlich habe testen können, muss ich gestehen, dass das Arbeiten im Stehen tatsächlich angenehmer ist als das permanente Sitzen!

Anfangs war ich doch etwas skeptisch, aber bereits nach der ersten Woche ohne Sitzen am Schreibtisch, kam echte Begeisterung auf, die nach wie vor anhält.

Durch den Einsatz des Yo-Yo® DESK 120 habe ich auch meine über viele Jahre bewährte Lernmethode überdacht, respektive modifiziert.

Dazu nun mehr…

Yo-Yo® DESK 120 Lernen leicht(er) gemacht?

Da ich kein Fan von reinen Produktrezensionen bin, binde ich die von mir vorgestellten „tools“ immer gerne in einen größeren Zusammenhang ein. Ich schreibe bewusst nicht „das große Ganze“, da dies wohl etwas vermessen wäre.

Als leidenschaftlicher und professioneller „Consulting Biohacker“ freut es mich immer sehr, wenn ich eine von mir angewandte Methode/Technik optimieren oder durch eine effizientere ersetzen kann.

So war/ist es auch im Fall meines Yo-Yo® DESK 120 Stehtisches. Wie das? Nun, da ich mich konstant aus-, fort- und weiterbilde lerne ich im Prinzip jeden Tag, oftmals mehrere Stunden.

Ich, wärend der Konzeption dieses Artikels, an meinem Yo-Yo DESK 120, Quelle: eigenes Foto.

In unserer multimedialen Zeit sind Dinge wie das Internet bekanntlich Fluch und Segen zugleich und um den Einsatz eines Computers kommt man wohl nicht mehr herum. Will man aber wohl auch nicht…

Ich war und bin immer ein großer Befürworter der sogenannten „Pomodoro-Technik“ (zu Deutsch: „Tomaten-Technik“ gewesen.

In aller Kürze handelt es sich bei der vom Italiener  Francesco Cirillo in den 1980er Jahren entwickelten Technik um eine Lernmethode.

Hierbei lernt man 25 Minuten unter maximaler Konzentration, welche dann für 5 minütige Pausen unterbrochen werden.

In den 5 Minuten Pause habe ich mich dann immer von meinem Stuhl erhoben und ein paar Mobilitätsübungen gemacht oder bin einfach durch die Wohnung gelaufen.

Die Devise lautete auf jeden Fall: Maximal 25 Minuten konzentrieren und dann auf keinen Fall sitzen in den Pausen!

Mein Yo-Yo® DESK 120 Stehtisch ersetzt nun die Phasen, in denen ich gesessen habe, die Mobilitätstechnik habe ich beibehalten. Somit handelt es sich beim Einsatz meines Stehtisches also um eine „getunte“ Version der „Pomodoro-Technik“.

Für alle, die sich fragen, warum die Technik nach einer Tomate benannt wurde, die offensichtlich keine Bewandtnis hat, sei gesagt, dass Cirillo (der Erfinder) die Zeit einfach mit einer Küchenuhr gemessen hatte, die die Form einer Tomate hatte.

Der Yo-Yo® DESK 120 fällt für mich demnach ganz klar in die Kategorie: „don’t work harder, work smarter“! Es geht also nicht darum, härter und mehr zu lernen, sondern die Effizienz zu steigern.

Sei es nun durch „tools“, wie einen Stehtisch oder durch Techniken, wie die „Pomodoro-Technik“.

Bevor ich Morgens lerne, meditiere ich meist etwa 30 Minuten, um meinen Kopf von meinen Gedanken zu befreien, mich zu „leeren“, um anschließend neues Wissen auch adäquat aufnehmen zu können!

Warum auch du – aus meiner Sicht – meditieren solltest, erfährst du in meinem fast gleichnamigen Artikel:

WARUM DU MEDITIEREN SOLLTEST – DEINE GEDANKEN ERSCHAFFEN DEINE REALITÄT!

Warum ich während der Meditation auch gerne Kaffee-Einläufe nutze, und was es mit diesen sonst noch auf sich hat, erfährst du in meinem Artikel:

MEIN PERFEKTER KAFFEE-EINLAUF ☕️

Eine weitere meiner Lerntechniken ist übrigens das Dekodieren von Sprache, insbesondere lateinisch-griechischer Begriffe aus der Medizin. Wie und warum ich das mache, um das zu Lernende besser zu durchdringen, kannst du in meinem Artikel

LATEINISCH-GRIECHISCHER WORTSCHATZ FÜR PERSONAL-TRAINER ? im Detail nachlesen. Wenn du dich für ein individuelles Consulting/Coaching interessierst, indem du lernst, effizienter zu lernen, dann schreibe mir eine E-Mail an:

info@bernd-stoesslein.de

Yo-Yo® DESK 120 – DER Stehschreibtisch?

Der von mir getestete Stehschreibtisch ist, mit knapp 120 (119) cm, der Größte aus der sogenannten „Klassik“ Reihe. Der Yo-Yo® DESK 120 ist ein echter „Brecher“ und wiegt satte 24,5 kg!

Diese muss er auch auf die Waage bringen, schließlich ist er ausgelegt für z.B. zwei externe Monitore und weiteres Equipment wie z.B. ein Notebook. Die exakten Maße betragen 119cm Breite x 78cm Tiefe.

Yo-Yo Desk Maße, Quelle: Sit-Stand.com®

Die optimale Körpergröße, um mit dem Yo-Yo® DESK 120 maximal effizient arbeiten zu können liegt, laut Hersteller, zwischen 150cm bis 183cm. Kleinere oder größere Menschen sollten auf den Yo-Yo® DESK SLIM, respektive den Yo-Yo® DESK GO ausweichen.

Der Yo-Yo® DESK 120 ist TÜV-zertifiziert und kommt mit einer Garantie von 3 Jahren! Die Gasfedern, welche links und rechts am Tisch mittels Hebel ganz einfach eingestellt werden können (siehe Bild), ermöglichen ein fast stufenloses Justieren auf die jeweilig gewünschte Höhe.

Eine der beiden seitlichen Gasfedern samt Griff, mit deren Hilfe sich der Yo-Yo® DESK 120 spielend leicht verstellen lässt, Quelle: eigenes Bild.

Laut Hersteller sind die Yo-Yo® Stehschreibtische auch die 1# der Stehschreibtische in Europa!

Yo-Yo® DESK 120 Fazit/Conclusio

So, wie lautet nun mein Fazit über den Yo-Yo® DESK 120? Lohnt sich die Investition? Lange Rede, aber auch langer Sinn: JA! Wieso, weshalb und warum habe ich aus meiner subjektiven Sicht in diesem Artikel bereits recht ausführlich erläutert.

Rein objektiv gesehen, und insbesondere unter der Berücksichtigung der geschilderten Syndrome (UPC & LCS), halte ich den Einsatz eines Stehschreibtisches wie den Yo-Yo® DESK 120 für absolut sinnvoll.

Nicht nur aufgrund dessen, spreche ich auch bewusst von einer Investition statt einer Ausgabe! Sicher, zunächst einmal stellen knapp 420 € für den Yo-Yo® DESK 120 eine Aufgabe dar.

Wenn man aber bedenkt, was man damit – aus meiner Expertise – allein präventiv und rehabilitativ für seine Gesundheit leisten kann, dann fällt dieser Stehschreibtisch in eine, wenn nicht DIE beste Investitionskategorie, die es gibt.

Welche das ist, höre ich den geneigten Leser leise denken? Nun, die Investition in das eigene Ich, respektive die eigene Gesundheit! Mit solch einer Investition liegt man immer goldrichtig!

Wer also unter den beispielhaft geschilderten Syndromen leidet, der sollte darüber nachdenken, ob diese nicht (auch) das Resultat oft jahrzehntelangen exzessiven und „falschen“ Sitzens sind!

Neben strukturiertem, individuellem und zielgerichtetem Krafttraining kann ein Stehtisch wie der Yo-Yo® DESK 120, aus meiner Sicht, ein wertvolles „Werkzeug“ für den eigenen „Gesundheitswerkzeugkasten“ darstellen!

Ich bin jedenfalls heilfroh, dass ich in einen Stehschreibtisch investiert habe und freue mich jeden Tag aufs Neue, an diesem arbeiten zu dürfen.

Hat dir dieser Artikel gefallen? Dann teile ihn mit deinen Freunden, hinterlasse einen Kommentar, abonniere den Newsletter/Blog und/oder schreibe mir eine E-Mail, an:

info@bernd-stoesslein.de

© HP Bernd Stößlein, Master of Business Administration in Sportmanagement.

In diesem Artikel findest du den ein oder anderen „Affiliate Link“, zu amazon. Wenn du über diesen Link etwas erwirbst, dann unterstützt du damit meine Blogartikel und schaffst Ressourcen für weitere qualitativ hochwertige Recherchen und Artikel wie diesen. Es entstehen für dich dadurch keine Mehrkosten! Alle meine grundsätzlichen Empfehlungen findest du unter: https://www.amazon.de/shop/bernd_stoesslein

YBELL is a 4-in 1 piece of fitness equipment with endless workout possibilities, especially when it comes to functional training/movements. The special design/shape of these dumbbells allows you to perform kettlebell-training, regular dumbbell-work, double grip “med ball”-bouts, push-up stands and much more. The YBell was carefully designed by experts in fitness and industrial design to make it easy and accessible for every Body 😉 No matter if you’re “just” a “weekend-warrior” or a professional athlete, integrating these “cool tools” will add variation to your workouts, which inevitably will lead to more progression!
Learn more about these helpful “tools” for you “training-toolbox”…

This article will also be available in German, soon!

YBELL – Why would you choose’em?

YBEll, why would/should you choose them? (what a pun 😉 ) Well, as always, this question has to be answered with: “it depends”! It depends on what’s your goal right now.

For example: It depends whether you’re new to the world of fitness, respectively a novice lifter or, i.e. if you’re a world class elite athlete.

In both cases you might take benefit out of integrating YBELLs into your workout, but in different ways!

This results to the weights of the YBELLs which, in comparison to ordinary dumbbells, are rather light in weight (up to about 15kg).

So if you are e.g. looking for a “most bang for your buck” approach to equip you own house with a little “home gym”, but lack the space to stuff it with space consuming racks and/or machines, you should definitely consider investing in a set of YBELLs!

Especially in times like we experienced in 2020 where lots of people, due to special circumstances, did not have the chance to visit their regular gym! With a full set of YBELLs at home there is no time for excuses but a lot of access for results!

Having a set of these will give you literally a myriad of training possibilities, especially for metabolic-, respectively anaerobic conditioning work, plus functional movements.

Due to the shape of the YBELLs you can use them as regular dumbbells, as kettlebells and (with some restrictions) as “medicine balls”. The restriction results in the fact that, obviously, you should by all means  not throw them around like a true medicine ball.

Keeping that in mind you can still use them for functional medicine ball-movements, as they can be gripped two-handed and that in a much more convenient way than regular dumbbells!

From my professional perspective/expertise I’d say the YBELL plays its true strength in its versatility for functional movements.

Let me explain…

YBELL and the sagittal plane

Most of power, strength, speed and other weight-training is more or less performed in the sagittal plane. That means, you either move a weight up or lower it down. Rotational exercises are found surprisingly rare, even in top athletes’ training protocols.

Of course you should keep in mind that even if someone is considered to be a world class athlete this doesn’t necessarily mean that he or she is also always performing a structured and sport specific training!

So, the big benefit of YBELLs is for sure the functional training aspect. Movements in which you rather train movement than (isolated) muscles.

If you’re not yet familiar with this training-nomenclature here’s a brief example:

Example 1:

An isolated exercise would be a seated dumbbell biceps curl. An exercise where you are sitting on a bench (with a dumbbell in each hand) and then curling the weight up (concentric phase) and afterwards lowering the weight (eccentric phase).

This would be considered to be an “open kinetic chain” and “open circuit” exercise, but we will leave this apart not to make things too complicated. As you can see, this exercise is intended to (depending on the way of gripping and rotating your wrist)  work different parts of your biceps muscles.

According to that it is, more or less, not training something else.

Seating YBELL-curls as example for an open kinetic chain excercise with open circuit, source: own picture.

Example 2:

In this example we think of an exercise named: “Medicine Ball (MB) Pull-over to stand”. A rather complex exercise, that focuses on movement, rather than isolated muscle work!

Performing this exercise requires you to stand upright (with a YBELL) in front of your belly (arms bent approximately 90° in the elbows), after that you squat down to a full squat (“ass to grass” or deep enough to leave a stain on the floor 😉 ).

Having reached this position you will move your upper body backwards until it is lying on the floor, while simultaneously extending your arms over your head (keep arms straight).

Then you’re going to do the same movement as described above but just in reverse, performed in an explosive manner.

This is an exercise in which you train a complete movement, with extensions and flexions of almost all joints and by activating all primary movers in your body.

Too see the described excercise, “Medicine Ball (MB) Pull-over to stand”, please watch the video below.

As you can see, the YBELLs are designed not to be used for super heavy hypertrophy work, like traditional bodybuilding work as they eventually will become too light, nor for something like powerlifting.

YBELL – Form follows function

So, what’s so special about the YBELL? Of course, it’s the design, but it also resembles a function. When it comes to designing products there is a rule: “form follows function”.

That means that, first of all, the product must be usable to solve a certain “problem”. Afterwards you can give it a nice appearance (design).

The YBELL does both. It looks really nice and has a very good workmanship + offers a vast versatility for exercises (as you can use it as dumbbell, kettlebell and “medicine ball”) while simultaneously saving a lot of space.

YBELL describes the evolution of the YBELL’s product development as followes:

The development of the YBell has been a labor of love for inventor and personal trainer Aaron Laurence. Over the last 15 years Aaron has trained thousands of people on Australia’s famous Bondi Beach.He was using traditional training tools, dumbbells, kettlebells and medicine balls, to create his own brand of High Intensity Resistance training. With his member numbers growing it became impossible to keep incorporating multiple pieces of equipment into his sessions. The solution to the problem was the YBell. One piece of equipment that did everything he was already doing and more!” (YBELL, 2020).

The YBELL’s name perfectly describes its appearance. It looks roughly like the letter Y with a triangle “around” it.

The YBELL-Family is available from XS up to XL and are sold individually.

YBELLs, from XS to XL, source: YBELL.

They star with 9,5 lb which is approximately 4,3 kg and move up to 26,4 lb, which is about 12kg.

Of course the YBELLs increase in size and weight from extra small to extra large.

YBELL – Get a Grip

The cool thing about the YBELLs are the grips. You have four on each YBELL and it gives you quite a lot of grip options. Either for a double handed grip or a single handed one.

Moreover, you can grip “inside” the bar. That differs the YBELLs from traditional dumbbells where the weight equals the center of mass. Meaning, that while gripping an ordinary dumbbell you find the weights aligned with the grip.

When you use the inner grip of the YBELL, the weight distribution differs from those of normal dumbbells. Using a YBELL the weight is not aligned with the grip but “molded” around your hand!

This will result in a different weight distribution and a total different feeling while moving the weights around.

Is this “better”? This would consider a definition of the term “better” in our case here but I would say: Not better, but different!

Keep in mind that constant training variation is one of the keys to continuing progression. Therefore it’s not as important of HOW much progression you do but to ensure ongoing progression.

You should also keep in mind that it’s about proficiency and not perfection. If you try to do something perfect it will never be done.

To give you a better understanding of how you can use the grips of the YBELL please take a look at the images below:

YBELL Inner Grip:

Choosing where to grip is essential! By changing the grip positions you can change the center of mass. Meaning, it’s a difference for your joints/muscles e.g. if you perform a YBELL bench press movement with your hand IN the YBELL or ON the YBELL!

YBELL inner grip, source: own picture.

Having your hand ON the YBELL, the weight will drag your hand more to the outside, whereas keeping your grip IN the YBELL will keep the weight in a line with your arms, respectively your elbow and shoulder-line (depending on which part of the movement you’re looking at).

Inner vs outer grip position, source: own picture.

YBELLS outer grips (“medicine ball”)

When gripping two-handed you can use the YBELLs to simulate a kind of “medicine ball-training”, at least to point where you don’t have to throw the ball. Therefore it’s not a true ballistic movement, e.g. like pushing a MB away from you with maximal force output!

But, as I mentioned earlier in the text, you can use any other exercises that you could perform with a regular MB! This will give you a vast possibility of exercise performances in all three planes (sagittal, frontal, transversal).

Especially useful for metabolic conditioning (where you don’t need super heavy weights) and other functional oriented movements.

YBELL “medicine ball” grip, source: own picture

YBELL Kettlebell-stile grip

The triumvirate of usage will also give you the opportunity to use the YBELLs like a conventional kettlebell.

YBELL kettlebell-stile grip, source: own picture.

This will expand your exercise repertoire to exercises like kettlebell swings or even Olympic Weightlifting inspired ones, like i.e. single-arm YBELL snatches, from different positions (hang/from the ground).  

Again the outcome of the exercise will differ from your grip position (e.g. kettlebell style = on the top grip of the YBELL)!

In this video I give you a brief example of exercises that can be performed using different grip variation on the YBELLs. Some exercises are performed with a closed kinetic chain and closed circuit, or an open kinetic chain with open circuit.

YBELL – price vs. investment

Well, when it comes to fitness equipment it’s inevitable to talk about the costs, the price and if something is considered to be a true investment.

So, what does a full set (10 YBELLS) cost? A 10-piece kit will cost you 599,90$ exclusively packing & shipping. This is an approximate price of 60$ per YBELL.

If you’d like to have them stored in a SUPER COOL vertical rack (see photo)  for an extra of 315,99$.

YBELL Combo 10-Piece Kit + Rack, source: YBELL.

You can either pick a YBELL Combo 10 Piece Kit + Rack or the Vertical Rack alone or each YBELL solely (not sold as pair).

Therefore you have plenty of options available suiting your demands, space and budget. I’ve being using the YBELLs quite some time now, very extensively with my own training and with clients and patients.

I consider the YBELLs as a very useful equipment. No matter if you have a professional facility in which you work with clients or if you want to equip your own home-gym.

Whether you’re working 1:1, alone or in groups, the YBELLs will give you a time and equipment-saving solution, the famous “most bang for your buck”!

I’m happy to have them in my gym!

YBELL Review Conclusion

So, what else can I say about the YBELLS that I haven’t said before? To be honest, quite a lot and one single article is surely not enough to show every possible usage, any kind of exercise or movement that can be applied with a set of YBELLs.

That’s not at all my intension nor my desire. This article is written to introduce you to this “cool tool”. To address you that there is more out there than the regular stuff.

Of course the fitness industry has the burden that almost every day something new “pops up”, but it is not necessarily useful! As my mentor Charles R. Poliquin, aka “Strength Sensei” (R.I.P.) once used to say:

I could wear my underpants above my jeans, that would be new. But it would be useless” (Poliquin 2018).

You get the point. Just because it’s new does not mean it’ll apply any real benefit. In the case of the YBELLs that’s the opposite. They are new AND useful!

I like the approach YBELL uses, it’s according to the “pareto principle” or 80:20 rule. You search for the minimum effective dosage to achieve maximum output. In the case of the YBELLS that’s the same.

They offer you the possibility to have different equipment all “molded” together in one piece. According to that it’s economic in terms of budget and equipment!

YBELLs have a non-slippery surface, a non-rust neoprene coating, are ideal for training almost everywhere and will expand your “training tool-box”. As you know: if you only have a hammer, everything looks like a nail!

Bonus Option:

YBELL offers quite extensive options of workout and education! You can, e.g. book an online introduction workshop, use the YBELL Workout-APP and/or apply either to their Coaching- and Master Trainer Courses.

Additionally there are lots of YBELL-Events available, to be found all here: https://ybellfitness.com/workouts-education/training-calendar-events/

My Final Conclusion:

I strongly recommend you to invest in these special barbells!

© HP Bernd Stößlein, Master of Business Administration in Sportmanagement.

If you liked this article please share it with your friends, subscribe to the newsletter and the blog.

If you like to book a professional online/offline consultation please feel free to contact me:

 info@bernd-stoesslein.de


Literature

YBELL about us, source: https://ybellfitness.com/about-us/, access: 5.8.20.

Wrist Max Finger and Wrist Trainer is a specially designed grip strength handle, made by a company called “Arm Sport”. Its origin comes from the world of professional arm wrestling. If you’re old enough, you will remember Sylvester Stallone’s 1987 highly underrated movie “Over the Top”, in which he played a character named Lincoln Hawk and the fabulous Movie’s music by Sammy Hagar, “Winner Takes it All”. But even if you’re not into the world of arm wrestling but e.g. into tennis, having a Wrist Max in you gym-bag/arsenal might be a beneficial thing! In this article you will learn about the specialties of this grip-tool and how you might use it to treat  a “Tennis Elbow”.

If you want to read more about Arm Sport’s special grip tools you can do so in my review about their “Cone Grips”.

Wrist Max  – Finger and Wrist Trainer

ARMSPORT does it again, with the Wrist Max handle. This “cool tool” is one of the most effective handles for wrist & finger training. It’s perfectly designed to fit an athlete’s grip and stays comfortable during the training.

You have two size-options between you can choose, (L & XL), according to the size of your hand (see picture). So, if you have HULK-size like hand, you’re good to go, too.

Wrist Max Size Chart, source:
© Wrist Max.

The grip itself is made from super durable plastic with adjustable straps which prevent your hand from slipping off the device.

The form of the Wrist Max is C-shaped, to resemble an arm wrestling opponent’s back of the hand. It really fits within your own hand and is never uncomfortable!

Depending on how you grab it (see pictures) you can either place your whole palm on the grip tool or you emphasize the pressure by sparing the mid-part of the fingers and using the tips of the fingers instead.

Insert pictures of different grip positions

You can find a short but really good review by arm wrestling champion Davon Larrat from Canada.

If you want to get more in depth knowledge what the Wrist Max actually was designed for (to become a stronger arm wrestler) I highly recommend following Davon Larrat!

I’m not an arm wrestler but a Strength and Conditioning Coach! Therefore I’ll give you my point of view how anybody could structurally integrate this “cool tool” and use it, e.g. in a rehabilitation phase aside from pure sport specific training.

Wrist Max for Lateral Epicondylitis?

Wrist Max: I like to think outside the box. In addition, I’m a “Heilpraktiker” (Complementary and Alternative Medicine Practitioner). Therefore I also want to illuminate the Wrist Max from a therapeutic and possible rehabilitate view.

But before I tell how I use the Wrist Max to treat something that’s called “Medial Epicondylitis”, I will explain you what it is.

The term “Lateral Epicondylitis” derives from Latin latus = side, rim (Becher et al., 1995) and the constructed word Epi/condyl/itis, which is a composite of:

  • Greek prefix epi = above (Becher et al., 1995)
  • Greek condyl, respectively kondylos = bone joint, ankle (Becher et al, 1995)
  • Suffix -itis = acute inflammation

Combining those three you get Epi/condyl/itis which is an “acute inflammation of the outmost part of a joint”. Add the word “lateral” and you get an “acute inflammation of the outmost part of a lateral joint”.

Another, colloquial, expression for this issue is “Tennis Arm”. To be more accurate a tennis arm is actually not an acute inflammation but rather a chronic ongoing (potentially) degenerative issue.

According to that, a more appropriate term would rather be “Lateral Epi/condyl/OSIS”.

With the suffix -osis describing a “chronic (degenerative) issue (in the tissue)”.

But how do you get a lateral epicondylosis? Well, due to my observation (also being a Strength and Conditioning Coach) I would say due to repetitive and forceful wrist extension and/or excessive supination, like e.g. playing a “back hand” in tennis.

What else might cause a Lateral Epicondylosis (“Tennis Arm”) in Tennis?

  • An improper and/or new racquet (size)
  • A new /faulty grip position
  • Repetitive hitting into the wind

Wrist Max Rehab for Tennis Arm – An approach

So, how do I structurally integrate the Wrist Max in a rehab program for tennis arm?

First it is important to take care of your overused elbow joint. If it is acute, ice might help to reduce an inflammation but in the long run heat will do a better job (if it is a degenerative issue and not a “silent inflammation”!).

If a patient suffers from a restriction of range of motion (ROM) I’d recommend to get rid of possible adhesions and after that I’d (re)build up strength and coordination.

The Wrist Max can be used to strengthen the agonist muscles in the elbow and ensure, what my Mentor Charles R. Poliquin aka “Strength Sensei” (R.I.P.) would have described, a proper structural balance.

As the Wrist Max is designed for wrist flexion, this will be the choice first, to prevent the extensor muscles of the forearm from further stress. Later, the extensors will be integrated in a structural-balanced rehab program.

I would also highly recommend to strengthen the scapula stabilizers as they are often underdeveloped and play an important role for proper elbow, respectively wrist kinetics.

An acute rehab phase may last around 8 weeks, but you might speed up recovery by integrating useful tools and techniques like i.e. Frequency Specific Microcurrent (FSM), platelet-rich plasma, dry needling and/or soft tissue tools (like the Heskiers-Tool).

When a tennis player is ready to hit the court again I’d recommend making further adjustments, like thinking about an appropriate racquet (consider size and string tension), footwear for proper alignment etc.

You can find more about the importance of proper alignment in my articles:

Wrist Max  – More Grip strength for a prolonged life?

Ok, but wait a second…a prolonged life due to a stronger grip?!

Yes, this seems to be true!

Wrist Max Finger & Wrist-Trainer, source: © Wrist Max

Besides the fact, that even in professional sport, training grip and neck training are probably the two most neglected pillars of strength training, studies found out, that a stronger grip is actually a better vital parameter for overall health than the blood pressure (at least in middle aged and older people)!

According to a nationwide population-based Taiwanese study the relative hand grip strength seems to be a simple indicator of cardiometabolic risk among the aforementioned middle-aged and older people.

Another study form 2016 states, that:

„(…) handgrip strength, may be a better tool to capture conceptual concomitant health, which may be a simple, inexpensive, and easy-to-use tool when targeting cardiovascular health in public health level” (Lee et al., 2016).

Furthermore, a study with the title: “Grip Strength is Associated with Longitudinal Health Maintenance and Improvement in Adolescents” came to the conclusion that:

Greater NGS is associated with longitudinal health maintenance and health improvements in adolescents. Low NGS could be used as a prognostic indicator of cardiometabolic risk and to identify adolescents who would benefit most from lifestyle interventions to improve muscular fitness.“ (Peterson et al., 2018).

The abbreviation NGS is used in this study for “Normal Grip Strength”. In addition, a 2017 study claims that:

„(…) higher baseline GS and 5-year increase in GS were protective of mortality, whilst GS decline was associated with an increased risk of mortality in the very old over 9.6 years, especially in women. These results add to the biological and clinical importance of GS as a powerful predictor of long-term survival in late life.“ (Granic et al., 2017).

In this study they used “GS” for abbreviating the term “Grip Strength”.

Another study from 2018 investigated the relation of grip strength (GS), cardiorespiratory fitness (CRF) and overall mortality risk found out that:

“CRF and GS are both independent predictors of mortality. Improving CRF and muscle strength together, as opposed to single optimization alone, can be the most effective behavioral strategy to reduce overall mortality and cardiovascular risk.” (Youngwon, 2018).

It can be seen that there are numerous studies on the meaningfulness of grip force measurement, respectively grip strength training.

Of course, this article does not claim to have listed every study on the benefits of grip strength! If you want to read more studies, you should simply go online and search for example for the key words: grip force measurement, hand force measurement, grip strength measurement etc.

Wrist Max – Review Conclusion

Wrist Max – So, what’s the deal of the big deal? First of all, it is very pricy! Depending on the size (L, XL) the models range between 39,90$ to 44,90$, which is – to be honest – more than fair!

Wrist Max in action, in my Gym, source: own picture.

Furthermore, it is a very versatile tool that can also be used for strength/hypertrophy phases and/or rehabilitation in strength and conditioning, not only in arm wrestling!

Considering that and it’s great portability makes the Wrist Max a real “cool tool” for every “gym rat”, professional athlete, “weekend warrior” or strength facility.

I would highly recommend you to also invest in the Arm Sports’ “ConeGrips” to further stack your “arm-arsenal”.

Having a strong grip clearly shows benefits of a prolonged life. According to that, investing in a useful tool like the Wrist Max makes total sense for me.

It seems to be a pretty useful tool while being in a reha phase and dealing with lateral epicondylitis/-osis (“Tennis Elbow”).

Conclusion: go and get one !

© HP Bernd Stößlein, Master of Business Administration in Sportmanagement.

If you liked this article please share it with your friends, subscribe to the newsletter and the blog.

If you like to book a professional online/offline consultation please feel free to contact me: info@bernd-stoesslein.de


Literature

Lateinisch-griechischer Wortschatz in der Medizin, S. 75. 

Lateinisch-griechischer Wortschatz in der Medizin, S. 114. 

Lateinisch-griechischer Wortschatz in der Medizin, S. 121.

Lee WJ; Peng LN; Chiou ST; Chen LK. Relative Handgrip Strength Is a Simple Indicator of Cardiometabolic Risk among Middle-Aged and Older People: A Nationwide Population-Based Study in Taiwan. Plos One 201611 (8), 0160876 DOI: 10.1371/journal.pone.0160876.

Peterson MD; Gordon PM; Smeding S; Visich P. Grip Strength Is Associated with Longitudinal Health Maintenance and Improvement in Adolescents. The Journal of Pediatrics 2018202, 226–230 DOI: 10.1016/j.jpeds.2018.07.020.

Granic A; Davies K; Jagger C; M Dodds R; Kirkwood TBL; Sayer AA. Initial Level and Rate of Change in Grip Strength Predict All-Cause Mortality in Very Old Adults. Age and Ageing 201746 (6), 970–976 DOI: 10.1093/ageing/afx087.

Gigaset E720 – So viel Extra (Made in Germany) muss sein. Dieser Blogartikel fällt in die Kategorie „Hinter den Kulissen“ oder, wie es „Denglisch“ ja jetzt heißt „making of“. Wie bereits im Artikel über das „ruggedized“ (robust gebaute) Smartphone Gigaset GX290 und anderen Berichten, zeige ich dem geneigten Leser auch immer mal, mit welchen „cool tools“ ich jeden Tag meine Büroarbeit absolviere. Denn auch als Strength-Coach/Personal-Trainer bzw. Heilpraktiker kommt man um Bürozeiten nicht herum. Um so wichtiger ist es, dass man auch dafür die besten „Werkzeuge“ zur Hand hat. In diesem Artikel berichte ich über mein neues, strahlungsarmes Haustelefon, das jedes Biohacker-Herz höher schlagen lässt.

Gigantisches Gigaset – Geht nicht, gibt’s nicht?

Die Frage, warum ich auf meinem Blog bestimmte Dinge vorstelle, werden sich die eingefleischten Leser wohl nicht mehr stellen. Diese wissen um meine Leidenschaft, über den sprichwörtlichen Tellerrand hinaus zu schauen.

Mein Gigaset E720A, fotografiert mit meinem Gigaset GX290, Quelle: eigenes Bild.

Als Strength and Conditioning-Coach/Personal-Trainer, Heilpraktiker, aber auch als sog. “Consulting Biohacker” kommt man heutzutage um das Thema (Tele)Kommunikation nicht mehr herum.

Aufgrund dessen habe ich mich natürlich auch in diesem Bereich stark mit elektromagnetischen Feldern, 5G usw. beschäftigt. Mehr Grundlegendes zu diesen Themen findet man in diesen beiden Artikeln, ebenfalls auf meinem Blog:  

Doch an dieser Stelle geht es um mein neues Gigaset. Nicht mein erstes Telefon dieser Marke, denn über sehr viele Jahre habe ich bereits ein Gigaset AS 28 H (siehe Fotos) genutzt. Dieses hatte mir auch immer treue Dienste geleistet.

Für meine Arbeit brauchte ich aber ein neues „Haustelefon“, zusätzlich mit Anrufbeantworter. Nicht zuletzt aufgrund der sagenhaften Verarbeitungsqualität „Made in Germany“ fiel meine Wahl dann wieder auf ein Telefon der Marke Gigaset.

Wie zu Beginn ja bereits erwähnt, setze ich auch beim Mobiltelefon/Smartphone auf die Marke Gigaset.

Gigaset E720A, Quelle: © Gigaset.

Das Gigaset E720 gibt es übrigens in unterschiedlichen Ausführungen.

In der von mir genutzten Version (mit Anrufbeantworter = E720A, siehe Fotos), ohne Anrufbeantworter und als HX-Universalmobilteil  zur Erweiterung bestehender DECT-Basisstationen oder zum direkten Betrieb an kompatiblen DECT und sogenannten CATiq-Routern.

Doch warum ausgerechnet dieses Telefon für meine tägliche Arbeit? Anbei einige meiner Highlights:

Das Gigaset E 720 besitzt z.B. „sprechende Wähltasten“. Gigaset nennt das „Voice Announcement“. Das finde ich insofern sehr praktisch, als dass ich mich beim alten Telefon, gerade bei längeren Nummern, oft vertippt hatte.

Denn das alte Gigaset hatte nicht bei jedem Tastendruck ein auditives Feedback gegeben. So wusste man, beim schnellen Tippen, nicht immer, ob man eine Zahl nun wirklich gewählt oder nur gedrückt (oder umgekehrt) hatte oder nicht.

Richtig „cooles feature“ des Gigaset E 720 ist also, dass es einem die getippten Zahlen sowie im internen Telefonbuch abgespeicherte Namen vorspricht. Tolle Idee, auch für Nutzer mit eingeschränkter Sehfähigkeit.

Gigaset E720A im Bluetooth-Modus, Quelle: © Gigaset.

Ebenfalls praktisch, es besteht die Option einer Anrufübertragung an andere Geräte, via Bluetooth® (4.2).

Für mich selbst zwar nicht relevant, trotzdem aber sehr cool, die direkte Anrufübertragung per Bluetooth® kann auch z.B. auf Hörgeräte übertragen werden! Eine super Möglichkeit für Menschen mit Beeinträchtigung des Hörvermögens!

Ein nettes „Bonbon“ ist, dass ich mit diesem Telefon auch ein „cool tool“ habe, das ich Patienten meiner Heilpraktiker-Praxis empfehlen kann. Ich bin immer auf der Suche nach tollen Gerätschaften, die Menschen mit besagten Einschränkungen das Leben erleichtern!

Gigaset schreibt dazu:

Für Menschen mit Hörgerät ist das eine wirkliche Erleichterung. Telefon und Hörgerät verstehen sich sonst nicht so gut. Entweder gibt es Rückkopplungen oder die Nutzer entfernen das Hörgerät vor dem Telefonat. Nun wird das Hörgerät zum Freisprechempfänger“ (Marcus Kluth, Product Manager von Gigaset).

Wenn wir schon beim Thema Ton, respektive Klang sind: Meiner Meinung nach zeichnet sich das Gigaset E 720 durch eine wirklich sehr hohe Audioqualität aus.

Nun bin ich natürlich kein Tontechniker, aber, meiner Meinung nach, sorgt das Gigaset E720 auch im Freisprechmodus für glasklare Tonübermittlung.

Selbst wenn es Hintergrundgeräusche beim Telefonieren gibt, passt die Software sowohl die Rufton- also auch die Hörerlautstärke automatisch an solche herausfordernden Gegebenheiten an! Hintergrundgeräusche können so ganz gut unterdrückt werden.

Selbstverständlich kann man die Ruf- und/oder Hörerlautstärke aber auch manuell anpassen!

Gigaset gegen Gauner und „Enkeltrick“

Interessantes „feature“ des Gigaset E720 ist der „Anti-Enkeltrick“. Dieser wird oft von Gaunern angewandt, um meist Senioren am Telefon davon zu überzeugen sie würden gerade von einem ihrer Enkel angerufen werden.

Diesen und allen anderen unerwünschten Anrufen, die einem wirklich auf die Nerven gehen können, kann man mit dem Gigaset E720 ebenfalls einen Strich durch die sprichwörtliche „Rechnung“ machen.

Anonyme oder unbekannte Nummern können nämlich, auf Wunsch, nur optisch angezeigt oder gar unterdrückt werden.

Darüber hinaus existiert eine Funktion namens „nur Kontakte“, mit der man nur die Nummern durchstellen lassen kann, die man vorher selbst ins Adressbuch des E720 eingegeben hat!

Wer, wie ich, das E720A für sein Büro und oder die Praxis etc. nutzen will, der kann übrigens unerwünschte Anrufer (wie etwa „Schmeißfliegen-Callcenter“) auf eine sogenannte schwarze Liste („black list“) setzen.

Besagte Telefon-Parasiten werden dann einfach nicht mehr durchgestellt, respektive abgelehnt. Damit spart man Zeit und vor allem Nerven!

Das E720A ist, aus meiner Sicht, also ein echter „Allrounder“. Es eignet sich sowohl für geschäftliche Zwecke, wie auch für Familien und/oder Menschen (z.B. Senioren) mit Hör- und/ oder Sehbeeinträchtigungen.

Darüber hinaus teilte mir Gigaset mit:

Das Gigaset E720 ist ein komfortables Telefon für Familien – es erleichtert aber auch älteren Menschen oder Menschen mit besonderen Bedürfnissen die Kommunikation. Ein Druck auf die Direktwahltaste A [farbig rot abgehoben, Anmerkung des Verfassers] löst eine Notfall-Kette aus. Bis zu vier hinterlegte Telefonnummern werden der Reihe nach angerufen, bis jemand abhebt.

Gigaset E720 – Strahlungsarm dank ECO-DECT?

Da ich mich, wie eingangs bereits erwähnt, intensiv mit dem Thema 5G, EMF, etc. befasse, wollte ich natürlich auch ein Haustelefon haben, das nicht noch mehr Strahlung in die Praxis, das Studio und die eigenen vier Wände bringt, sondern ein Strahlungsarmes.

Gigaset E720A im “ECO-DECT”-Modus, Quelle: Eigenes Bild.

Laut Hersteller soll dies mit dem Gigaset E720 auch der Fall sein. Durch die  „ECO-DECT Technologie“ soll der Stromverbrauch des Geräts um 60% reduziert werden können.

In diesem Modus wird die Sendeleistung dann auf ein absolut notwendiges Maß reduziert, um weiterhin noch eine stabile Verbindung zwischen Mobilteil und Basisstation zu gewährleisten. 

Solange sich das Gerät im Stand-By Modus befindet, soll es sogar vollständig strahlungsarm sein! Dennoch ist es dann, laut Gigaset, 300 Stunden in Bereitschaft (nach voller Ladung), was etwas 12 Tagen entspricht!

Alles auf einen Blick – das Datenblatt des E720A

Gigaset E720A Datenblatt, Quelle: © Gigaset.

Fazit/Conclusio Gigaset E720

Alle meine Blogartikel schließen stets mit einem Fazit, respektive einer Conclusio. Was kann ich also über mein neues Praxis-Telefon sagen? War ich überrascht? Nein. Aber ich hatte auch bereits hohe Erwartungen an dieses Telefon.

Denn schließlich ist es bereits das zweite Modell aus dem Hause Gigaset (das dritte, wenn man mein altes Gigaset von „anno dazumal“ mitzählt), neben meinem geliebten Smartphone GX290. Eine ausführliche „review“ zu diesem tollen Mobiltelefon findet der geneigte Leser hier.

Der vorliegende Artikel gewährt also mal wieder einen weiteren Blick „hinter die Kulissen“ von Bernd Stößlein Personal-Training, der Naturheilpraxis/des Heilpraktikers Bernd Stößlein und des „Consulting Biohackers“ der ich nun mal mit Leib und Seele bin.

Zum Gigaset kann ich sagen, dass es für die UVP von um die 120€ (in der von mir genutzten Ausführung, mit AB) extrem viel mitbringt. Wie der Amerikaner sagen würde „most bang for your buck“. Also viel Leistung für vergleichsweise wenig Geld!

Vom Gigaset E720 war ich also nicht überrascht, dennoch aber ein weiteres Mal begeistert! Ein Telefon, das ich meinen Kunden und Patienten guten Gewissens weiterempfehlen kann und werde!

Besonders gut gefällt mir der ECO-Modus, der die Strahlung reduziert oder gar eliminiert (im Stand-By Modus). In Sachen von EMF, die uns tagtäglich „bombardieren“, eine tolle Sache!

Kurz und knall: absolute Kaufempfehlung! Eine echte Investition!

Hat dir dieser Artikel gefallen? Dann teile ihn mit deinen Freunden, hinterlasse einen Kommentar, abonniere den Newsletter/Blog und/oder schreibe mir eine E-Mail, an:

info@bernd-stoesslein.de

© HP Bernd Stößlein, Master of Business Administration in Sportmanagement.

In diesem Artikel findest du den ein oder anderen „Affiliate Link“, zu amazon. Wenn du über diesen Link etwas erwirbst, dann unterstützt du damit meine Blogartikel und schaffst Ressourcen für weitere qualitativ hochwertige Recherchen und Artikel wie diesen. Es entstehen für dich dadurch keine Mehrkosten! Alle meine grundsätzlichen Empfehlungen findest du unter: https://www.amazon.de/shop/bernd_stoesslein

Brain Coach Performance Certification is an (online) certification by Annette Verpillot, respectively her Canada-based company named Posturepro. This course is co-hosted by Director of Strength and Conditioning for Basketball, Golf & Tennis, Preston Greene (Florida Gators) and Assistant Athletic Performance Coach, Blake Bender (California Golden Bears).

This knowledgeable triumvirate will tell you how to “rewire” you brain and how to bring a simple and practical understanding of neurology to fitness providers of all levels. An online certification that will equip you with the health and fitness-tools to immediately improve your practice and change the way you work with clients/patients by working with a brain-based approach. 

In this article I’ll give you a glimpse of what I’ve learned and why you also should invest in this education…

Brain Coach Performance Certification – A brain- based approach

What makes this course unique you might ask? Well, it’s definitely the brain- based approach!

The Brain Coach Performance Certification(BCPC) is divided into 6 modules. It includes more than 30 lessons and over five hours of video content! On top you will also have access to all of the updates that will be added by Posturepro while improving the model content based on the users’ feedback!

There is also a private Facebook-Group where you can exchange problems and discuss solutions with other trainers/practitioners.

The BCPC is a brain-based approach on how to better train your clients and athletes. Addressing the brain to build a better foundation is key; if you are not addressing the postural foundation, you are adding more symptoms to what the root cause is. 

Brain Coach Performance Certification – The inner world creates the outer world

If you want to train your clients better you will have to gain insight! That doesn’t mean that you have to be a mysterious esoteric troglodyte wizard with a crystal ball!

It simply has to do with basic human anatomy and how your brain is wired. How you observe and process the world you live in, particularly visually.

What you see, in terms of sensory impulses, and HOW this information is perceived and processed in the correspondent part of your brain (visual cortex) determines your motoric actions!

According to that, postural problems are not always and only limited to misalignments of your musculoskeletal system, but most likely due to neuromuscular problems, especially problems with sensory perception through the eyes.

But before we dig deeper into basic anatomy we’ll start with some word definitions.

If you follow my blog you will have noticed that I’m a huge fan of defining all the used terms. Just to make sure that there are no questions left.

So, let’s start with the company’s name: Posture(pro).

What actually IS a posture? Posture – unlike most of medical terms (who derive from Latin, respectively old Greek) “posture” etymologically most likely derives from Italian postura = posture (Wikipedia, 2020). The suffix -pro is an abbreviation for professional.

Due to that, Posturepro claim to be  professionals in postural issues. Is that true? To make a long story short, I think it is! Just my opinion, but I could be right 😉

Furthermore, my mentor Charles R. Poliquin (R.I.P.) was a big advocate of Posturepro and anyone who knew Charles (aka “Strength Sensei”) also knew, that he didn’t endorse anything he didn’t like! According to that, consider Posturepro to be Strength Sensei approved!

Posturepro Brain Coach Performance Certification – What you will learn

As mentioned in the summary the BCPC is divided into six modules.

  • Module 1: Welcome
  • Module 2: Brain Coach
  • Module 3: Your Feet and Posture
  • Module 4: Your Eyes and Posture
  • Module 5: The Postural Assessment
  • Module 6: Quiz & Certification

A single blog article is sheer too short to address all the modules with their extensive lessons. Lesson 3 & 4, for example, each have 9 sub-lessons you can dig through.

But I’d like to give you a short summary of each modules just to show you a little teaser what you can expect by enrolling/investing in this course.

Module 2: Brain Coach

In Module 2, Lesson one, you will learn about the „missing link”.

According to the BCPC the missing link in most therapy treatments is “(…) the lack of knowledge in the comprehension of how primitive movement patterns are the foundation of all human movement.” (Posturepro, 2020).

The rest of Module 2 will take you step by step through the structural built of your brain. You will learn about the most important brain areas and their functions. These are:

  • The Sensory Cortex
  • How to use sensory input
  • The Motor Cortex
  • The Vestibulospinal Tract
  • The Reticulospinal Tract
  • The Pontomedullary Reticular Formation (PMRF) 

I want to emphasize that the Brain Coach Performance Certification by all means is not an accumulation of foreign words to suggest pseudo competency!

In case you’re not (yet) familiar with the mentioned above here’s a brief etymological explanation:

Cortex derives from Latin and means cortex of the brain (Becher et al., 1995).

Vestibulo/spinal is a composition of Latin vestibular = belonging to the vestibule and Latin spina = thorn, spike, spine/backbone (Becher et al., 1995).

Reticulo/spinal is another compound. Made out of the Latin prefix rete = net, and the aforementioned suffix spina (Becher et al., 1995).

Ponto/medullary Reticular Formation is a construction of Latin pons = bridge, Latin medulla = bone marrow and the already decrypted rete = net (Becher et al., 1995).

In Module 2 of the Brain Coach Performance Certification you will learn more in detail about the built up and function of these terms.

Module 3: Your Feet and Posture

The alignment of the feet is of uttermost importance! You can also read about that in my article: “Alignment from head to toes” and in the “Freo Foot Care System Review”.

Module 3 is divided in 9 sub-categories, respectively 9 lessons. In these you will learn about:

  • The neurophysiology of the feet
  • How to find out if you suffer from an foot imbalance
  • The pathology of flat feet
  • The movement efficiency of the ankle
  • How to fix feet imbalances
  • About ankle force production
  • Movement efficiency of the knee
  • Force production for the knee

Module 3 will also back up the recommendations with studies. Therefore you can dig even deeper into a particular topic.

Module 4: Your Eyes and Posture

The role of the eyes, respectively the conscious processing of visual stimuli plays an extreme important, yet all too often neglected role in postural problems, respectively sports performance!

In the Brain Coach Performance Certification you will learn about how divergent sensory input might negatively affect the visual information processed in your occiput, which is Latin occiput = back of the head (Becher et al., 1995).

Module 4 is divided in 9 sub-categories, respectively 9 lessons. In these you will learn about:

  • Neurophysiology of the eyes
  • How to test for an eye imbalance
  • Eye Exercises  à check spelling error in module 4 exCercises
  • Movement efficiency of the back
  • The lox back fixing imbalances
  • Low back force production
  • Movement efficiency of the shoulder
  • Fixing shoulder imbalances
  • Shoulder force production

Module 4 is the most practical oriented module. By the way I’m aware of the irony of saying “practical” in an online seminar 😉 But let’s put it this way. It’s the module with the most exercises in the program.

Preston Greene and Blake Bender will guide you through efficient exercises that are (not only) useful if you work in the strength and conditioning profession.

Module 5: The Postural Assessment

The Brain Coach Performance Certification is more of an advanced course as it challenges you with a lot of (new) input. In chapter 5 you will find the longest videos of the course, up to about 30 minutes for a single lesson.

Module 5 is divided in 4 sub-categories, respectively 4 lessons. In these you will learn about:

  • Recap of the Brain Coach
  • The sensory receptors
  • The postural assessment
  • More about Brain Coach Posturepro

Module 6: Certification

In order to accomplish the Brain Coach Performance Certification this course finishes with a quiz. To successfully pass, you’ll have to answer the questions correctly to demonstrate what you have learned.

The course closes with a “Thank You” by Annette Verpillot.

What will you get as a bonus?

As if the course wouldn’t be enough you also get a cornucopia of extras, including:

  • BONUS 1: 30 mins One-on-One Business Development Call with Annette Verpillot (value: $500)
  • BONUS 2: FREE Access to our Facebook Practitioner Group (value: $500)
  • BONUS 3: Get listed on the Posturepro Website as a Provider (value: $850)
  • BONUS 4: Gain Access to Peer-Reviewed Studies (value: $250)

Posturepro Proprioceptive Insoles

A proprioceptive insole? What’s that I can hear you ask… Well it’s a “cool tool” you will learn more in depth in the Brain Coach Performance Certification. I’ll give you a short summery though.

The guys from Posturepro describe it this way:

The Proprioceptive Insoles excite the hundreds of thousands of nerve cells loaded in the soles of your feet. Studies show that a textured insole is optimal to arouse postural muscles and elicit benefits ranging from improved balance to improved gait patterns.” (Posturepro, 2020).

Different kinds of Posturepro Proprioceptive Insoles.

As you will learn in the course, numerous  studies have confirmed that the feet are part of how your brain manages movement.

According to this, your body utilizes information from your feet to create the proper postural strategy to stand upright, which is quite an energy-consuming task if you suffer from (structural) imbalances!

The postural insoles are designed and supposed for the purpose to correct foot misalignments.

They work by activating your skin’s mechanoreceptors, by changing the way that the motor cortex is projecting onto your muscles, allowing each foot to send the same (and propper) information to the brain.

Mechano/receptor derives from Greek mechan(o) = “with the help of tools”, “caused by mechanic action” (Becher et al., 1995); and Latin recipere = “to take back” (Frag Cäsar).

So, literally translated, mechanoreceptor means: “with the help of tools (something is) taken back”.

With the help of these insoles you’re supposed to have an enhanced coordination of movement and furthermore improved via several motor tracts (reticulospinal and vestibulospinal).

Posturepro states that:

Because the insoles work with the movement center of the brain, we can see changes in alignment, stability, and pain reduction in a very short amount of time.” (Posturepro, 2020).

Brain Coach Performance Certification Conclusion

In the end of each blog article I like to draw a conclusion. Likewise with the BCPC-course. To make a long story short, you probably just want to hear my answer to one simple question:

Would I recommend taking this course?

And the answer is: yes! From my point of view it was definitely an investment. Sure, it will take you time, not only to work through the extensive video material but also to have all the information settle and digested.

Having absorbed all the new information you are, as the word says, in a new formation. This will give you new tools for your “health tool box” while treating patients and/or clients.

Remember, if you only have a hammer, everything looks like a nail!

Let’s have a brief talk about the investment. In EUR it’s 390 € (429 US $). You’ll probably have noticed that I wrote “investment” instead of “cost”.

If you invest, you will get a so called “return on investment”. Which means at first you “spend” some money, but in the long run you will profit from the knowledge you have gained.

Therefore I address you to learn more, to earn more! And please rather be a “learn it all” than a “know it all”. The only thing I know for sure, is that I don’t know anything for sure!

© HP Bernd Stößlein, Master of Business Administration in Sportmanagement.

If you liked this article please share it with your friends, subscribe to the newsletter and the blog.

If you like to book a professional online/offline consultation please feel free to contact me:

 info@bernd-stoesslein.de


Literature

Posture, source: https://fr.wiktionary.org/wiki/posture, access from 13.7.20.

Posturepro, Module 2, Lesson 1, The missing link, 2020.

Lateinisch-griechischer Wortschatz in der Medizin, p. 53.

Lateinisch-griechischer Wortschatz in der Medizin, p. 62.

Lateinisch-griechischer Wortschatz in der Medizin, p. 131.

Lateinisch-griechischer Wortschatz in der Medizin, p. 132.

Lateinisch-griechischer Wortschatz in der Medizin, p. 176.

Lateinisch-griechischer Wortschatz in der Medizin, p. 207.

Lateinisch-griechischer Wortschatz in der Medizin, p. 207.

Lateinisch-griechischer Wortschatz in der Medizin, p. 246.

Recipare, Quelle: https://www.frag-caesar.de/lateinwoerterbuch/recipere-uebersetzung-1.html, acces from 13.7.2020.

Conegrip Forearm and Finger Trainer (affilate link) are – as the name suggests – cone-shaped grip strengthening tools. Nothing new under the sun you might think, but it is! As most tools designed for enhancing grip strength are cylinder- shaped! Well, Bernd, “no big deal” I can hear you say. But think again! In this article I’ll tell you more about the importance of gripping power in strength training, how you might benefit from it (in Team-Sports i.e. like Basketball, Football, Soccer, etc.) and what distinguishes the Conegrips (affiliate link) from cylinder-shaped grip tools.

How to recruit more muscle fibers in your hand, like the abductor digiti minimi and much more.

Get a grip…

How to become a Conehead

Ok I cannot resist to make this joke about the Coneheads…come on, it’s too good not to make it! For those of you who are old enough to remember, “Coneheads” is a 1993 movie, starring Dan Aykroyd, about cone-headed aliens who try to live a normal people’s life on earth 🙂  

But, what I’d like to stress with the sentence “how to become a Conehead” is actually that you should start to think about the benefits of a cone-shaped grip strength tool!

Cone Grips, sourcet © 2016–2020 ConeGrip.

Let’s start with the basics. What actually is a cone? Well, according to Wikipedia a cone is:

“(…) a three-dimensional geometric shape that tapers smoothly from a flat base (frequently, though not necessarily, circular) to a point called the apex or vertex.

A cone is formed by a set of line segments, half-lines, or lines connecting a common point, the apex, to all of the points on a base that is in a plane that does not contain the apex. Depending on the author, the base may be restricted to be a circle, any one-dimensional quadratic form in the plane, any closed one-dimensional figure, or any of the above plus all the enclosed points. If the enclosed points are included in the base, the cone is a solid object; otherwise it is a two-dimensional object in three-dimensional space. In the case of a solid object, the boundary formed by these lines or partial lines is called the lateral surface; if the lateral surface is unbounded, it is a conical surface.” (Wikipedia, 2020).

Why are you telling me that, you might wonder? Well, it will make sense within a second when we switch from basic geometry to basic human anatomy.

The Art of Grapping and punching

In martial arts, self-defense techniques (like Krav Maga and others) or law enforcement you have to grab i.e. forearms, which are more like cone- shaped instead of a cylinder….

That’s where a strong grip comes into play and how you can transfer your efforts in the gym to “the real deal”. You apply what you have strengthened “in the trenches”.

The more you train with thicker grip implements, like the cone grip, the more motor units you might recruit. This will inevitably lead to improved overall upper body strength and useful skills, both in you specific sport and profession.

It’s not like simple “show off” muscles, but something you can really use!

If you want to know more about grip training you can read my article about the “Gripedo”.

So, what does all that have to do with cone-shaped grip devices? Well, if you have ever been engaged in any kind of martial arts and/or self-defense technique you might have realized that if you clench a fist and strike an object, the toughest knuckles are the first two ones.

The  third finger and the pinky (see image below) are commonly the lesser reliable “strike-buddies”.

The third (ring finger) and the pinky are commonly week(er) fingers for gripping and/or striking with a clenched fist. Source, own picture.

Why is that so? We will see in a minute.

First, think of another similar phenomenon…if you have ever trained with Barbells/Dumbbells or any kind of grips that are above 30 mm of diameter (50mm and above) you probably will have realized, that you most likely develop the most gripping power (fist clenched) with the thumb, the index- and the middle-finger.

The ring finger and the pinky can be closed too, but are normally not that involved in gripping (a cylinder-shaped) object, like the rest of the hand!

According to my anecdotal experience with myself and lots of patients and clients that might be due to our “cone-shaped” hand.

Cylinder-shaped grip-tools in different sizes, source: own picture.

If you take a look at the comparison of the cylinder-shaped gripping tools and the cone grips the difference is obvious. Whereas it’s troublesome to create a “gripping-equilibrium” in all five fingers using cylindric tools,  it is much easier using the cone-shaped ones.

The extra load, respectively the stress you put on the hand muscles should also create a greater training effect, especially on the abductor digiti minimi. “

It is  “(…) a skeletal muscle situated on the ulnar border of the palm of the hand. It forms the ulnar border of the palm and its spindle-like shape defines the hypothenar eminence of the palm together with the skin, connective tissue, and fat surrounding it. Its main function is to pull the little finger away from the other fingers (i.e. abduction).” (Wikipedia, 2020).

Well, aductor digiti minimi? Sounds funny…but I have never heard of that one, you might think. Is it important? Well…if you ask me, when it comes to gripping strength, it definitely is. That’s just simply the fact as in gripping strength the more equals the better!

Ad/ductor derives from Latin ad = after, to; and Latin ducere = to draw/pull sth. (Becher et al., 1995).

Digiti derives from Latin digitus = Finger (Becher et al., 1995).

Minimi comes from Latin minor = smaller (Becher et al., 1995).

To set the record straight: gripping strength is an absolute necessity when it comes to professional strength training/coaching, no matter which sport or profession you’re into!

It clearly isn’t limited to arm wrestling or gripping competitions!

Unfortunately the development of proper grip strength is still one of the most overlooked and neglected issues -not only- in sports performance. At least to my experience.

How to usefully implement Cone Grips?

The next question is how you can usefully integrate these cone-shaped training devices in your workout.

Well, as always, the answer to that question is: “it depends”. It clearly depends on your training age and the experience you have gained in the gym.

Let’s say you’re a novice lifter with training age of zero years. Would it be useful to jump start training with thick implements? I’d say: no.

You wouldn’t lend a novice driver your new Porsche GT 2 RS, would you?  The answer to this rhetorical question is obvious: “hell no!”.

Same with special thick gripping implements like the Cone Grips (affiliate link)! But, if you have a training age of, let’s says, two continuous years with regular strength training (4 times a week) you should absolutely consider using them.

By the way, your training age has nothing to do with your biological age! You can be comparatively young (i.e. 18 years of biological age) and have a higher training age as someone being (biological) age 50.

Training age depends on how many consecutive years you have spent with PROPER training!

According to this, an 18- year- old with 3 years of consecutive, structured and regular strength training can have a higher training age as the 50 year old who just started working out!

The variation in grip diameter will bring more progression and stimuli to your workout and your body! This will result in new neuromuscular adaptations, increased strength and hypertrophy!

Just switch from your regular 30mm diameter grips to the cone grips. They can be implemented on almost any regular Barbell and/or Dumbbell, gripping devices, machines etc.

In this picture i.e. you can see me in my Personal-Training Gym, using the Cone Grips while performing bench press, using other special tools, like my BambooBench®, weight releasers and a monolift.

Me useing the Cone Grips while performing bench press, source: own picture.

By the way, look at the time of the screenshot (22:22) that’s synchronicity! If you’d like to know more about this interesting phenomenon I highly recommend you reading the works of Carl Gustav Jung (affiliate link)!

Back to the thick implements, respectively the Cone Grips. If you start using them don’t be surprised that you might experience a slight drop off in your weights. As you cannot close your hands as much as you were used to, gripping starts get harder.

That’s clearly not a disadvantage but you should be aware of that obvious fact.

Which exercises are predestinated for using Cone Grips (affiliate link)? Well, essentially all exercises!

I’d highly recommend using these special grip tools on all kinds of arm exercises, for different variations of pull ups, bench press and other back exercises.

You just have to ask yourself whether it’s an exercise you want to improve your grip strength on or if you don’t want your grip to be the “limiting factor”. That might be the case on deadlifts for example.

If you want to challenge yourself by deadlifting with a thicker grip you’re good to go. But if you want to emphasize other muscles more, skip the Cone Grips for that workout. Just start playing with the use of them.

Cone Grips are a useful variation in a structured periodical and goal oriented training regime.

If you’re unsure how to usefully integrate such devices in your workout, please feel free to contact me for a professional Strength-Coach/Personal-Training (Online)-Consultation :

info@bernd-stoesslein.de

Conclusion ConeGrip

Let’s draw the mandatory conclusion of the implementation of Cone Grips (affiliate link). To make a long story short: should you use them? From my point of view that’s a “Hell yes!”. But you should take in consideration when and how!

Being a novice lifter you should start with basic stuff to gain lifting experience. After having gained a proper lifting age of two years or above, I think you’re good to go using the Cone Grips!

There are lots of thick grip implement tools which have a cylindrical shape. The Cone Grips are superior in design, as the cone-shape structure has a higher transfer effect to sports and professions (i.e. law enforcement, first responders etc.).

In addition to that, a cylinder will give you the chance to further recruit muscle fibers in your fingers and hand, like the aductor digiti minimi.

Something with the surname “minor” doesn’t seem to be something being of consideration when it comes to strength training but in terms of grip strength every muscle fiber counts!

But of course Cone Grips are not the “magic pill”. If you fail to proper plan your workouts you plan to fail, as the saying goes!

Or, if you put it this way, if you don’t know how to design your training program for your specific needs the Cone Grips won’t do the “magic” for you either!

Cone Grips are an investment in your strength training, they are affordable, portable, versatile and easy to use and clean.

Conclusion: go and get a pair!

© HP Bernd Stößlein, Master of Business Administration in Sportmanagement.

If you liked this article please share it with your friends, subscribe to the newsletter and the blog.

If you like to book a professional online/offline consultation please feel free to contact me: info@bernd-stoesslein.de


Literature

Cone, source: https://en.wikipedia.org/wiki/Cone, date of access: 6.7.20.

Abductor digiti minimi muscle of hand, source: https://en.wikipedia.org/wiki/Abductor_digiti_minimi_muscle_of_hand, date of access: 6.7.20.

Lateinisch-griechischer Wortschatz in der Medizin, S. 3

Lateinisch-griechischer Wortschatz in der Medizin, S. 31.

Lateinisch-griechischer Wortschatz in der Medizin, S. 69.

Lateinisch-griechischer Wortschatz in der Medizin, S. 137.  

Fight Flex ist ein Spagat-Trainer der gleichnamigen Manufaktur. Mithilfe dieses hochwertigen Trainingsgerätes „Made in Germany“ lässt sich der Längs- und Querspagat bis hin zum Überspagat mit 200Grad Dehnwinkel trainieren! Auf Anfrage fertigt der Hersteller sogar Modelle an, bei denen die Dehnung über 200Grad hinaus ermöglicht wird. In diesem Artikel gehe ich auf die – aus meiner Sicht – überlegenen Vorteile des Fight Flex ein, erkläre die Vorteile des Dehnen an sich und gebe Infos, wie ich mit Tipps und Tricks  meine Dehnfähigkeit schnell steigern konnte. Außerdem zeige ich dir, für welche Dehnübungen ich den Fight Flex auch noch anwende!

Fight Flex in unterschiedlichen Positionen, Quelle: © FightFlex.

Was passiert beim Dehnen?

Bevor wir uns dem fantastischen Fight Flex zuwenden, müssen wir uns erst einmal mit dem Thema des Dehnens an sich befassen und uns folgende Fragen dazu stellen:

  1. Was ist Dehnen überhaupt?
  2. Gibt es unterschiedliche Dehnungsmethoden?
  3. Welchen Sinn ergibt es, sich zu dehnen?
  4. Was hat körperliches Dehnen mit geistiger Flexibilität zu tun?
  5. Welche Tipps & Tricks gibt es, um den Dehnerfolg zu beschleunigen?
  6. Was kann die Dehnfähigkeit behindern?
  7. Was kann man durch Dehnen über  das Leben lernen?

Definitionen über das Dehnen

Wer meine Blogartikel regelmäßig liest, der weiß, dass ich ein großer Fan der deutschen Sprache, respektive ihrer Exaktheit und Präzision in Sachen Begriffsdefinition, bin.

Ebenso gerne lege ich aber auch größten Wert auf die Dekodierung genutzter Begrifflichkeiten, insbesondere Lateinisch-Griechischer Wörter aus der Medizin.

Im Kontext des Dehnens werden allzu oft viele Begrifflichkeiten in einen Topf geworfen und – aus meiner Sicht – fälschlicherweise synonym gebraucht.

Diese sind:

  • Beweglichkeit
  • Flexibilität
  • Mobilität
  • Dehnbarkeit

Der geneigte Leser soll dies bitte nicht als „Erbsenfilletiererei“ auffassen, sondern den Wert exakter Begriffsdefinitionen kennen und schätzen lernen. Denn sonst ist das Gesagte/Geschriebene oft nicht das Gemeinte und Missverständnisse sind vorprogrammiert.

Der Begriff Beweglichkeit stammt von: „(…) mobilitas, veränderlichkeit, regsamkeit (…)“ (Grimm 1854).

Das von mir sehr geschätzte Althochdeutsche Wörterbuch der Gebrüder Grimm (ja, diejenigen die auch die Märchen geschrieben haben) führt den Begriff der Beweglichkeit also auf Veränderlichkeit und Regsamkeit zurück, sowie den lateinischen Begriff mobilitas.

Wenn sich etwas regt, dann bewegt es sich, was sich bewegt, das ver-ändert seine Stellung. Demnach ist Beweglichkeit also anscheinend die (willentliche?) Fähigkeit, eine (Körper)Position zu variieren.

Die willentliche und unwillentliche Fähigkeit, Körperpositionen zu ändern, klammere ich an dieser Stelle erst einmal noch aus.

Wie man sieht, werfen die Gebrüder Grimm auch schon den nächsten, häufig genutzten Begriff in den Raum, die Mobilität.

Mobilität kommt von Lateinisch mobilitas, mobilitatis = Beweglichkeit, Bewegungsvermögen. Eine Mobilisation ist demnach die „Beweglichmachung von Körpergelenken“ (Becher et al., 1995).

Somit ist Mobilität mit Beweglichkeit tatsächlich synonym zu gebrauchen, also gleichbedeutend. Doch kennzeichnet die Beweglichmachung/Beweglichkeit eines Gelenkes gleichzeitig die Dehnfähigkeit/Dehnbarkeit?

Aus anatomischer Sicht würde ich sagen: grundsätzlich ja, denn die Beschaffenheit eines Gelenkes (knöcherner Aufbau, Art des Gelenkes, Sehnen- und Bandstrukturen, Faszien, Ablagerungen, Adhäsionen etc.) bestimmen dessen Funktion.

Das bedeutet aber nicht, dass jeder diese Beweglichkeit/Mobilität auch in vollem Umfang jederzeit, untrainiert und willentlich abrufen kann!

Flexibilität stammt von Lateinisch flectere = biegen, beugen, krümmen bzw. flexibilitas = Biegsamkeit (Becher et al., 1995).

Ist man also besonders flexibel, wenn man sich besonders biegen, beugen und krümmen kann? Wie steht es dann um die „Streckbarkeit“ ? Den schließlich kann man seine Gliedmaßen ja nicht nur beugen, biegen und krümmen, sondern auch strecken!

Mein Ziel: Stärke und Flexibilität! Quelle: Eigenes Foto.

Was geschieht beim Dehnen?

Nachdem wir einen kleinen Exkurs in Sachen Begriffsbestimmung absolviert haben, wollen wir uns nun in aller Kürze einmal damit beschäftigen, was beim Dehnen überhaupt passiert.

An dieser Stelle zitiere ich aus einem der wohl besten Bücher aller Zeiten über das Training, das den schlichten Titel „Trainingslehre“ (affiliate link)  trägt.

Beweglichkeit ist die Fähigkeit des Menschen, Bewegungen mit einer großen Schwingungsweite (Amplitude) auszuführen. Die maximale Bewegungsamplitude ist demzufolge Maßstab der Beweglichkeit. Bei wissenschaftlichen Untersuchungen drückt man sie oft in Winkelgraden oder Zentimetern aus (…). Die Beweglichkeit ist eine elementare Voraussetzung einer qualitativ und quantitativ guten Bewegungsausführung.“ (Harre, 1986).

Nun wissen wir also, dass Beweglichkeit kennzeichnet WIE VIEL ich von meinem grundsätzlichen anatomisch gegebenem Bewegungsradius tatsächlich auch (willentlich) abrufen kann.

Wie „gut“ oder „schlecht“ eine Bewegung, wie z.B. das Laufen vollzogen werden kann, hängt also auch davon ab, ob und wie beweglich jemand zur Zeit ist.

An dieser Stelle sollte sich jeder (Therapeut) auch einmal Gedanken darüber machen, ob Gewichtstraining alleine immer eine geeignete/ausreichende Lösung für Störungen des aktiven (Muskeln und andere Weichteilgewebe) und passiven (Skelett) Bewegungsapparates darstellt, oder ob zuerst nicht eine optimierte Beweglichkeit gewährleistet werden sollte/muss!

Eine professionelle Anamnese eines zertifizierten, erfahrenen und für die jeweilige Sportart geeigneten Strength-Coaches/Personal-Trainers ist vor Aufnahme jedes Trainingsprogramms hier anzuraten!

Auch gilt es, den Zusammenhang zwischen dem Gehirn und dessen Einfluss auf Fehlhaltungen und damit letztlich auch zusammenhängende mangelnde Dehnbarkeiten zu berücksichtigen!

Der Leser darf meine eigenen Qualifikationen, die hinter diesen Aussagen stecken, jederzeit gerne einsehen, unter: https://www.bernd-stoesslein.de/qualifikationen/

Aktives und passives Dehnen

Wie bereits erwähnt, wird im Kontext des Dehnens oft mit vielen Begrifflichkeiten um sich geworfen und gerne das ein oder andere fabuliert. So auch in Bezug auf die unterschiedlichen Dehnungszustände.

Denn man kann sich nicht nur eigenständig dehnen, sondern kann selbstverständlich auch gedehnt werden. Entweder unter Zuhilfenahme von Gerätschaften, wie dem Fight Flex oder auch einem Trainingspartner.

An dieser Stelle sei wieder aus dem Buch „Trainingslehre“ zitiert:

Unter passiver Beweglichkeit verstehen wir die größtmögliche Beweglichkeit in einem Gelenk, die der Sportler mit Nachhilfe (Partner, Gerät, eigenes Körpergewicht) erreichen kann (…). Durch die Veränderung der passiven Beweglichkeit kann also im Wesentlichen der Dehnbarkeitsgrad solcher Muskeln bestimmt werden, die die Amplitude der Bewegung einschränken. Unter aktiver Beweglichkeit verstehen wir die größtmögliche Beweglichkeit in einem Gelenk, die der Sportler selbstständig, ohne andere Nachhilfe, alleine durch die Tätigkeit seiner Muskeln bewerkstelligen kann“ (Harre, 1986).

Der „richtige“ Zeitpunkt zum Dehnen?

Nun, wann ist der richtige Zeitpunkt, um sich zu dehnen? Vor dem Training, nach dem Training, zwischen den Trainings-Sätzen oder gar an einem separaten Tag?

Mit dem Dehnen ist es so eine Sache.

Die unterschiedlichen Anschauungen gleichen diesbezüglich fast schon einem Religionskrieg, in dem jeder Anhänger mit dogmatischem Eifer probiert, die „Ketzer“ zu verfolgen und auf dem „Scheiterhaufen“ zu verbrennen, die einer anderen Ansicht „huldigen als man selbst.

Vielleicht wäre ein besserer Ansatz zunächst einmal überhaupt den Wert des Dehnen zu erkennen und dann die für sich beste Dehnmethode und den besten Zeitpunkt zu wählen.

Anschließend gebe ich MEINE 7 Empfehlung für optimales Dehnen:

  1. Bewegungsanalyse durchführen lassen (Gangbild, Haltung, Augenkoordination etc.)
  2. Möglichst bereits im Kindes- oder Jugendalter damit beginnen
  3. Vor dem eigentlichen (Gewichts)Training und/oder an einem separaten Tag
  4. Wenn mögliche 2x/Tag (Morgens und Abends)
  5. Dehnposition einnehmen und mind. 20 Sek. halten
  6. Maximale Dehnposition serienmäßig* hintereinander einnehmen (10-15 Mal pro Serie), um Höchstgrenze der aktuellen Bewegungsamplitude mehrmals zu erreichen und so schrittweise erhöhen zu können
  7. Weichgewebe-Tool (Heskiers-Tool) nutzen, um Bewegungsamplitude („range of motion“) zu vergrößern

*Mit Serie ist hier ein Dehnungs-Satz gemeint. Man absolviere also z.B. 5 Sätze a 10-15 Wdh, in denen man darauf abzielt, die aktuell maximale Dehnposition/Bewegungsamplitude zu erreichen und diese ggf. ein wenig zu erhöhen.

Mehr Tipps & Tricks zur schnelleren Erhöhung der Dehnfähigkeit erfährst du in meinem Artikel über Posture Pro Brain Coach Performance (erscheint in Kürze) und in meinem Artikel über das Heskiers-Tool.

Des Weiteren empfehle ich, nicht nur in diesem Zusammenhang, ebenfalls meinen Artikel über das Inversions- bzw. Dekompressionstraining der Wirbelsäule.

Statisches vs. dynamisches Dehnen

Statisches versus dynamisches Dehnen wird ebenso kontrovers diskutiert wie alle anderen Parameter des Dehnens. Deshalb sei an dieser Stelle, und zur Vollständigkeit, nur kurz der Unterschied erläutert.

Dynamisches Dehnen bedeutet, dass eine Dehnposition eingenommen und sich dann in diese „hinein“ und wieder „hinausbewegt“ wird. Der Begriff stammt von Griechisch dynamis = Vermögen, Kraft, Fähigkeit, Geschicklichkeit bzw. dem Adjektiv dynamikos = bewegungsbedingt, kraftvoll, wirksam, mächtig (Becher et al., 1995).

Beim statischen Dehnen agiert man dann genau entgegengesetzt zum dynamischen, denn man nimmt eine Dehnposition ein und hält diese für eine gewisse Zeit, ohne zu „federn“ oder sich hin- und her zu bewegen.

Der Begriff stammt von Lateinisch stare = stehen bzw. Griechisch statikos = zum Stehen bringend, das Stehen (Becher et al., 1995).

Was kann die Dehnfähigkeit behindern?

Ein Grund für eingeschränkte Beweglichkeit sind aus meiner Sicht definitiv sogenannte Adhäsionen.

Wie bereits in meinem Artikel über das Heskiers-Tool beschrieben, leitet sich der Begriff Adhäsion  vom lateinischen Präfix ad- = zu, für; und Lateinisch haerere = an etw. festhalten, stecken bleiben ab (Stößlein 2020).


Wer mehr über dieses Thema wissen will, dem empfehle ich, die bereits mehrfach genannten und verlinkten Artikel zu lesen.

Ein flexibler Geist wohnt in einem flexiblen Körper

Was hat eine flexible Geisteshaltung mit einem flexiblen Körper zu tun? Nun, wenn man der Redensart „Ein starker Geist wohnt in einem starken Körper“ Glauben schenken darf, dann sollte es in Sachen Flexibilität, respektive Beweglichkeit ebenso sein, oder?

Wer also eine eingefahrene, rigide Sichtweise auf die Dinge hat, der ist auch meist körperlich relativ starr?!

Könnte man, durch gesteigerte körperliche Flexibilität, zu mehr geistiger Dehnbarkeit gelangen?

Kann Flexibilitätstraining/Dehntraining, wie es z.B. auch bei Pilates und oder Yoga gemacht wird, einer Art Meditation gleichkommen? Meditation durch Mobilität – Mobilität durch Meditation?

Durch die Fähigkeit, eine steife, starre „Komfortzone“ zu verlassen und so durch gesteigerte Beweglichkeit zu mehr geistiger Geschmeidigkeit zu gelangen?

Ein interessanter Aspekt, der in vielen Kulturen, wie z.B. Asien oder Indien sicher mehr Bedeutung zugemessen wird als bei uns in Mitteleuropa.

Warum du Meditieren solltest, kannst du in meinem Artikel nachlesen:

Warum du Meditieren solltest – Deine Gedanken erschaffen deine Realität

Man denke zudem an das Reich der Tiere. Wer kennt es nicht, wenn sich der Stubentiger  nach dem Aufstehen reckt und streckt. Jeder Hund, jede Großkatze oder z.B. auch Vögel strecken sich regelmäßig. Denn wer (zu lange) rastet, der „rostet“ nun mal!

Loslassen – Was man durch Dehnen über das Leben lernen kann

Was ich beim Dehnen über das Leben an sich lernen konnte, ist das Loslassen. Für mich geht es beim Dehntraining – wie bereits erwähnt – nicht nur um den physischen (körperlichen) Aspekt, sondern auch um die Fähigkeit der geistigen Flexibilität, die auch bedeutet, Loslassen zu lernen.

Denn Dehnen ist, aus meiner Sicht, weniger das Aushalten eines Schmerzes über eine bestimmte Dauer als mehr die Fähigkeit, zum Erlernen Spannungen Schritt für Schritt loslassen zu können, um das eigene Wesen zu erweitern.

Dies resultiert dann, ganz physisch, darin, dass man flexibler wird und sich die Bewegungsamplituden erhöhen. Spirituell gesehen bietet es die Möglichkeit, durch das „Loslassen“ der Muskulatur auch emotional Hass, Wut, Ärger, Missgunst, Neid und andere negative Gedanken loszuwerden.

Vielleicht ergeht es dem Leser ebenfalls so? Dies darf in den Kommentaren gerne zur Diskussion gestellt werden!

Fight Flex – der beste Spagat Trainer?

Fight Flex, mit unterschiedlichen Polsterfarben, Quelle: © FightFlex.

Kommen wir nun zum Fight Flex an sich. Ich habe mit dem Erfinder Martin Öxle korrespondiert und er beschreibt seine geniale Erfindung folgendermaßen:

FightFlex setzt als erster mechanischer Spagattrainer auf „geführte Dehnung in senkrechter Körperhaltung“. Dehnen mit FightFlex ist – beginnend ab dem Dehnwinkel von 80Grad bis zum maximalen Dehnwinkel von 200Grad – komplett stufenlos! Kein mechanisches Rastsystem zwingt (…)zu ruckartigen und schmerzhaften Bewegungen. Stretching mit FightFlex steht für stufenloses, dynamisches, effektives und hierbei überdurchschnittlich schmerzfreies Dehnen! Während der Dehnung kann – durch einfaches Drehen der Hüfte –zwischen dem Querspagat und dem Längsspagat gewechselt werden! Dies vollkommen unabhängig vom eingestellten Dehnwinkel. Steigerung der Beweglichkeit „aus der Hüfte heraus“ ist äußert effektiv. Hier liegt der besondere Innovationsstatus von FightFlex!“ (Oexle, 2020).

Aus meiner Sicht kann der Fight Flex allerdings noch weit mehr. Denn ich nutze Ihn nicht nur zum Training der unterschiedlichen Spagat-Arten (Längs- und Querspagat bzw. „Damenspagat“ und „Herrenspagat“, oder auch als Grätsche und Spagat bezeichnet), sondern ebenfalls für andere Dehnpositionen. Doch dazu später mehr.

Auf meine Anfrage, wie genau der Fight Flex funktioniert, schreibt Martin:

Angetrieben durch ein paar einfache Drehungen am Handrad, wechselt der FightFlex automatisch von der platzsparenden Transportstellung (in dieser Stellung wird der FightFlex angeliefert) in die Dehnstellung. FightFlex ist jetzt einsatzbereit (…)! Der Sportler nimmt hierzu auf den gepolsterten Beinauflagen und der Sitzfläche Platz. Die Beine und der Oberkörper bilden während dem Stretching eine Linie. Das Körpergewicht verteilt sich hierbei zum Großteil auf die beiden Beinauflagen. Die Sitzfläche wird hautsächlich beim dynamischen Dehnen (Wechsel zwischen Längs- und Querspagat) belastet. Sobald Ihr auf dem FightFlex Patz genommen habt, lässt sich der FightFlex durch Drehung am Handrad sanft und stufenlos auf jeden Dehnwinkel zwischen 80Grad und 200Grad einstellen. Mit FightFlex ist „Grad für Grad“ und somit „step by step“ eine Steigerung Ihrer persönlichen Dehngrenze möglich.“ (Öxle, 2020).

Ganz abgesehen von den Funktionen des Fight Flex, ist das Gerät eine Ingenieurs-Meisterleistung und für mich wirklich ein modernes Kunstwerk. Der Fight Flex strahlt durch seine bloße Präsenz seine unglaubliche Qualität „Made in Germany“ aus!

Fight Flex, in Endstellung, Quelle: © FightFlex.

Ein echtes Design-Highlight, das die Blicke, nicht nur in jedem Fitnessstudio, auf sich zieht!

Neben dem Design besticht das Gerät, meiner Meinung nach, auch durch seine absolut hochwertige Qualität. Alles hält bombenfest, ist stabil, nichts quietscht, nichts knarzt.

Jede Schraube hält, jedes Rad sitzt, die Polster sind mit ihren Nähten unglaublich schön und sauber verarbeitet!

Ich habe selten so ein extrem hochwertiges Fitness-Produkt gesehen! Jede Feder, der Knauf, das Drehrad, die gesamte Konstruktion sieht einfach unglaublich solide und hochwertig aus!

Nettes „Gimmick“, auf Wunsch kann man sich von der Firma Fight Flex auch sein eigenes Logo in den Fight Flex fräsen lassen! Des Weiteren kann man zwischen unterschiedlichen Polsterfarben wählen.

Die Manufaktur FightFlex bietet einem die Möglichkeit, das eigene Firmenlogo ins Gerät fräsen zu lassen, sehr cool! Quelle: Eigenes Foto.

Jeder Strengt-Coach/Personal-Trainer, Kampfsportler etc., der nicht nur gute, sondern großartige Leistungen anbietet und professionelles Equipment sein Eigen nennt, der sollte dies durch die Investition  in einen  Fight Flex unterstreichen!

Das Training mit dem FightFlex macht Spaß…und sieht toll aus 😉 Quelle: Eigenes Foto.

Fight Flex – mehr als nur ein Spagat-Trainer?

Vom Hersteller wird der Fight Flex als Spagat-Trainer beworben. Doch meiner Meinung nach ist das Gerät in der Lage, noch viel mehr Potential zu entfalten. So kann es auch für eine Vielzahl weiterer Dehnmöglichkeiten eingesetzt werden.

So z.B. für die Dehnung der Oberschenkel, Rück- und Vorderseite, was den Einsatzbereich dieses Gerätes deutlich erhöht!

Folgende Bilder zeigen einige der möglichen Einsatzbereiche des Fight Flex:

Bilder folgen in Kürze!

Fight Flex – Eine Investition!

Natürlich stellt sich für viele das leidliche Thema eines „Preises“. Bevor nach einem Wert gefragt wird, erhält man all zu oft die Frage nach einem „Preis“. Ich habe „Preis“ bewusst in Anführungszeichen gesetzt, um zu zeigen, dass ein Gerät aus einer Manufaktur natürlich auch Geld kostet.

Wer erwartet, er bekäme ein so EXTREM HOCHWERTIGES Trainingsgerät zum „Preis“ eines China-Billigproduktes, der lebt aus meiner Sicht in einer total verquerten Welt!

Fight Flex (mit blauer Polsterung), Quelle: © FightFlex.

Wer den Wert hinter diesem Produkt erkannt hat, und für sich und/oder seine Klienten/Patienten etc. in ein solches investieren möchte, dem bietet Fight Flex grundsätzlich zwei Optionen.

Zum einen den Kauf und zum anderen eine Miete.

Letztere liegt regulär bei 79€/netto je Monat (94,-€/Monat inkl. MwSt.) Weitere Infos diesbezüglich findet man auf der Webseite des Herstellers.

Den „Preis“ zum Kauf gibt der Hersteller mit 2.237,20€/ab Werk (inkl.19% MwSt.) an (Stand 2020). Weitere Informationen können ebenfalls auf der Homepage des Herstellers entnommen werden.

Fazit/Conclusio

Fight Flex, die beste Art zu Dehnen? Aus meiner Sicht, ja! Insbesondere, wenn es sich um das Erlernen des Längs- und Querspagates geht! Ganz salopp gesagt, „stinken“ diesbezüglich alle anderen Trainingsgeräte auf dem Markt ab!

Trainingsgeräte, die den Spagat erlernen sollen, sind meist sehr minderwertige China-Waren, die mehrere hundert Euro kosten und nach ein paar Einsätzen bereits auseinanderfallen.

Außerdem ist mir kein anderer Spagat-Trainer bekannt, der eine vergleichbar hochwertige Verarbeitung und stufenlose Einstellung bietet.

Es existieren zwar vergleichbare Geräte, bei diesen handelt es sich aber, laut Aussage von Fight Flex, um Kopien des Originals! Hier ist also Vorsicht geboten!

Das Original ist aber bekanntlich immer besser als die Kopie!

Fight Flex, meiner Meinung nach, das beste Spagat-Trainingsgerät,
Quelle: © FightFlex.

Wer auf der Suche nach dem besten Spagat-Trainer (in Bezug auf Preis und Leistung) ist, dem empfehle ich ,in den Fight Flex zu investieren!

Wer den Fight Flex gerne einmal ausprobieren möchte, kann dies gerne bei mir im Personal-Training-Studio, in 95326 Kulmbach (Oberhacken 5) tun. Nach vorheriger Terminvereinbarung.

Für jeden Kampfsportler und jeden, der Selbstverteidigungstechniken lernt, ist das Training des Längs- und Querspagates aus meiner Sicht eine sinnvolle Sache. Dies gelingt wohl auf keine Art und Weise so einfach, bequem und fortschrittlich wie mittels Fight Flex!

Wenn dir dieser Artikel gefallen hat, dann teile ihn mit deinen Freunden, abonniere den Blog/Newsletter und hinterlasse einen Kommentar.

© HP Bernd Stößlein MBA in Sportmanagement


In diesem und anderen Artikeln findest du den ein oder anderen „Affiliate Link“, zu amazon. Wenn du über diesen Link etwas erwirbst, dann unterstützt du damit meine Blogartikel und schaffst Ressourcen für weitere qualitativ hochwertige Recherchen und Artikel wie diesen. Es entstehen für dich dadurch keine Mehrkosten! Alle meine grundsätzlichen Empfehlungen findest du unter: https://www.amazon.de/shop/bernd_stoesslein

Literatur

Deutsches Wörterbuch von Jacob und Wilhelm Grimm. 16 Bde. in 32 Teilbänden. Leipzig 1854-1961. Quellenverzeichnis Leipzig 1971. Online-Version vom 27.05.2020.

Lateinische-griechischer Wortschatz in der Medizin, S. 72.

Lateinische-griechischer Wortschatz in der Medizin, S. 82.

Lateinische-griechischer Wortschatz in der Medizin, S. 138.

Lateinische-griechischer Wortschatz in der Medizin, S. 209 & 210.

Trainingslehre, Grundlagen und Methodik zur Entwicklung der Beweglichkeit, Charakteristik der Beweglichkeit, S. 180 f.

Martin Oexle, FightFlex, 2020.

ShouldeRök™️ is a mace, respectively gada-like mobility and strength-tool, developed by Chris Duffin, from Kabuki Strength. I emphasize mace/gada-like, as it is one of a kind when it comes to usability, design, and quality!

To ShouldeRök™️ or not to ShouldeRök™️ ? That’s your question? In this article I‘ll tell you why you definitely should ShouldeRök™️ and how it may benefit you in different ways and sports!

All the info in this article focuses on the use of the ShouldeRök™️ by Kabuki Strength, no matter if you either like to use the tactical version or the standard one!

What is a (Tactical) ShouldeRök™️? – An unusual deconstructing approach!

I really do have a big liking for Latin and Greek terms in medicine. Maybe that‘s because I  also work as what is called a “Heilpraktiker” in Germany.

A literal translation would be “heal practitioner”, but a more appropriate could be “complementary and alternative medicine practitioner” (CAM practitioner).

To get a deeper understanding for what a “Tactical ShouldeRök™️”actually is we should dive a little bit into the meaning of the term itself.

As well as the (Tactical) ShouldeRök™️” is a strength and mobility tool, language is a tool, too. So what both things share in common is, that they can be deconstructed and that you should better know how to use them properly!

Due to that we’re going to start with an actual definition of the term “Tactical Shoulde(r)|Rök”.

The adjective “tactical”, which derives from Greek tattein = to deploy, to erect, to mount sth., in file; respectively the adjective tactical comes from Greek taktikos = to arrange something, skilled, to collocate(Becher et al., 1995).

The Tactical-ShouldeRök™️ comes in a nice carrying case.

The term “shoulder” – of course – describes the lateral parts of your upper body which connect your arms with your trunk.

The shoulder is one of the most agile joints in your body. It is composed of several joints between the bony parts of the shoulder blade, the upper arm and the clavicle. The shoulder’s characteristic shape is above all conferred by the muscle parts of the deltoid muscle.

Being one of the most flexible joints in the human body it is kept in shape and moved by a complex system of different muscles (including the rotator cuff). Due to the large range of motion and the small bony joint surfaces, the shoulder joint is also very vulnerable to injuries.

Since all nerves and blood vessels of the arms run through the shoulder area, shoulder injuries can also lead to pain and functional restrictions (i.e. adhesions, trigger points etc.) of the upper extremity that can lead to structural imbalances and so on.

That’s where proper shoulder training comes into play! Not only whether you are performing on a world elite level of strength training or if you simply want to be a strong mind living in a strong and healthy body!

After having deconstructed the origins of “tactical” and “shoulder” there is only one missing “stone”, the “Rök”. According to Wikipedia:

The Rök runestone (Swedish: Rökstenen (…) is one of the most famous runestones, featuring the longest known runic inscription in stone. (…) It is considered the first piece of written Swedish literature and thus it marks the beginning of the history of Swedish literature”.

The benevolent reader may forgive me my supreme attention to detail but I mentioned earlier being in love with Latin and Greek terms in medicine. Furthermore, when it comes to such an outstanding product like the ShouldeRök™️ I like to pay attention to every little detail!

ShouldeRök™️ – Painkiller or Vitamin?

Now that we have verbally deconstructed all the parts of the ShouldeRök™️ we get a first but already good intention what it was designed for. It‘s not an ancient wizardry but – from my holistic point of view as a strength coach and CAM practitioner –  a true cornerstone for proper shoulder health.

Is it THE best tool for healthy shoulders? Will it cure all your preexisting shoulder issues/injuries? Of course not, don‘t be foolish! There is no such thing as THE best tool, nor will it cure al your shoulder problems, especially if used willy-nilly.

If you ask me, and you kind of do so as you‘re reading my article, I would state that the ShouldeRök™️ acts rather like a “Vitamin” than a “Painkiller”. If you are suffering from serious shoulder pain due to wear and tear, trauma etc. you should first consult a physician before using even the best tool!

When you are looking for a way to build “bullet proof” shoulders, if you are in a rehabilitation/prehab-phase, if you want to efficiently train muscles of your rotator cuffs and shoulders you have never heard and thought of, well THEN you should use a tactical approach, with the ShouldeRök™️!

Deconstructing the use of the ShouldeRök™️!

Where do I see the big benefits of this “cool tool”?

In a nutshell: I use it with patients, clients and athletes to build/increase proper muscular balance and strength in the shoulder girdle, as well as all the muscles that are involved in the movement, too. These are foremost the upper pectoralis muscles, rotator cuff, the arms and the upper back.

Of course there is always the debate concerning a certain exercise to be “sport specific” and/or if it is useful to integrate it in an athletes routine. After having worked not only with a special crowd of self-defense (Krav Maga) practitioners I can tell you that the ShouldeRök™️ definitely IS sport specific but can also be applied in general physical preparation (GPP)!

Now you might ask: “Why is that the case?”. Well on the one side it‘s the unique and transferable movement itself (that makes it sport specific), which we will look at in detail in a moment and on the other hand it is the ability to holistically strengthen your shoulder girdle.

Here you can see a rear view of the swinging movement using the ShouldeRök™️.

You might also wonder: “Cool, Bernd but when in real life do I need to swing a rod with a weight around my head?”. Well, actually you don’t but what you need to do, when it comes to self-defense techniques is the strength and power to release you i.e. from an attack from behind!

That’s where the sport specific component of the ShouldeRök™️ comes into play! Think of this scenario, you are getting attacked from behind, i.e. being chocked, by a taller, much stronger opponent. What are you going to do? Stand there and wait for being faded out?!

Well of course you must have a plan how to react in this special scenario but what you also must have is some decent strength to reach besides or over your head and defend yourself!

So that is exactly a “real life” scenario where you have to apply force, strength and power while reaching over/behind your head and simultaneously gripping and pulling something. And you should better be fast…and strong!

If you deconstruct such movements you surely can train all your muscles that are involved in such a movement. You can do i.e. pull-overs or reverse flies, rows, whatsoever.

But you also need to train a dynamic swinging movement, involving all kinds of weighted rotations. Boom, that‘s where you get a tactical approach with the ShouldeRök™️, regardless if you use the Tactical Rök or the normal one.

Having worked with Krav Maga people for a couple of years now and being a Krav Maga student myself I can tell you how much I see a benefit of introducing the Rök to our training.

There are tons of techniques that involve deflecting attacks from various stands. Whether being already in a fighting position or form a standing position. It‘s grabbing, deflecting, punching on so one.

Literally everything that involves defending and/or attacking with your upper extremities also involves a body defense. That means moving your trunk AND moving your arms.

Strength is never a weakness! So in order to defend yourself you‘d better be strong. Not necessarily big, but strong!

Of course the use of the Rök is by all means not limited to Krav Maga. I’d say that you can apply it to probably any kind of self-defense technique, Martial Art and for all people working in law enforcement!

Should “Average Joe” use a ShouldeRök™️?

To make a long story short: yes, but with some restrictions! Ok, having told you about my example of how to implement the ShouldeRök™️ into Sport Specific Training I will also give you my view how I use it with non-athletes in general physical preparation (GPP).

Living in a society that has to deal with a more and more monotonous lifestyle the ShouldeRök™️ is – from my point of view – a really helpful tool to break free!

What is weak and rigid, that breaks or how we say in German: “wer rastet, der rostet” which means: “the one who rests, gets rusty”!

ShouldeRök™️, use it or lose it. Invest in healthy shoulders.

Let‘s face it, people nowadays are doing jobs where they are sitting all day long. They are sitting while having breakfast, while driving to work, being at work, sitting at lunch, sitting while driving home….just to sit again, while having dinner and while doing “Netflix and Chill”.

Well, don’t get me wrong, there is nothing bad with sitting itself, but it is that overstressed “sterno-symphysial” posture people tend to perform all day long. Holding a steering wheel, typing on a computer keyboard, watching down on a cellphone/tablet etc.

All sorts of things that will not only give you bad posture but also make you “bow to your phone”, enslaving you to “helpful” gadgets.

You bow down to social media etc. While doing that you give away your inner strength. I mean, how can you supposed to be a strong character if you look like the hunchback Quasimodo?!

Unless you don‘t want to get casted as the Hunchback of Notre Dame, you better start working on a strong posture. That‘s where I apply the ShouldeRök™️ with my non athletes clients/patients. The classical office worker, clerk and so one.

First of all the huge benefit of working out with the Rök is that you must perform the exercise while standing. As mentioned above people are simply sitting too much, resulting them in weak gluteus muscles and weak shoulder girdles with especially shi**y external rotation capabilities.

So, if those “average clients/patients” go to a gym, what do they tend to do? Sure, they choose exercises where they can sit! The cool thing though about the Rök is, that you cannot perform the exercise while sitting…well I have learned to never say never as I have seen lots of stupidity in the gym. But, at least you should not perform the exercise while sitting.

That leads us back to an important point, no matter if athlete or not, posture! Just being an elite athlete doesn‘t mean you do an elite training!

While performing the Rök-Swings you have to stand in an upright position, while keeping your core as stable as possible. I also highly recommend my students to only work out with the ShouldeRök™️ while either being barefoot or wearing proper shoes with flat soles.

From my expertise wearing modern training shoes will decrease the efficiency of the work with the Rök to quite some extend!

If you want to learn more about how to strengthen your posture you can check out my articles on one of my blogs (www.bernd-stoesslein.de)

As mentioned above, I also use the ShouldeRök™️ with my rehabilitation patients. The only restriction I would make is if someone has severe contraindications of doing weighted rotations with his shoulders.

So to speak these are (from my expertise): acute/silent trauma (physical/psychological), rupture or partly ruptured tissues in the shoulder girdle, severe shoulder pain of unknown origin, severe cartilage damage, short post operation time and inadequate post operation recovery time and too much scar tissue that has to be removed/softened to enhance flexibility.

If someone hast inappropriate flexibility in the shoulders/rotator cuffs I would recommend integrating the ShouldeRök™️ AFTER having done appropriate soft tissue work, like using Gua Sha, a Heskiers Tool, Acupressure/Acupuncture, Frequency Specific Microcurrent or whatever technique you are skilled in or have access to. Consult a good therapist if you need such treatment!

The ShouldeRök™️ is built to last!

Let’s finally talk about the quality of this piece of equipment. It was my first training tool I got from Kabuki Strength so I was a bit curious if it really puts into practice what it “preaches” online.

Let me tell you, it definitely does! Just like the Rök Runestone, the ShouldeRök™️ is built to last!

I chose the Tactical SholdeRökÔ as I like to travel to clients from time to time and with the cool carry case the 2,5lbs plate and the parts of the Rök are nicely stored and ready to hit the road.

Besides the fact, that the tactical version can be deconstructed in two pieces there is no difference to the “one piece version”.

What I like is that you can use 50mm Olympic Plates with the Rök (a Kabuki Strength labeled 2,5lbs plate already comes with the Tactical Rök) and that you can also use its one end as kind of fascia/soft tissue tool for either working on your own trigger points or on those of clients.  

What else can I say concerning the quality? Well, the finish looks really “bad a**”, (I do have a black oxide version), the knurling is pretty strong to ensure a good grip. You just can feel the love and, like we say in German, “Herzblut” (“heart blood”) they put into this unique piece of equipment!

Conclusion – ShouldeRök™️, the Master of the Universe?(h2)

The ShouldeRök™️ is so much more than an ordinary Macebell or Gada. It’s much more like He-Man‘s sword that metaphorically might help you transform from the cheesy Prinz Adam from Eternia into He-Man, the most powerful man in the universe…just in case you are willing to protect castle Grey Skull form the evil forces of Skeletor 😉

Working out with the ShouldeRök™️ brings back my childhood memory of watching epic Filmation Cartoons, like He-Man!

Unlike He-Man, who only shared his secret with the Sorceress, Man at Arms and Orko, I’m sharing my experience working with the Rök on myself, athletes as well as non-athletes with you all.

Unless clients/patients suffer from some severe condition (see mentioned examples above) I strongly believe that the integration of the ShouldeRök™️ will improve strength, enhance flexibility, strengthen your core and (if done properly) even might enhance your breathing patterns.

More about breathing can be read in my article: “The Oxygen Advantage®”.

With the purchase of a ShouldeRök™️ you do not only get what you pay for (obviously a ShouldeRök™️) but also get granted access to some extra in depth training videos that are not available for public!

Furthermore you have the option to “upgrade” your Rök by purchasing a so called “MyoRök”. An “Instrument Assisted Soft Tissue Mobilization-Tool” (IASTM).

This IASTM tool is made of high-quality surgical steel (stainless steel) and is used (not only) by professional therapists to loosen fascial structures. The fascial “soft tissue” tissue is mobilized.

I’m really keen on getting this cool upgrade for my own Rök!

I’d like to finish my article with my opening and once again answer the question:

“Should you ShouldeRök™️ ?” Yes, you should, as it’s an investment in yourself! As well as for general physical preparation and for specialized physical prepation. Think of it: you invest once, and profit for a lifetime! Get tactical!

The Tactical-Shoulderök™️ comes with a 2,5 lbs (1m25kg) plate form Kabuki Strength.

© HP Bernd Stößlein, Master of Business Administration in Sportmanagement.

If you liked this article please share it with your friends, subscribe to the newsletter and the blog.

If you like to book a professional online/offline consultation please feel free to contact me: info@bernd-stoesslein.de


Literature

Lateinisch-griechischer Wortschatz in der Medizin, S. 220.

Gustafson, Alrik, Svenska litteraturens historia, 2 volums (Stockholm, 1963). First published as A History of Swedish Literature (American-Scandinavian Foundation, 1961). Chapter 1. Forntid och medeltid, Lönnroth, in Lönnroth, Göransson, Delblanc, Den svenska litteraturen, vol 1.Rök runestone, source: https://en.wikipedia.org/wiki/R%C3%B6k_runestone#cite_note-Gustafson1-1, access: 09.02.20.